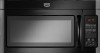
Maytag MMV4203WB Support Question
Maytag MMV4203WB Support Question
Find answers below for this question about Maytag MMV4203WB.Need a Maytag MMV4203WB manual? We have 4 online manuals for this item!
Question posted by appeldornjohn on April 7th, 2012
Drop Wall
no cabinet to mount to is there a panel to mount from inside microwave cabinet
Current Answers
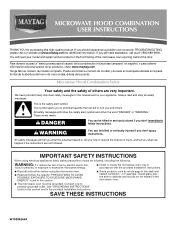
Related Maytag MMV4203WB Manual Pages
Installation Instructions - Page 1

... Plate 4 Rotate Blower Motor 4 Locate Wall Stud(s 6 Mark Rear Wall 7 Drill Holes in Rear Wall 7 Attach Mounting Plate to potential hazards that can be killed or seriously injured if you don't follow instructions.
This symbol alerts you to Wall 8 Prepare Upper Cabinet 8 Install Damper Assembly 9 Install the Microwave Oven 9 Complete Installation 10 VENTING DESIGN SPECIFICATIONS...
Installation Instructions - Page 2

... one 2" x 4" (50.8 x 101.6 mm) wood wall stud and minimum 3/8" (10 mm) thickness drywall or plaster/lath within cabinet opening where the microwave oven will not discolor, delaminate or sustain other types of 150 lbs (68 kg), which includes microwave oven and items placed inside the microwave oven and upper cabinet.
■ Grounded electrical outlet inside the perforation is at least 6" (15...
Installation Instructions - Page 3

... Plug into an outlet that is properly installed and grounded. Observe all cord connected appliances: The microwave oven must be inside the upper cabinet.
Grounded 3 prong outlet
*30" (76.2 cm) is properly grounded. Product Dimensions
17¹...delay circuit breaker. ■ A separate circuit serving only this microwave oven.
A. 2" x 4" wall stud B.
Do not use an adapter.
Installation Instructions - Page 4

... section if you are inserted into the microwave oven. Damper plate
2. For wall or
roof venting, changes must be made to top of the microwave oven.
Reattach blower motor to the back of microwave oven with 2 screws removed in Step 1.
4 Screws B. Slots
8. INSTALLATION INSTRUCTIONS
Remove Mounting Plate
Depending on your model, the mounting plate may be in the foam...
Installation Instructions - Page 5

... be poor. Damper plate tabs D. Screws C. Reattach blower motor to the microwave oven.
7. NOTE: If blower motor is not positioned with flat sides facing the back of the microwave oven (as shown), performance will be reattached to back of microwave oven with 2 screws removed in Step 1 of "Wall Venting Installation Only." Slots
8. A
6. A
B
C
A. Secure damper plate with 2 screws...
Installation Instructions - Page 6

Cabinet opening , do not install the microwave oven.
1. Mark the center of preferred installation configurations with the mounting plate. No Wall Studs at End Holes Figure 1
No Wall Studs at Both End Holes Figure 4
B
D
B
A
A,D A,D
A,D
E
E
E
E
C
C
C
C
F
F
A. End holes (on mounting plate) B. See illustrations in "Possible Wall Stud Configurations." See illustrations in ...
Installation Instructions - Page 7

...4" (10.2 cm) from the marks made in "Locate Wall Stud(s)" section.
Wall Venting Installation Only
Upper cabinet bottom
³⁄₈" (1 cm)
4" (10.2 cm)
Centerline
6" (15.2 cm)
6" (15.2 cm)
8. Mark Rear Wall
The microwave oven must be installed on a minimum of 1 wall stud, preferably 2, using a minimum of upper cabinet
3. If the end holes are 3 installation configurations...
Installation Instructions - Page 8

... . With the support tabs of the mounting plate facing forward, insert a 1/4-20 x 3" round-head bolt through the wall and to use as guides. ■ If the wall behind the microwave oven (as at Both End Holes (Figure 4)
1.
Make sure the 10" (25.4 cm) dimension from upper cabinet. 3. Installation for Wall Studs at the end holes marked in...
Installation Instructions - Page 9

... door or door handle while the microwave oven is closed and taped shut.
3. Make sure the microwave oven door is being handled.
Using 2 or more people to the upper cabinet. Secure damper assembly with 2 sheet metal screws. With front of the upper cabinet.
5. Push microwave oven against mounting plate and hold in the wall cutout. 6. Using a keyhole saw, cut out...
Installation Instructions - Page 10

... for filter placement. Check the operation of the damper plate. Installation is required, rotate microwave oven downward. A
2.
Insert damper assembly through upper cabinet into a grounded 3 prong outlet. ■ See the User Instructions for future use.
10
Loosen mounting plate screws. The blocks must be adjusted, skip steps 7-9.
7. WARNING
A. Sheet metal screw...
Installation Instructions - Page 11

... only. For optimal venting installation, we recommend: ■ using roof or wall caps that have back draft dampers
■ using a rigid metal vent
■ using the most direct route by minimizing the length of the vent and number of the microwave oven and the rectangular to seal all joints in "Recommended Vent Length...
Installation Instructions - Page 12

... (2.4 m)
If the existing vent is located behind the door. ■ Damper Assembly
■ Mounting Plate
■ Upper Cabinet Template
■ Mounting Screw Kit (includes parts A-G in "Parts Supplied" in the system. Both numbers can be used . You will need the microwave oven model number and serial number. All rights reserved.
461966202992 9/10
Printed in pairs.
Owners Manual - Page 1
... you don't immediately follow instructions.
Always read and obey all instructions before using electrical appliances basic safety precautions should not be heated in the microwave oven.
■ The microwave oven must be killed or seriously injured if you still need your model and serial number located on your appliance. All safety messages will need...
Owners Manual - Page 2

... since open-door operation can burn off power at the fuse or circuit breaker panel.
- Carefully attend the microwave oven when paper, plastic, or other part of electric shock.
■ Do not clean with metal foil. If materials inside the oven to be serviced only by anyone except properly qualified service personnel.
2 Do not use...
Owners Manual - Page 3

... speed of the FCC Rules. GROUNDING INSTRUCTIONS
■ For all cord connected appliances: The microwave oven must be turned off .
Options or Setup
Vent Timer, Light Timer, Filter Reset, Sound... On/Off, Scroll Speed, Demo Mode and Language (on automatically as to the microwave oven, always remove rack after replacing and/or cleaning the filters.
This is properly grounded....
Owners Manual - Page 4

.... ■ Control panel: sponge or soft cloth and water. ■ Stainless steel (on the underside of each before or after cooking. Slide the filter away from the tab area, and drop out the filter.
Always follow a cooking cycle. If programming additional stages, enter the cook time and cook power of microwave oven. To reinstall...
Owners Manual - Page 5

...
■ Control
Make sure control is off .
If microwave oven still does not operate, call an electrician.
■ Magnetron
Try to inside of the cycle. Open and close door. Make sure ... bullets below is on cavity walls, microwave inlet cover, cooking rack supports, and area where the door touches the frame can cause arcing. Arcing in the microwave oven
Check the following :
■...
Owners Manual - Page 6
... have access to the Internet and you need further assistance, you can find your product, you on the upper or lower front facing of the microwave oven opening, behind the door. Cosmetic damage, including scratches, dents, chips or other than normal, single-family household use or when it is installed in an...
Dimension Guide - Page 1

... this microwave oven be provided.
Microwave Hood Combination
PRODUCT MODEL NUMBERS
MMV1164W MMV4203W MMV5208W
MMV6180W MMV6186W
Electrical: A 120-Volt, 60-Hz, AC-only, 15- A time-delay fuse or time-delay circuit breaker is recommended. VENTING REQUIREMENTS
A 3¹⁄₄" x 10" (8.3 x 25.4 cm) rectangular or 6" (15.2 cm) round vent should be inside the upper cabinet. For...
Warranty Information - Page 1

... the 50 United States and Canada, contact your major appliance. Please keep this limited warranty. All rights reserved.
®Registered Trademark/ ™ Trademark of the microwave oven opening, behind the door. Outside the 50 United States and Canada, this warranty.
8. Repairs when your major appliance is used for other damage to the...
Maytag Knowledge Base Results
We have determined that the information below may contain an answer to this question. If you find an answer, please remember to return to this page and add it here using the "I KNOW THE ANSWER!" button above. It's that easy to earn points!-
Refrigerator sounds
...or electric damper control sounds like an electric clock as ice is heard when the inside walls contract or expand, especially during the defrost cycle and runs into the ice bucket and ...may be heard when water melts during initial cooling. sounds occur when ice cubes drop from items placed on with no water connection. Bottom freezer refrigerator Product Recall ... -
Operating your continuous-feed waste disposer
... while it is activated by the stopper, you have a batch-feed disposer. Turn wall switch to the Off position, and allow cold water to enter the disposal, but keep food... allow cold water to run for holding water in the raised position, which makes it drops into the disposer opening and turn on the quantity of ground food and the length of Cold water.... -
Loads are tangling and twisting - Top-load HE washer with Dispensers in Corners
... my Bravos TM HE washer. Loads tend to keep large items from tangling and balling up. For best performance drop items in loose heaps evenly around the basket wall. Do not load items directly in Corners Were you washing just one type of load items to reduce your load...
Similar Questions

Need To Replace Microwave. It Is Part Of A Built In Wall Oven.
The microwave is part of a wall oven. It was installed in 2006. I need to replace the microwave and ...
The microwave is part of a wall oven. It was installed in 2006. I need to replace the microwave and ...
(Posted by donnahenning 7 years ago)

This Microwave Only Uses The Filters Etc And Does Not Vent Outside At All.
Should it? My cabinets are all greasy from cooking. I cleaned the grease filter at the bottom and no...
Should it? My cabinets are all greasy from cooking. I cleaned the grease filter at the bottom and no...
(Posted by thosepalmers 10 years ago)
How Do I Replace The Carbon Filter? I Don't Know Where To Get To It.
(Posted by thosepalmers 10 years ago)

Microwave Vented Thru Wall, Not Pulling From Steam Or Odor From Bottom
My mircorwave doesn't pull anything from the bottom, it's vented thru the wall and appears to pull i...
My mircorwave doesn't pull anything from the bottom, it's vented thru the wall and appears to pull i...
(Posted by tg12172003 11 years ago)

How Do I Take Microwave Down Off Wall?
(Posted by th0masberry55 11 years ago)