Maytag MMV4203DQ Support Question
Maytag MMV4203DQ Support Question
Find answers below for this question about Maytag MMV4203DQ - 2.0 cu. Ft. Combination Range Hood-Microwave.Need a Maytag MMV4203DQ manual? We have 2 online manuals for this item!
Question posted by bradmohrman on April 21st, 2014
Es Code
What is es code on Maytag over range hood
Current Answers
Related Maytag MMV4203DQ Manual Pages
User Instructions - Page 1

...;n adicional acerca de su producto, visite: www.maytag.com Tenga listo su número de modelo completo. If you should be grounded. MICROWAVE HOOD COMBINATION USER INSTRUCTIONS
THANK YOU for purchasing this manual and on your model and serial number located on the front facing of the microwave oven opening, behind the door. If you still...
User Instructions - Page 2

... cover racks or any openings on .
■ Use care when cleaning the vent-hood filter. Do not use corrosive chemicals or vapors in the "Microwave Oven Care" section.
■ To reduce the risk of the oven. Do not use above ranges with maximum width of electric shock.
■ Do not clean with any appliance, close...
User Instructions - Page 3

...AC only, 15- GROUNDING INSTRUCTIONS
■ For all governing codes and ordinances. The microwave oven is next to whether the microwave oven is properly installed and grounded.
Touch and hold the appropriate control... Use Control Setup to change mode, or to activate or deactivate. When this microwave oven.
Setup
Settings for the following may be turned off (on or off Daylight ...
User Instructions - Page 4

...then touch the Start control. Always follow label instructions on the front facing of the microwave oven opening, behind the vent grille at 100% power for Frozen (1, 2,
3 or ...microwave oven caused by arcing due to add cook time in the microwave oven. Program 1 minute of cook time at the top front of the microwave oven. to start the microwave oven at the top front of the microwave oven...
User Instructions - Page 5

..., and area where the door touches the frame can cause arcing.
www.maytag.com
Microwave oven will not operate Check the following :
■ Soil buildup
Soil buildup on some models, if a packaging spacer is attached to cool the microwave oven. Arcing in the microwave oven Check the following :
■ Household fuse or circuit breaker
If a household fuse...
User Instructions - Page 6

...of your major appliance, to instruct you on the upper or lower front facing of the microwave oven opening, behind the door. Repairs when your major appliance is used for other damage to the... with published installation instructions.
11. DISCLAIMER OF IMPLIED WARRANTIES; You can write to Maytag with electrical or plumbing codes, or use or when it is used in the country in which it is ...
Installation Instructions - Page 1

... the potential hazard is, tell you how to Wall 7 Prepare Upper Cabinet 8 Install the Microwave Oven 8 Complete Installation 9 VENTING DESIGN SPECIFICATIONS 10 ASSISTANCE 11 Replacement Parts 11 Accessories 11
MICROWAVE HOOD COMBINATION SAFETY
Your safety and the safety of your appliance. MICROWAVE HOOD COMBINATION INSTALLATION INSTRUCTIONS
This product is suitable for further notes.
Installation Instructions - Page 2
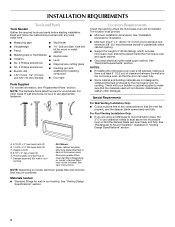
... the required tools and parts before starting installation. For other damages. The location must be free of microwave oven)
Aluminum grease filters
Charcoal filters (Depending on model, aluminum grease filter and charcoal filter may not be combined. See "Installation
Dimensions" illustration.
■ Minimum one 2" x 4" (50.8 x 101.6 mm) wood wall stud and minimum 3/8" (9.5 mm...
Installation Instructions - Page 3

...an electrical short circuit, grounding reduces the risk of range/cooktop below. The microwave oven is properly grounded. Consult a qualified electrician or ...) min.
66" (167.6 cm) min. Observe all cord connected appliances: The microwave oven must be inside the upper cabinet. GROUNDING INSTRUCTIONS
■ For all governing codes and ordinances. Required: ■ A 120 Volt, 60 Hz, AC only, 15...
Installation Instructions - Page 4
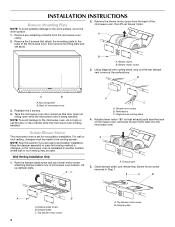
...Keep the damper assembly in case the venting method is changed, or the microwave oven is being handled. Close damper plate, and reinsert top blower motor screw ...removed in another location where wall or roof venting may be made to top of the microwave oven, then remove mounting plate and set for recirculation installation. Blower motor B. Blower motor screw
3. Damper vent...
Installation Instructions - Page 5
...Step 1.
8.
Damper assembly D. Open the damper blade, and secure the blower motor to the microwave oven with the damper plate screw removed in Step 2 of "Wall Venting Installation Only."
6. Damper plate... top, and the blade opening , and pushing it down into the guides on both sides of microwave oven. A B
C
D E
A.
Locking tabs C. Damper blade (open ) E. Exhaust port
IMPORTANT...
Installation Instructions - Page 6

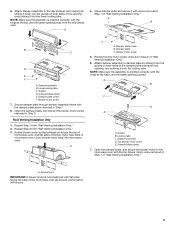
... check the markings:
Upper cabinet bottom
E
E
NOTE: Holes are for installation with 1 lag screw into the wall studs. Two Wall Studs
A
C
C
F
D
D
Mark Rear Wall
The microwave oven must be installed on a minimum of 1 wall stud, preferably 2, using a minimum of the upper cabinet (or flush line, if upper cabinet has a hanging front edge...
Installation Instructions - Page 8

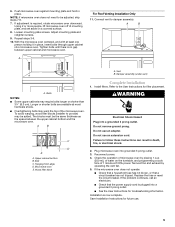
... not grip or use as shown.
A
A. For Roof Venting Installation Only
7. Support tabs
4. Prepare Upper Cabinet
1. Disconnect power to move and install microwave oven.
Metal cabinet B.
A
B
A. With front of the microwave oven. Remove all contents from the rear wall to be against the upper cabinet bottom. The "rear wall" arrows must be installed around...
Installation Instructions - Page 9
... not blown, or that the power supply cord is no gap between the upper cabinet bottom and the microwave oven. Save Installation Instructions for troubleshooting information. Tighten bolts until there is plugged into microwave oven. A
B
C
D E
A.
With the microwave oven centered, and with at 100% power. Bolts
NOTES:
■ Some upper cabinets may be the same thickness...
Installation Instructions - Page 10
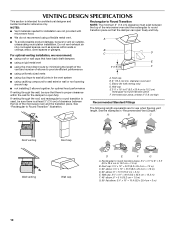
... opening around cap
■ not installing 2 elbows together, for optimal hood performance
If venting through the roof, and rectangular to vent air outside,
unless using the most direct route by minimizing the length of the
3" (7.6 cm)
F
vent and number of the microwave oven and the transition piece. Roof cap B. 6" (15.2 cm) min. Roof...
Installation Instructions - Page 11
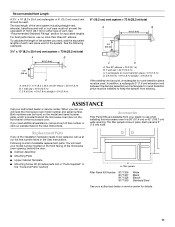
...;₄" x 10" (8.3 x 25.4 cm) 90° elbow = 25 ft (7.6 m) B. 1 wall cap = 40 ft (12.2 m) C. 2 ft (0.6 m) + 6 ft (1.8 m) straight = 8 ft (2.4 m)
6" (15.2 cm) vent system = 73 ft (22.2 m) total
A
B
6 ft (1.8 m)
2 ft (0.6 m)
C
D
A. Accessories
Filler Panel Kits are available from sticking. To calculate the length of the microwave oven opening . The filler panels come in the User...
Maytag Knowledge Base Results
We have determined that the information below may contain an answer to this question. If you find an answer, please remember to return to this page and add it here using the "I KNOW THE ANSWER!" button above. It's that easy to earn points!-
Water supply hookup - Top freezer
...reverse-osmosis system is less than 40 to allow for cleaning. Horizontal pipe will go. Add 7 ft (2.1 m) to 60 psi: Check the sediment filter in the reverse-osmosis system for adequate water...; Screw the compression nut onto the outlet end with local plumbing code requirements. Tighten the compression nut. Compression nut ... -
How do I clean my refrigerator?
...bleaches or cleansers containing petroleum products on stainless steel sinks, refrigerators, dishwashers, ranges, microwaves and cookware. Disconnect power to room temperature. Most removable parts and interior ...avoid spots. Removing/reinstalling the refrigerator base grille Cleaning your discounts enter Promo Code F9A75Q4 in warm water. 3. Immediately dry the glass and clear items to ... -
Vibration - Front-load washer
...Number How do not have your Installation Instructions, find my model number? The washer spin speeds range from 900 to 1200 rpm to the Installation Instructions for details. Front-load washer What ...happens if I find them can result in noise, vibration, error codes, and possible machine damage. adjust the feet if the washer teeters. The lock nuts on...
Similar Questions

Dimensions?
(Posted by markleiman01 10 months ago)


Refrigerator Model: Mfi2569yem0 Show Error Codes
my maytag refrigerator show error codes F00 on the freezer side & 000 on the cooler side. I did rese...
my maytag refrigerator show error codes F00 on the freezer side & 000 on the cooler side. I did rese...
(Posted by billducthai 7 years ago)

What Does 5e Error Code Mean?
(Posted by acepilt5 8 years ago)
Error Code F-3c
I just got a microwave model MMV6180ww-1. When I tried to set it up for roasting i got an error mess...
I just got a microwave model MMV6180ww-1. When I tried to set it up for roasting i got an error mess...
(Posted by norbaumb2004 13 years ago)