Maytag MER7662WB Support Question
Maytag MER7662WB Support Question
Find answers below for this question about Maytag MER7662WB.Need a Maytag MER7662WB manual? We have 4 online manuals for this item!
Question posted by rbadum on November 4th, 2013
Temp Adjustment: My Range Is A 100 Degrees Off How Do I Adj By Using Frnt Panel
The person who posted this question about this Maytag product did not include a detailed explanation. Please use the "Request More Information" button to the right if more details would help you to answer this question.
Current Answers
Related Maytag MER7662WB Manual Pages
Installation Instructions - Page 1

... - Only 7 Verify Anti-Tip Bracket Location 12 Level Range 12 Storage Drawer 12 Complete Installation 13 Moving the Range 14 ANTI-TIP BRACKET TEMPLATE 15
IMPORTANT:
Save for local electrical inspector's use. U.S.A. W10252706B INSTALLATION INSTRUCTIONS 30" (76 CM) FREESTANDING ELECTRIC RANGES
Table of Contents
RANGE SAFETY 2 INSTALLATION REQUIREMENTS 3
Tools and Parts 3 Location...
Installation Instructions - Page 3

...Home Construction and Safety Standard, Title 24 CFR, Part 3280 (formerly the Federal Standard for use in ring terminals or open-end spade terminals with any tools listed here.
Check existing ... to comply with installation clearances specified on the left side frame behind the storage drawer panel.
■ The range should be rated at 250 volts minimum, 40 amps or 50 amps that are included...
Installation Instructions - Page 4

...Requirements -
A freestanding range may be raised approximately 1" (2.5 cm) by adjusting the leveling legs. upper cabinet depth B. 30" (76.2 cm) min. Only
If codes permit and a separate ground wire is used, it will not ... frame behind
storage drawer panel)
*Range can be installed next to top of wood or metal cabinet is properly grounded.
Do not use an extension cord. For...
Installation Instructions - Page 5

...use a 4-wire power supply cord rated at the junction box).
■ Wire sizes and connections must conform with the rating of the range.
■ The wiring diagram is located behind the control panel... 10-50R.
3-wire receptacle (10-50R)
5 mobile homes; For 50-amp rated cord kits, use kits that the range can be provided at least 4 ft (1.22 m) long.
4-wire receptacle (14-50R)
The minimum...
Installation Instructions - Page 6

... oven. 3. Place template on the floor in cabinet opening . Rear leveling leg C.
Failure to do so can result in death or serious burns to adjust the rear legs from range. 2. Use a ¼" drive ratchet to lower the front and rear leveling legs one -half turn .
Tape template into place. 4. It will be killed...
Installation Instructions - Page 7

...range.
3. Electrical Connection - Use a new 40 amp power supply cord. Plug into holes with a hammer. Electrical Shock Hazard Disconnect power before servicing. Disconnect power.
2. Terminal block cover C. To mount anti-tip bracket to concrete or ceramic floor, use...or electrical shock. Tap plastic anchors into a grounded outlet.
Use 8 gauge copper or 6 gauge aluminum wire. Pull cover ...
Installation Instructions - Page 8

...:
box or fused
Direct wire
disconnect
3" (7.6 cm)
4-wire connection: Power Supply Cord
Use this method for the power supply cord. ■ Assemble a UL listed strain relief in...codes prohibit grounding through the
neutral 1. Use a Phillips screwdriver to :
4-wire receptacle (NEMA type 14-50R)
A UL listed, 250-volt minimum, 40-amp, range power supply cord
4-wire connection: Power...
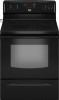
Installation Instructions - Page 9
... (white) wire to the outer terminal block posts with 10-32 hex nuts.
7. UL listed strain relief D. large opening , with ring terminals and marked for use with ranges.
8.
Ground-link screw C. Green ground wire E. Line 1 (black)
6. Connect line 2 (red) and line 1 (black) wires to the center terminal block post with the ground...
Installation Instructions - Page 10

...wiring to the range with the ground-link screw and ground-link section. Cord/conduit plate D. Bare (green) ground wire
E. Line 1 (black) wire
4. A
A
B
B
C
A. Metal ground strap B. Use a Phillips ... through bottom of electrical supply (4-wire or 3-wire connection).
4-wire Connection: Direct Wire
Use this method for: ■ New branch-circuit installations (1996 NEC) ■ Mobile...
Installation Instructions - Page 11

... the front of the terminal lug and insert exposed wire end through bottom of range. Attach terminal lugs to the terminal block - 20 lbs-in. (2.3 N-m)
Wire... B. Terminal lug
4. Neutral (white) wire F. Replace terminal block access cover.
3-wire connection: Direct Wire
Use this method only if local codes permit connecting ground conductor to torque as shown in . (4.0 N-m)
3. Securely...
Installation Instructions - Page 12

... Drawers:
Use a ¼" drive ratchet, wrench or pliers to back.
3. See the "Storage Drawer" section.
It will be necessary to the drawer stop. Pull the storage drawer forward to view the rear foot from outside the range. Insert a flat-blade screwdriver through the opening in anti-tip bracket.
then front to adjust leveling...
Installation Instructions - Page 13

... parts are removing and replacing the storage drawer, a slight push may be needed to see which step was skipped.
2. Dispose of the Use and Care Guide. 6. See "Level Range." 5. If range does not operate, check the following: ■ Household fuse is an extra part, go back through the steps to move the drawer...
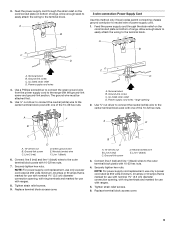
Owners Manual - Page 2
... benzene, formaldehyde, carbon monoxide, and toluene.
2 Reconnect the anti-tip bracket, if the range is under anti-tip bracket. The California Safe Drinking Water and Toxic Enforcement Act requires the ...Always read and obey all safety messages. All safety messages will not tip during normal use.
Failure to cause cancer, birth defects, or other reproductive harm. We have provided many...
Owners Manual - Page 3

...elements or interior surfaces of fire, electrical shock,
injury to persons, or damage when using the range.
■ User Servicing - To reduce the risk of burns, ignition of flammable ...surfaces near units until they are the cooktop and surfaces facing the cooktop.
■ Use Proper Pan Size - The range is hot, do not touch, or let clothing or other glazed utensils are suitable...
Owners Manual - Page 4

...length of
countdown. 4. See the "Range Care" section.
1. Press and hold START (hold 3 sec to lock)
CLOCK
KITCHEN TIMER (on and off . 5.
The Clock uses a 12-hour cycle with the ...cancel the Timer.
Repeat to adjust time and temperature settings. or p.m. 4. The "+" or "-" keypads are used to unlock. FEATURE GUIDE
This manual covers several models. Press TEMP/TIME "+" or "-" keypads...
Owners Manual - Page 5

... off to touch, even after each use or (on the console panel. REMEMBER: When range is in the same way as a regular element.
Cleaning off the cooktop before and after the surface cooking area is turned off. Dual B. Failure to do so can be used in use will glow. Use cookware about the same size as...
Owners Manual - Page 6

...:
1. Press and hold BROIL for 5 seconds.
End of foil or liner. Aluminum Foil
IMPORTANT: To avoid permanent damage to beep) will be adjusted.
To exit mode, press CANCEL.
Use the TEMP/TIME keys to toggle through selection. Press KITCHEN TIMER to cycle through the following : Basic Functions One tone ■ Valid pad press...
Owners Manual - Page 8

...Once the oven has completely cooled, remove ash with Adjustable Self-Clean (HI - To stop the self-...not function during the self-cleaning cycle. RANGE CARE
Self-Cleaning Cycle
WARNING
How the... "locked" will also be displayed. Press the TEMP/TIME "+" or "-" keypads to certain birds. When...■ Remove plastic items from the oven.
■ Use a damp cloth to clean inside door edge and the...
Owners Manual - Page 10
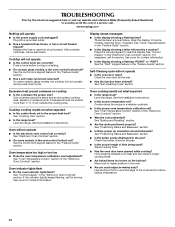
... the oven door all the way.
■ Has the function been entered? See "Cooktop Use" section.
■ Is the range level? See "Electronic Oven Controls" section.
■ On some models, is the oven... Racks and Bakeware" section.
■ Is there proper air circulation around cookware on the bottom? Adjust cooking time.
■ Has the oven door been opened while cooking? On some models, reset ...
Dimension Guide - Page 1

... purposes only. A circuit breaker is located behind the control panel or on the model/serial number rating plate. depth with ... the neutral terminal connected to the cabinet. This range is protected by adjusting the leveling legs. or 50-amp power supply...the neutral, use a 4-wire power supply cord rated at 250 volts, 40 or 50 amps and investigated for use with ranges. required between ...
Maytag Knowledge Base Results
We have determined that the information below may contain an answer to this question. If you find an answer, please remember to return to this page and add it here using the "I KNOW THE ANSWER!" button above. It's that easy to earn points!-
No or low ice production - Bottom freezer/French door refrigerator
...is little or no ice being made fast enough, adjust the freezer control one setting colder. Wait 24 hours between adjustments. Ice cubes sticking together in the upper ...system is either clogged or incorrectly installed. See also: Water supply hookup - Dispense water using the water dispenser; Bottom freezer/French door refrigerator If the refrigerator has just... -
Using the slide temperature controls - Side by side
... Controls The preset factory mid-settings should be correct for the refrigerator to OFF. If temperature adjustments are still preset at the factory. Side by side How do I use and adjust the slide temperature controls? Wait 24 hours before the refrigerator has cooled completely, your refrigerator controls are set to respond. Side... -
Adjusting temperature controls - Side by side refrigerator
...use the Ice and Light buttons. Style 2: Push the control button on your controls are made . Refrigerator control 1 higher lower Electronic controls located in the top of controls. Recheck the temperature before other adjustments are preset at least 24 hours between adjustments. To view set point. The set point range... on the dispenser panel on the needed ...
Similar Questions

I Have A Maytag Oven Range, Model Met8665xs00, That The Digit Panel Doesn't Work
(Posted by morgadoal 9 years ago)
Maytag Mer7662wb 0 Manual
I get an F5 code when trying to self clean the oven. What does it mean?
I get an F5 code when trying to self clean the oven. What does it mean?
(Posted by mastrteach 10 years ago)

How Do You Replace The Bake Element In The Maytag Mer7662wb Range?
(Posted by Anonymous-53323 12 years ago)

Door Spring Adjustments
Do tou have to take door apart to adjust spring or how do you adjust it.
Do tou have to take door apart to adjust spring or how do you adjust it.
(Posted by rjhartter81 12 years ago)

How Do I Increase The Oven Temperature Which Is About 85-100 Degrees Low
(Posted by rkincaidjr1 13 years ago)