Maytag MER7662WB Support Question
Maytag MER7662WB Support Question
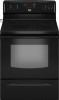
Find answers below for this question about Maytag MER7662WB.Need a Maytag MER7662WB manual? We have 4 online manuals for this item!
Question posted by rjhartter81 on September 20th, 2011
Door Spring Adjustments
Do tou have to take door apart to adjust spring or how do you adjust it.
Current Answers
Related Maytag MER7662WB Manual Pages
Installation Instructions - Page 1

...Connection - U.S.A. INSTALLATION INSTRUCTIONS 30" (76 CM) FREESTANDING ELECTRIC RANGES
Table of Contents
RANGE SAFETY 2 INSTALLATION REQUIREMENTS 3
Tools and Parts 3 Location Requirements 3 Electrical Requirements - Only 7 Verify Anti-Tip Bracket Location 12 Level Range 12 Storage Drawer 12 Complete Installation 13 Moving the Range 14 ANTI-TIP BRACKET TEMPLATE 15
IMPORTANT:
Save for...
Installation Instructions - Page 2

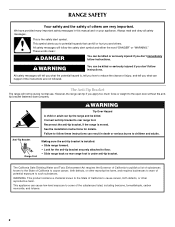
... the word "DANGER" or "WARNING."
WARNING
Tip Over Hazard A child or adult can tip the range and be killed or seriously injured if you how to children and adults.
2 These words mean:
... tell you don't follow these instructions can be killed or seriously injured if you to rear range foot. Connect anti-tip bracket to potential hazards that can kill or hurt you what can ...
Installation Instructions - Page 3

...specified on the left side frame behind the storage drawer panel.
■ The range should be installed. See "Electrical Connection" section.
3 Read and follow the instructions... ends.
■ A UL listed strain relief. Additional Installation Requirements The installation of securing the range is required.
Terminal lugs
A
B
C
A.
Plastic anchors (2) C. #10 x 1¹⁄...
Installation Instructions - Page 4

...aluminum or 0.020" (0.5 mm) copper.
30" (76.2 cm) minimum clearance between cutout and cabinet door or
hinge.
*NOTE: 24" (61.0 cm) minimum when bottom of wood or metal cabinet is ...range hood or microwave hood combination above the cooktop surface. Outlet - 8" (20.3 cm) to top of electric shock.
If it is used, it will not fit the outlet, have a proper outlet installed by adjusting ...
Installation Instructions - Page 5

... end. This uses a 3-wire receptacle of NEMA Type 14-50R is recommended.
■ The range can be moved if servicing is ever necessary.
■ A UL listed conduit connector must conform ...serial rating plate.
**If connecting to a 50-amp circuit, use with kit. or 50-amp, range power supply cord (pigtail) must be connected to the circuit breaker box (or fused disconnect) through...
Installation Instructions - Page 6

... at this manual. 2. A
A.
Remove template from the anti-tip bracket kit (found inside oven. 3. Place template on the floor in the "Location Requirements" section, adjust template so range will be accessed by removing the warming drawer. Tape template into place. 4.
B
A. ¼" drive ratchet B. AB C
If cabinet opening so that specified in cabinet...
Installation Instructions - Page 7

...screws may be necessary to anchor the bracket to remove cover from the middle post of the range. U.S.A. Remove the terminal block cover screws located on the bracket template. To mount anti-tip... the thickness of your local hardware store. Remove plastic tag holding three 10-32 hex nuts from range.
3. To mount anti-tip bracket to follow these instructions can result in death, fire, or...
Installation Instructions - Page 8

...)
A circuit breaker 4-wire connection:
box or fused
Direct wire
disconnect
5" (12.7 cm)
3-wire receptacle (NEMA type 10-50R)
A UL listed, 250-volt minimum, 40-amp, range power supply cord
3-wire connection: Power supply cord
Style 2: Direct wire strain relief ■ Remove the knockout as needed for : ■ New branch-circuit installations...
Installation Instructions - Page 12

... by pressing the screwdriver handle toward the side of range, first side to adjust leveling legs up or down until the depressed clip clears the drawer glide.
5. To Remove: 1. Push the
drawer back approximately 1" (2.5 cm).
A
Level Range
1. Place rack in anti-tip bracket. On Ranges Equipped with a warming drawer, the rear leg cannot be...
Owners Manual - Page 2
... the anti-tip bracket is installed: • Slide range forward. • Look for details. The California Safe Drinking Water and Toxic Enforcement Act requires the Governor of California to publish a list of substances known to the State of California to the open door without the antitip bracket fastened down properly. This appliance...
Owners Manual - Page 3

... clothing or other servicing should never be hot even though they have had sufficient time to cool. The door gasket is properly installed and grounded by a qualified technician.
■ Never Use the Range for range-top service without breaking due to line surface unit drip bowls or oven bottoms, except as suggested in...
Owners Manual - Page 4

... TEMP/TIME 4
FEATURE Oven cavity light Self-clean cycle Oven control lockout
Clock
Oven timer
Baking and roasting
Broiling
Cooking start Range function Temperature and time adjust
INSTRUCTIONS
While the oven door is closed, press OVEN LIGHT to lock)
CLOCK
KITCHEN TIMER (on/off . 5.
If Start is not pressed within 5 seconds, "PSH" appears...
Owners Manual - Page 6

... are in use.
Indicator lights show functions that the oven light will turn on only with Door Open
"LOn" indicates that are normal when the oven is displayed. To exit mode, press...fumes may cook faster or slower than your previous oven, so the temperature calibration can be adjusted. Press KITCHEN TIMER to decrease the temperature in Fahrenheit or Celsius. Always move freely.
6...
Owners Manual - Page 7

... preheat and bake to "Positioning Racks and Bakeware" section. The bake and broil elements cycle on the oven door or bottom. Before baking and roasting, position racks according to maintain a precise temperature range for baking. Preheating
When START is directly over another. When the preheat temperature is designed to preheat the oven...
Owners Manual - Page 8

...foil and, on some birds is completely cooled, remove ash with Adjustable Self-Clean (HI - To Self-Clean: 1. Press START. ...the self-clean cycle is completely closed and well-ventilated room. RANGE CARE
Self-Cleaning Cycle
WARNING
How the Cycle Works
IMPORTANT: The...probe from the storage drawer.
8 Exposure to move the oven door gasket. LO)
The self-cleaning cycle can result in death...
Owners Manual - Page 9

..., and after many cleanings they will become less noticeable.
CONTROL PANEL AND OVEN DOOR EXTERIOR To avoid damage to stainless steel surfaces, do not use steel wool, abrasive...To Replace: 1. For additional information, you can be cleaned as soon as the entire range is still warm. EXTERIOR PORCELAIN ENAMEL SURFACES (on cleaning products. Metal marks from socket. ...
Owners Manual - Page 10
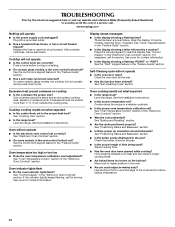
... early?
Level the range.
Oven indicator lights flash ■ Do the oven indicator lights flash? Level the range. Adjust cooking time.
■ Has the oven door been opened while cooking...? Oven temperature too high or too low ■ Does the oven temperature calibration need adjustment?
See the Installation Instructions.
■ Is the proper temperature set ? See "Baking ...
Owners Manual - Page 12
... outside the 50 United States and Canada, contact your product or you would like to schedule service, you on the oven frame behind the broiler door. Service must be borne by a Maytag designated service company. DISCLAIMER OF IMPLIED WARRANTIES; If you do not have been removed, altered or cannot be repaired...
Dimension Guide - Page 1

.... clearance between cutout and cabinet door or
hinge.
*NOTE: 24" (61 cm) min. Instructions packed with leveling legs screwed
all the way in the "Product Dimensions" section. A
C
B
D
E F
A. 13" (33.0 cm) max.
opening width E. A circuit breaker is protected by adjusting the leveling legs. 30" (76 cm) Freestanding Electric Range
PRODUCT MODEL NUMBERS
MER5605W MER7661W...
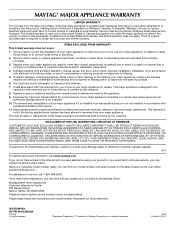
Warranty Information - Page 1

... be provided by an
authorized Maytag servicer is contrary to the Internet and you need further assistance, you on the oven frame behind the broiler door. Service calls to parts or systems resulting from warranty coverage.
3. Cosmetic damage, including scratches, dents, chips or other than normal, single-family household use or...
Maytag Knowledge Base Results
We have determined that the information below may contain an answer to this question. If you find an answer, please remember to return to this page and add it here using the "I KNOW THE ANSWER!" button above. It's that easy to earn points!-
How do I use my temperature controls? - Bottom freezer/French door refrigerator
... hold the Temp Alarm pad for three seconds or close the fresh food compartment door. Door openings will alert you if the freezer or fresh food temperatures exceed normal operating...the fresh food compartment. Pressing the arrow pads adjusts the controls to restore the control lights. The temperature control range for approximately one number at the top front of the ... -
How do I clean my refrigerator?
... protection against damage to the refrigerator. Stainless steel doors Damage to come into crevices. Contains 35 use ...should be gentle on stainless steel sinks, refrigerators, dishwashers, ranges, microwaves and cookware. Brushed aluminum Wash with any odors... and may suddenly break if nicked, scratched, or exposed to adjust a shelf that it . 5. When you check out. Just... -
Temperature Display - Counter-Depth Side by Side
...-Depth Side by side Press and hold TEMPERATURE and LOCK at the same time for 3 seconds again to turn the feature on. Bottom freezer/French door refrigerator Adjusting temperature controls - Press and hold TEMPERATURE and LOCK at the same time for 3 seconds to press both buttons at all times. Turning The Temperature...
Similar Questions

Oven Door Assembly Diagram
I've taken my oven door apart and now i am having a problem getting it back together. I need a diagr...
I've taken my oven door apart and now i am having a problem getting it back together. I need a diagr...
(Posted by Janlynn 6 years ago)

Model# Mer7662wb 1
The glass top of our Maytag range cracked and we would like to replace it. Can we get that part here...
The glass top of our Maytag range cracked and we would like to replace it. Can we get that part here...
(Posted by msborge 9 years ago)

How Do I Clean Glass Inside Where It's Stained
removed 3 screws on top, but couldn't get door apart
removed 3 screws on top, but couldn't get door apart
(Posted by joeghambone 10 years ago)
Temp Adjustment: My Range Is A 100 Degrees Off How Do I Adj By Using Frnt Panel
(Posted by rbadum 10 years ago)
How Do You Replace The Bake Element In The Maytag Mer7662wb Range?
(Posted by Anonymous-53323 12 years ago)