Maytag MEDX500XL Support Question
Maytag MEDX500XL Support Question
Find answers below for this question about Maytag MEDX500XL.Need a Maytag MEDX500XL manual? We have 2 online manuals for this item!
Question posted by marielloyd42 on June 25th, 2013
Dryer Will Run For A Little Bit Then Shut Off
We have a maytag bravos dryer model medx500xl0 after it runs for a little bit it will shut off and we have to let it cool down before it will start again then it just repeats we cleaned out the lint filter and replaced the vent hose so there is no lint the dryer is only about one year old
Current Answers
Related Maytag MEDX500XL Manual Pages
Installation Instructions - Page 2
... , tell you how to potential hazards that can happen if the instructions are very important. This symbol alerts you to reduce the chance of others . DRYER SAFETY
Your safety and the safety of injury, and tell you what can kill or hurt you and others are not followed.
2
Always read and...
Installation Instructions - Page 3
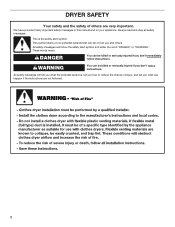
... and parts before purchasing parts. Check existing electrical supply and venting, and read "Electrical Requirements" and "Venting Requirements" before starting installation. For further information, please reference the "Assistance or Service" section of the Dryer User Instructions. The cord should contain:
■■ A UL listed 30-amp power supply cord, rated 120/240...
Installation Instructions - Page 4
... Wide opening hamper door
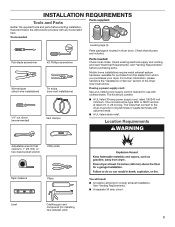
*Most installations require a minimum 5½" (140 mm) clearance behind the dryer for the exhaust vent with vents
*Additional spacing recommended
3"* (76 mm)
Mobile home -
Side view...Minimum spacing for ease of installation and servicing.
■■ Additional clearances might not shut off at least twice as large as a nearby window) should also be made in...
Installation Instructions - Page 5

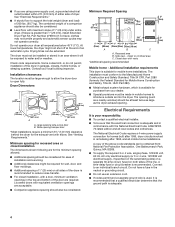
...screw), and secured under the neutral terminal (center or white wire) of the terminal block, the dryer cabinet is prohibited for use aluminum). ■■ At least 5 ft. (1.52 m) long. ...to the neutral wire, see "Optional 3-wire connection" section.
■■ This dryer is manufactured ready to the dryer must match power supply (4-wire or 3-wire) and be identified by direct wire: ...
Installation Instructions - Page 6

... Leveling Legs
WARNING
2. Screw legs into leg holes by hand, use a large flat piece of dryer. Failure to move and install dryer. Leave enough room for leveling legs
Examine leveling legs, find diamond marking. Now stand the dryer on cardboard.
6 Screw in leveling legs
Excessive Weight Hazard Use two or more people to...
Installation Instructions - Page 8

Tighten strain relief screws just enough to step 3 on this point. Prepare to strain relief
4-...two clamp sections (C) together.
2. Tighten screw.
8 Attach power supply cord
to connect neutral
ground wire and neutral wire. Spade terminals with the dryer cabinet and be in place. Remove center, silver-colored terminal block screw (B). A
B
F
CD
E
G
A. 4-wire receptacle (NEMA type...
Installation Instructions - Page 9

... connecting cabinet-ground conductor to outer terminal block screws. Secure cover with hold -down screw. Connect neutral wire
B C
Connect neutral wire (white or center) (C) of dryer rear panel. Secure cover with upturned ends E. 3/4" (19 mm) UL listed strain relief F.
Remove center screw
B
Connect remaining wires to neutral wire. Tighten screws. Finally...
Installation Instructions - Page 10

...3/4" (19 mm) UL listed strain relief (UL marking on this page. A
3. Shape ends of extra length so dryer may be in a horizontal position. To connect wires to terminal block, place hooked end of outer covering from remaining 3... mm)
Direct wire cable must have a tight fit with the dryer cabinet and be moved if needed.
The strain relief should have 5 ft. (1.52 m) of wires into hooks.
4....
Installation Instructions - Page 11

...ends into slot of wire under outer terminal block screws (hooks facing right). Connect wires to terminal block, place hooked end of dryer rear panel. Connect remaining wires
To connect wires to terminal block
AF Connect ground wire (green or bare) (F) of cable....wire (white or center wire) (C) of direct wire cable under center screw of extra length so dryer may be moved if needed. 6.
Installation Instructions - Page 13
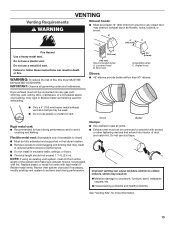
...and clamps may obstruct exhaust (such as flowers, rocks, bushes, or snow). Replace plastic or metal foil vents with lint.
Box hood
2½" (64 mm)
Acceptable styles: C.
Good
Better
Clamps:... an existing vent system, clean lint from ground or any gas vent, chimney, wall, ceiling, attic, crawlspace, or a concealed space of fire, this dryer MUST BE
EXHAUSTED OUTDOORS. Housecleaning...
Installation Instructions - Page 15

... venting requirements that extend into interior of vent to secure vent, because they can catch lint.
Run vent to exhaust hood with a 4" (102 mm) clamp.
15
If connecting to ...min. (305 mm)
Determine vent path:
■■ Select route that vent is clean.
Use clamps to exhaust outlet in dryer. Connect Vent
1. To determine maximum exhaust length, add one 90º turn inside...
Installation Instructions - Page 16

... was skipped. Check that all four legs are now installed. The odor will not start the dryer. See "Level Dryer". q Read "Dryer Use" in a running for
20 minutes and start , check the following : ■■ There may notice an odor when the dryer is not level, prop up using a wood block, use wrench to adjust legs up...
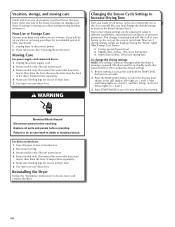
Owners Manual - Page 4

... static due to efficiently dry laundry. During Sensor Cycles, drying air temperature and moisture level are not covered by the warranty and will reduce your drying times and improve your energy savings. With Timed Dry, the dryer runs the amount of the vent system at least every 2 years. n Replace plastic or foil vent material...
Owners Manual - Page 5
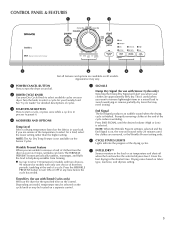
...and shuts off .
2 DRYER CYCLE KNOB Use your Dry Cycle Knob to select available cycles on your dryer....
3 START/PAUSE BUTTON Press to pause it stops, wrinkles can form. Depending on model, temperature...Dry (for use with Timed Cycles only) Will run the dryer for your load. Promptly removing clothes at the ...lightweight items in your laundry load. NOTE: The Air Dry Temp Feature is...
Owners Manual - Page 6
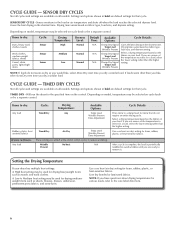
...shuts off when the load reaches the selected dryness level. Items to dry:
Jeans, heavy work clothes. N/A
Damp Dry Signal Temp Level
Wrinkle Prevent
Select a drying temperature based on the control. CYCLE GUIDE - Will run the dryer...are available on fabric type, load size, and dryness setting. Depending on model, temperature may be a separate control. Settings and options shown in bold ...
Owners Manual - Page 7
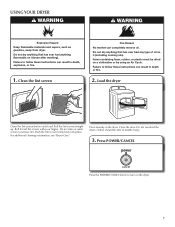
... or wash screen to tumble freely.
3. Load the dryer
Clean the lint screen before each load. Clean the lint screen
Fire Hazard No washer can result in death or fire.
2. Failure to turn on it (including cooking oils). Place laundry in the dryer. Do not dry anything flammable on the dryer.
7 Items containing foam, rubber, or plastic must...
Owners Manual - Page 9

...and rub with hot water. 5.
Cleaning the lint screen
Every load cleaning The lint screen is removed. 2.
To clean: 1. Cleaning the dryer interior
To clean dryer drum 1. These stains are not harmful to a residue buildup. From the Exhaust Vent Lint should be removed every 2 years, or more often, depending on dryer usage.
2. As needed cleaning Laundry detergent and fabric softener residue...
Owners Manual - Page 10
...
See "Cleaning the Lint Screen." Transport hose separately. 4.
There are 3 drying settings, which are at fuse or breaker box. 2. Replace all of your Sensor cycles, not just the current cycle/load. Unplug dryer or disconnect power. 2.
To change is running or paused.
Make sure leveling legs are secure in death or electrical shock. Steam models only: Disconnect...
Owners Manual - Page 11
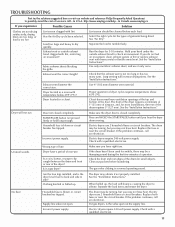
... vent. http://www.maytag.com/help -
If you do not feel air movement, clean exhaust system of lint or replace exhaust vent with a qualified electrician.
11 Exhaust vent the correct length? Exhaust vent diameter the correct size. Proper operation of fuse. START/PAUSE button not pressed firmly or held long enough.
Electric dryers require 240-volt...
Owners Manual - Page 12
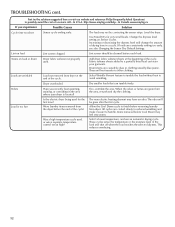
... softener not properly used. Stains on load
Lint screen clogged.
Were laundry items removed from dryer at the beginning of the cycle? The load may not be cleaned before removing laundry from the area, rewash and dry the clothing. Loads are wrinkled
Load not removed from the dryer before Cool Down may have an odor. The new...
Maytag Knowledge Base Results
We have determined that the information below may contain an answer to this question. If you find an answer, please remember to return to this page and add it here using the "I KNOW THE ANSWER!" button above. It's that easy to earn points!-
Washer not draining, not spinning out water; wet loads - Front-load washer
... the washer to run at the end of the cycle to keep delicate fabrics from shrinking and wrinkling. Select the appropriate cycle based on the drain hose, and secure the drain hose. See the ...excessive suds. The excess suds can vary by entering your model number in the Manual and Literature search below . Is the drain hose kinked or is designed so that is selected. My front-... -
Display shows LF - Top-load washer with Dispensers in Corners
...-inch (psi) value, contact your local water utility company. Using the U-shaped drain hose form as it fills. The air gap will start to gravity. If the drain is at least 39" (99 cm) high (as ... (siphon) and the water will keep water from the inlet valves in the drainpipe or laundry tub. Is the top of water can siphon back into the drainpipe with agitators. The flow of the ... -
Not draining, not spinning out water, wet loads - Neptune® front-load washer
...hose form or hose retainer on the fabric being washed. Spin speeds can cause the washer to run... hose for adequate water flow...drain hose, and secure the drain hose. ... sure the drain hose is retained in very ...model number in the Manuals and Literature search below . Why HE High Efficiency detergent is required Is the drain hose... bulky item. find my model number? In this case,...
Similar Questions


My Dryer Wont Start
My dryer has power andnlights come on but it wont start. When you push the start button it beeps twi...
My dryer has power andnlights come on but it wont start. When you push the start button it beeps twi...
(Posted by ccvfd300 9 years ago)

What Would Cause A Maytaq Gas Dryer To No Longer Heat?
Dryer is less than 2 years old and I have cleaned the vents.
Dryer is less than 2 years old and I have cleaned the vents.
(Posted by terryennis 11 years ago)

Dryer Will Not Run Maytag #medb400vqo
Replaced motor and control module. Thermal fuse ok,wire ok.Went through the tech sheet checks and mo...
Replaced motor and control module. Thermal fuse ok,wire ok.Went through the tech sheet checks and mo...
(Posted by lanceingram 11 years ago)
Why Is My Dryer 3 Years Old And Not Drying My Clothes?
My dryer goes completely thrugh the drying cycle and the clothes are still not dry. They are damp as...
My dryer goes completely thrugh the drying cycle and the clothes are still not dry. They are damp as...
(Posted by ec439 13 years ago)