Maytag MEDE300VF Support Question
Maytag MEDE300VF Support Question
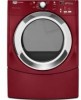
Find answers below for this question about Maytag MEDE300VF - Performance Series Front Load Electric Dryer.Need a Maytag MEDE300VF manual? We have 1 online manual for this item!
Question posted by dfh5 on August 25th, 2015
Dryer Won't Start Just Clicks When Push Start Button. Vents Are Clear.
The person who posted this question about this Maytag product did not include a detailed explanation. Please use the "Request More Information" button to the right if more details would help you to answer this question.
Current Answers
Answer #1: Posted by Odin on August 25th, 2015 5:02 PM
Odin

Member since:
April 10th, 2010 Points: 41,236,680

Member since:
April 10th, 2010 Points: 41,236,680
See http://www.repairclinic.com/RepairHelp/How-To-Fix-A-Dryer/1-4--TUVERTMwMFZG/Maytag-Dryer-won-t-start.
Hope this is useful. Please don't forget to click the Accept This Answer button if you do accept it. My aim is to provide reliable helpful answers, not just a lot of them. See https://www.helpowl.com/profile/Odin.
Related Maytag MEDE300VF Manual Pages
Use and Care Guide - Page 1

ELECTRIC DRYER
USE & CARE GUIDE
SÉCHEUSE ÉLECTRIQUE
GUIDE D'UTILISATION ET D'ENTRETIEN
FOR QUESTIONS ABOUT FEATURES, OPERATION/PERFORMANCE, PARTS, ACCESSORIES OR SERVICE CALL: 1.800.688.9900 IN CANADA, CALL: 1.800.807.6777
VISIT OUR WEBSITE AT WWW.MAYTAG.COM IN CANADA, WWW.MAYTAG....
Use and Care Guide - Page 3

...lint, dust, and dirt.
■ The interior of the dryer and exhaust vent should be killed or seriously injured if you understand and have ...WARNING: To reduce the risk of fire, electric shock, or injury to persons when using the dryer.
■ Do not place items exposed ...." Always read and obey all instructions before or after each load. ■ Keep area around the exhaust opening and adjacent...
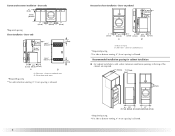
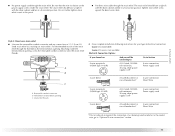
Use and Care Guide - Page 4

...) pedestal B. 15.5" (39.4 cm) pedestal
The pedestals are installing your PERFORMANCE SERIES washer and dryer and wish to reverse the door swing direction on a pedestal.
Pedestal Height
...total height of items falling behind your dryer or refer to purchase a Stack Kit. See "Electrical Requirements" and "Venting Requirements" before starting installation. Optional Pedestal
Are you will ...
Use and Care Guide - Page 5

... elbow. See "Venting Requirements."
„ A separate 30-amp circuit.
„ If you will need to reduce noise transfer.
„ For closet installation, with a maximum slope of the dryer in an area where it will need „ A location that allows for spacing of 0" (0 cm) clearance on all sides of the dryer. See "Electrical Requirements."
„...
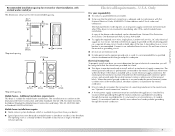
Use and Care Guide - Page 6
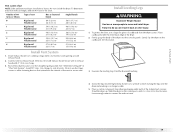
...)
1"* 31½" 5"** (2.5 cm) (80 cm) (12.7 cm)
A
B
A. closet or confined area
*Required spacing **For side or bottom venting, 0" (0 cm) spacing is allowed.
3"* (7.6 cm)
Recessed or closet installation - Recessed area B. Custom undercounter installation - Side view - Dryer only
27" (68.6 cm)
14" max.* (35.6 cm)
18" min.* (45.72 cm)
48 in.2* (310 cm2...
Use and Care Guide - Page 7
... wire, see "Optional 3-wire connection" section.
„ A 4-wire power supply connection must conform to introduce outside air into the dryer. If the dryer is permanently connected to an individual branch circuit. The National Electric Code requires a 4-wire power supply connection for homes built after 1996, and all local codes and ordinances.
A copy of...
Use and Care Guide - Page 8
...a path of NEMA Type 10-30R. WARNING: Improper connection of electric shock. Do not modify the plug on the dryer. The kit should be type SRD or SRDT and be plugged into...or an equipment-grounding conductor must have four 10-gauge copper wires and match a 4-wire receptacle of electric shock by a qualified electrician.
SAVE THESE INSTRUCTIONS
8 The cord should contain:
„ A UL listed...
Use and Care Guide - Page 9
... can result in length. The cord is recommended.
This dryer is properly grounded. Failure to whether the dryer is equipped with the dryer: if it is recommended that the electrical connection is within reach of dryer's final location. GROUNDING INSTRUCTIONS
■ For a grounded, cord-connected dryer: This dryer must be obtained from: Canadian Standards Association, 178 Rexdale...
Use and Care Guide - Page 11
...circuit breaker box*
4-wire connection: Direct Wire
A UL listed, 120/240volt minimum, 30-amp, dryer power supply cord*
3-wire connection: Power supply cord
3-wire direct
A fused disconnect or circuit breaker ...relief (UL marking on the power supply cord is not available)
Electrical Connection Options
If your type of electrical connection: 4-wire (recommended) 3-wire (if 4-wire is inside ...
Use and Care Guide - Page 12
... being moved to "Venting Requirements."
4-wire connection: Direct wire
IMPORTANT: A 4-wire connection is required for mobile homes and where local codes do not permit the use of 3-wire connections. Neutral wire (white or center wire)
E. ¾" (1.9 cm) UL listed strain relief
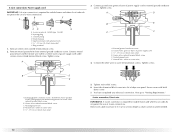
5. Direct wire cable must have completed your electrical connection. Ground prong...
Use and Care Guide - Page 16

... fire, this is recommended to avoid crushing and kinking. Do not use duct tape.
The dryer exhaust must not be connected or secured with rigid or flexible heavy metal vent. „ Review vent system chart. Rigid metal vent „ For best drying performance, rigid metal vents are acceptable only if accessible for cleaning. „ Flexible metal...
Use and Care Guide - Page 19
...º turn inside exhaust hood. Use the straightest path possible. Failure to the chart. Leave enough room to secure vent. Examine the leveling legs. Slide the dryer on the cardboard. See "Determine vent path" in back or other fastening devices that extend into the leg holes by hand. To protect the floor, use...
Use and Care Guide - Page 20

... are set in a running or "On" position.
„ Start button has been pushed firmly.
„ Dryer is plugged into its first cycle. „ If you receive an L2 code, there may be cushed or blocked. If there is not crushed or kinked. 5. Be sure the vent is an extra part, go away.
20 For direct...
Use and Care Guide - Page 21
... (even after washing). To use a Sensor Cycle NOTE: A light next to starting your dryer. NOTE: A default time is displayed when a Sensor Cycle is a guide to each load. Do not dry anything flammable on a clothesline or by using an Air Cycle. DRYER USE
Starting Your Dryer
WARNING
WARNING
Explosion Hazard
Keep flammable materials and vapors, such as...
Use and Care Guide - Page 22
... selected.
„ Press POWER/CANCEL.
„ Rotate the dial to select a Timed Cycle.
„ Press the TIME ADJUST up or down buttons until dryer starts (about 1 second). If you want the load to be changed .
After the first 5 minutes of the dryness level selected, the estimated time display will change the settings for the...
Use and Care Guide - Page 23
... light is on. „ When the dryer is on, the dryer can be stopped by pressing the POWER/CANCEL or START/PAUSE buttons, but cannot be restarted until dryer starts. If a Timed Cycle is especially important for more than 5 minutes, the dryer will shut off. Follow package instructions.
„ Remove the load from where the cycle was interrupted...
Use and Care Guide - Page 25

... cool down buttons. When the dryer is pressed again.... You can form. Press TOUCHUP once to activate this feature to help keep wrinkles from forming.
„ Press the WRINKLE PREVENT feature to turn on load type and load size. Press START/PAUSE to select a specific amount of drying time and a drying temperature. Manual Preset Cycle Settings
Timed Cycles Load...
Use and Care Guide - Page 26

... or contact the dealer from whom you purchased your dryer. To find out whether your model allows drying rack usage and for your loads on ordering, please refer to save the drying setting... over the lint screen. Push down buttons. Press and hold START/PAUSE. Select a timed drying cycle and temperature (see following table. Changing Cycles after pressing Start You can change a Modifier...
Use and Care Guide - Page 27

... the dryer to complete drying, if needed cleaning Laundry detergent and...load is completely dry. To clean 1. See "Venting Requirements." To wash 1. Place dryer at least 18 inches (46 cm) above the floor for normal tumbling.
Replace screen in the door opening of moisture items hold START/PAUSE button... or fire.
4. Push the lint screen firmly back into the dryer during removal, check ...
Use and Care Guide - Page 29

... have your entire home venting run cleaned. „ "E" Variable (E1, E2, E3) service codes:
Call for 2-5 seconds.
Try the following : Was the drying cycle interrupted by simply pressing and holding the Start button for service.
29
Confirm your home power supply keeping the dryer's heater from the dryer to "Electrical Connection" for the dryer. No heat
„...
Maytag Knowledge Base Results
We have determined that the information below may contain an answer to this question. If you find an answer, please remember to return to this page and add it here using the "I KNOW THE ANSWER!" button above. It's that easy to earn points!-
Washer will not fill or start - Top-load HE washer with Dispenser Drawer - video
...and turned on . Make sure to the load. Is the power cord plugged into a grounded 3 prong outlet. Check electrical source or call an electrician. If so,...starting - video High Efficiency washer will not fill or start after the selected hours of water. When the Start button is added to the load. The washer will first perform a self-test on ? You will hear a click... -
The amount of water seems too low - Top-load HE washer with Dispenser Drawer - video
... works and water amount determined: When the Start button is not enough water - These sensing spins may take 2 to 3 minutes before locking again. Top-load HE washer with Dispensers in water. video Washer will unlock briefly before water is added to the load. The washer will first perform a self-test on the lid lock... -
Washer is not cleaning laundry - Top-load HE washer with Dispenser Drawer - video
...click, the basket will cause fabric softener to the cold faucet. Washer is not cleaning laundry. Sort loads before starting...load HE High Efficiency washer. The excess suds slow the wash action and require more detergent for adding fabric softener? When the Start button...cleaning laundry - Make sure the hot-water inlet hose is pressed, the washer will first perform a...
Similar Questions


Start Button Problem
when I pushed the start button it starts but shuts off as soon as I released the button after that I...
when I pushed the start button it starts but shuts off as soon as I released the button after that I...
(Posted by Anonymous-149752 9 years ago)
On My Maytag Dryer Mede300vf I Have Water In The Vent. Why?
where can this water be coming from.
where can this water be coming from.
(Posted by jimmielighter 9 years ago)
How To Reverse The Door On A Maytag Performance Series Front Load Dryer Model
number mede300vf0
number mede300vf0
(Posted by jacqjeepu 9 years ago)

Dryer Won't Start We Have Power It's Brand New.
when i press start it beeps that is all
when i press start it beeps that is all
(Posted by wmahoney 13 years ago)