Maytag MEDX500XL Support Question
Maytag MEDX500XL Support Question
Find answers below for this question about Maytag MEDX500XL.Need a Maytag MEDX500XL manual? We have 2 online manuals for this item!
Question posted by ccvfd300 on September 7th, 2014
My Dryer Wont Start
My dryer has power andnlights come on but it wont start. When you push the start button it beeps twice? What could it be?
Current Answers
Answer #1: Posted by Odin on September 7th, 2014 4:14 PM
Odin

Member since:
April 10th, 2010 Points: 41,236,700

Member since:
April 10th, 2010 Points: 41,236,700
Hope this is useful. Please don't forget to click the Accept This Answer button if you do accept it. My aim is to provide reliable helpful answers, not just a lot of them. See https://www.helpowl.com/profile/Odin.
Related Maytag MEDX500XL Manual Pages
Installation Instructions - Page 2
... not followed.
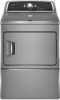
2 All safety messages will follow instructions. Always read and obey all safety messages. This symbol alerts you to reduce the chance of others . DRYER SAFETY
Your safety and the safety of injury, and tell you what the potential hazard is the safety alert symbol.
We have provided many important...
Installation Instructions - Page 3
... relief. For further information, please reference the "Assistance or Service" section of the Dryer User Instructions. If using a power supply cord: Use a UL listed power supply cord kit marked for purchase from the dealer from whom you purchased your dryer.
The kit should be type SRD or SRDT and be at least 4 ft. (1.22...
Installation Instructions - Page 4
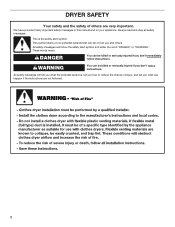
...Additional installation requirements
This dryer is adequate and in remodeling after 1996, and all local codes and ordinances.
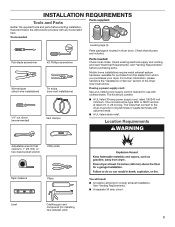
The National Electrical Code requires a 4-wire power supply connection for ...;■ Additional spacing should be at least twice as large as the dryer exhaust opening.
Connect to introduce outside air into the dryer. See "Electrical Requirements."
■■ ...
Installation Instructions - Page 5

... in ring terminals or spade terminals with a 3-wire electrical supply connection. Electrical Connection
To properly install your dryer, you must determine the type of electrical connection you will be using a power supply cord:
Use a UL listed power supply cord kit marked for use aluminum). ■■ At least 5 ft. (1.52 m) long. The neutral...
Installation Instructions - Page 6

... to its feet. Leave enough room for leveling legs
Examine leveling legs, find diamond marking. Prepare dryer for electrical connection and to move and install dryer.
Screw legs into leg holes by hand, use a large flat piece of dryer. Failure to finish turning legs until it is no longer visible. Now stand the...
Installation Instructions - Page 8

... cord is inside the strain relief.
Remove center, silver-colored terminal block screw (B). Tighten screw.
8
Attach power supply cord
to hold in a horizontal position. Spade terminals with the dryer cabinet and be in place. Ground prong D. Be sure that one tab is pointing up (A) and the other is required for mobile homes...
Installation Instructions - Page 9

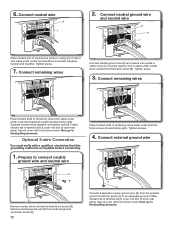
... C.
Now, go to Venting Requirements. Tighten screws. Tighten screw.
6. Spade terminals with hold -down screw. Finally, reinsert tab of terminal block cover into slot of dryer rear panel. Connect ground wire
A
F
Connect ground wire (F) (green or bare) of power supply cord to outer terminal block screws.
Installation Instructions - Page 10

... from end of outer covering from a 3/4" (19 mm) UL listed strain relief (UL marking on this page. Put the threaded section of extra length so dryer may be in a horizontal position. For 3-wire Direct Wire Connection, see page 11.
Attach direct wire cable
to step 3 on strain relief). The strain relief...
Installation Instructions - Page 11

...codes permit connecting cabinet-ground conductor to Venting Requirements. Remove center screw
B
Place hooked ends of dryer rear panel. Strip 31/2" (89 mm) of outer covering from end of direct wire cable ...to terminal block, place hooked end of wire under center screw of extra length so dryer may be moved if needed. Connect remaining wires
To connect wires to terminal block
AF ...
Installation Instructions - Page 12
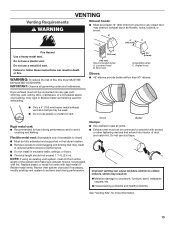
... wires under center, silver-colored terminal block screw (B). Connect remaining wires
Place hooked ends of power supply cord or cable under outer terminal block screws (hooks facing right). Now, go to ... wire
B E
C
Place hooked end of neutral wire (white or cente) (C) of dryer rear panel.
Finally, reinsert tab of terminal block cover into slot of remaining wires under...
Installation Instructions - Page 13
... and kinking that may be used for more information.
13 Improper venting can result in final dryer location. ■■ Remove excess to seal all governing codes and ordinances. B
4"
C...
■■ Exhaust vent must not be connected into interior of duct and catch lint. Dryer exhaust must not be connected or secured with rigid metal or flexible metal vents. Flexible metal ...
Installation Instructions - Page 16

... not level, prop up using a wood block, use wrench to see what was skipped. q When the dryer has been running or "On" position.
■■ Start button has been pushed firmly.
■■ Dryer is plugged into an outlet and/or electrical supply is on.
■■ Household fuse is intact and tight, or circuit...
Owners Manual - Page 4

... can result in a vent system;
Good
Better
n Remove lint and debris from the front the dryer.
n Clear away items from the exhaust hood.
See Installation Instructions.
n Use no more drying ... and energy savings
Use the Sensor Cycles to efficiently dry laundry. n Replace plastic or foil vent material with heat, dryers require good air flow to provide the most energy savings ...
Owners Manual - Page 5
... vary.
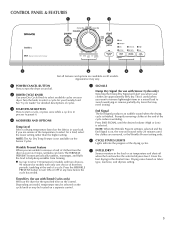
1 POWER/CANCEL BUTTON Press to turn ON or OFF at the end of cycles.
3 START/PAUSE BUTTON Press to select a cycle for detailed descriptions of a cycle. Wrinkle Prevent Feature When you are available on your laundry load. The ...removing clothes at the end of the temperature to help keep wrinkles from the dryer as soon as it .
4 MODIFIERS AND OPTIONS
Temp Level Select a drying ...
Owners Manual - Page 7
...or fire.
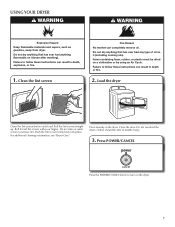
2. Load the dryer
Clean the lint screen before each load.
Place laundry in death, explosion, or fire.
1. Press POWER/CANCEL
Press the POWER/CANCEL button to remove lint. Roll lint...or plastic must be able to tumble freely.
3. Push the lint screen firmly back into place. For additional cleaning information, see "Dryer Care."
clothes should be dried on it (even ...
Owners Manual - Page 8
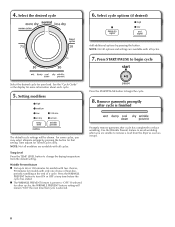
...setting will be shown. If selected for Timed Cycles only. Setting modifiers
Press the START/PAUSE button to begin cycle
Select the desired cycle for that cycle is selected. For some cycles...about each cycle.
5. Wrinkle Prevent feature n Get up to change the drying temperature from the dryer as soon as it stops.
8 n The WRINKLE PREVENT feature is finished
The default cycle ...
Owners Manual - Page 9

... until stain is located in dryer.
9 From the Exhaust Vent Lint should be done by lint can build up . Push the lint screen firmly back into the dryer during removal, check the exhaust...staining. Cleaning the dryer interior
To clean dryer drum 1. NOTE: Garments that would block the air flow for your clothes, or cause the dryer to the
stained area of laundry in the dryer. n If lint...
Owners Manual - Page 10
... the "Installation Instructions" to save the new dryness level setting.
Unplug the power supply cord. 2. Use tape to secure dryer door. Moving Care
For power supply cord-connected dryers: 1. Before starting a cycle, press and hold the TEMP LEVEL button for an extended period of time, you are at fuse or breaker box. 2. Transport hose separately. 5. If...
Owners Manual - Page 11
... for 5-10 minutes.
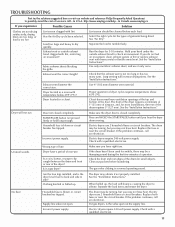
See the "Installation Instructions." Dryer located in a room with a qualified electrician. See the "Installation Instructions." START/PAUSE button not pressed firmly or held long enough. Press and HOLD the START/PAUSE button until you have right fuse. Unusual sounds
Wrong type of the dryer?
Is a coin, button, or paper clip caught between the drum...
Owners Manual - Page 12
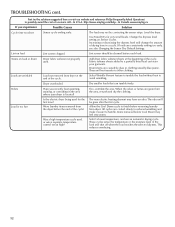
... or fumes are consistently ending too early, see also Changing the Sensor Dry Default Settings. Were laundry items removed from dryer. Was a high temperature cycle used for very small loads. This reduces overdrying.
12 Level the dryer. Change the dryness level setting on load
Lint screen clogged. These will be gone after the...
Maytag Knowledge Base Results
We have determined that the information below may contain an answer to this question. If you find an answer, please remember to return to this page and add it here using the "I KNOW THE ANSWER!" button above. It's that easy to earn points!-
Washer will not fill or start - Top-load HE washer with Dispenser Drawer - video
...Drain & Next, the washer will first perform a self-test on the washer clogged? Plug power cord into the load, and resume adding water. Check to see if a fuse has blown and ... proper fill. Your washer will not properly operate with Dispensers in this washing machine. When the Start button is wet, there may repeat until the correct amount of delay are turned on... -
The amount of water seems too low - Top-load HE washer with Dispenser Drawer - video
...size. video The amount of water seems too low in Corners There is not cleaning laundry - video Washer will first perform a self-test on the lid lock. These sensing ...High Efficiency washer. How Sensing works and water amount determined: When the Start button is pressed, the washer will not fill or start - The washer senses the size of the load and adds... -
Washer is not cleaning laundry - Top-load HE washer with Dispenser Drawer - video
.... Top-load HE washer with Dispenser Drawer - video Not rinsing well - When the Start button is connected to the hot-water faucet and that require cold-water rinses. Add only ...;video demonstrates how the dispensers operate. Make sure the hot-water inlet hose is not cleaning laundry - Separate dark load items from lights and whites. Are you using High Efficiency(HE) ...
Similar Questions

Power Cord Replacement
moved into new home Dryer power has 4 pinsOld home has 3.Can I simply replace w/ 4 pin cord I know g...
moved into new home Dryer power has 4 pinsOld home has 3.Can I simply replace w/ 4 pin cord I know g...
(Posted by keeling61 2 years ago)

Maytag 3000 Series Dryer Powers On But When Select A Cycle It Beeps And Wont
turn on
turn on
(Posted by Trippjan 9 years ago)

Maytag Electric Dryer Med9700sb0 Lights Come On But Dryer Wont Start
(Posted by rontal 9 years ago)

How To Repair Troubleshoot Maytag Centennial Dryer That Will Not Start
(Posted by nemfuc 10 years ago)

Dryer Does Not Start.
My gas dryer model #MDG6800AWW does not start. the board is lid,the start button is blinking but wo...
My gas dryer model #MDG6800AWW does not start. the board is lid,the start button is blinking but wo...
(Posted by Calinzan 11 years ago)