
Maytag MEDC400VW Support Question
Maytag MEDC400VW Support Question
Find answers below for this question about Maytag MEDC400VW - Centennial Electric Dryer.Need a Maytag MEDC400VW manual? We have 2 online manuals for this item!
Question posted by detpriar on December 8th, 2013
Do You Need A Strain Relief For The Power Supply Cord On A Dryer
The person who posted this question about this Maytag product did not include a detailed explanation. Please use the "Request More Information" button to the right if more details would help you to answer this question.
Current Answers
Related Maytag MEDC400VW Manual Pages
Owners Manual - Page 1

...dans le logement de la porte à l'intérieur de la sécheuse.
You will need to help you obtain assistance or service if you don't immediately follow instructions. Dealer name
Serial number...
Numéro de téléphone
Numéro de modèle
Date d'achat
DRYER SAFETY
Your safety and the safety of purchase or installation date for future reference. This is ,...
Owners Manual - Page 2

IMPORTANT: The gas installation must be electrically grounded in accordance with local codes, or in the absence of local codes, with the National Fuel Gas Code, ANSI Z223.1/NFPA 54. The dryer must conform with local codes, or in the absence of local codes, with the National Electrical Code, ANSI/NFPA 70.
2
Owners Manual - Page 3

...electrical...of re or explosion, or to the dryer plays a big role in death or ... Clear away items from the front the dryer.
3
WARNING
Fire Hazard Use a heavy ... the Installation Instructions supplied with your lint ...installed the dryer. Do not use a plastic vent. See...9632;■ Cleaning your dryer for Good Air Flow
...foil vent material with heat, dryers require good air flow to light...
Owners Manual - Page 4

...time the feature runs. CONTROL PANEL
Not all models.
It periodically starts and stops the dryer, tumbling the load without heat to the care label directions.
On models with an ...On other models, you like, select a setting closer to ENERGY PREFERRED, which is included in your dryer has multiple heat settings:
■■ A High heat setting may be used for most loads.
Timed...
Owners Manual - Page 5
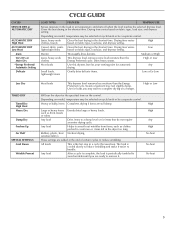
.... Drying time varies
Low
lightweight items
based on the control. High or Low
Will run the dryer for loads you are ready to remove it easier to avoid wrinkles until you may be selected ...dries denims.
Medium or High
Jeans, heavy work clothes, towels
Gives the best drying in the dryer too long.
Heavy or bulky items Completes drying if items are added at the end of garment ...
Owners Manual - Page 6

... or knob.
If your dryer, wipe the dryer drum with a damp cloth to OFF. Place drying rack in death, explosion, or fire. WARNING: To reduce the risk of fire, electric shock, or injury to... if needed.
The signal will sound only if the selector is included in death or fire. To stop your dryer has a Temperature selector, set to follow these instructions can result in dryer. To ...
Owners Manual - Page 7

...the dryer with hot water. 5. As Needed ...supply line. 3. Apply a liquid, nonflammable household cleaner to dry the drum. Tumble a load of clean cloths or towels to the stained area of clothes. Unplug dryer or disconnect power...laundry in the door of time, you should be removed every 2 years, or more often, depending on dryer usage. Wet lint is located in front of the dryer...
Owners Manual - Page 8

... blown, or has a circuit breaker tripped? If the problem continues, call an electrician.
■■ Is the correct power supply available? When balled up ?
Electric Dryers
For power supply cord-connected dryers: 1. Use masking tape to secure dryer door. Gas Dryers
1. http://www.maytag.com/help - Replace the fuse or reset the circuit breaker. Unusual sounds
■■ Has...
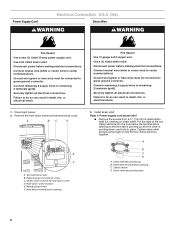
Installation Instructions - Page 2

...will be considered. ■ A level floor with upturned ends.
■ A UL listed strain relief. Some codes limit, or do so can be at least 18 inches (46 cm) ...support the total weight (dryer and load) of the dryer in ring terminals or spade terminals with a maximum slope of the Dryer User Instructions. If using a power supply cord, a grounded electrical
outlet located within 2 ft...
Installation Instructions - Page 3

... homes built after 1996, dryer circuits involved in remodeling after 1996, and all mobile home installations.
The National Electric Code requires a 4-wire supply connection for Mobile Home Construction... or grounding circuit.
■ Do not use an extension cord.
■ If codes permit and a separate ground wire is used, it is recommended that a qualified electrician determine that the...
Installation Instructions - Page 4

... power supply cord with upturned ends.
■ A UL listed strain relief. The 3-wire power supply cord, at least 4 ft (1.22 m) long, must be grounded. GROUNDING INSTRUCTIONS
■ For a grounded, cord-connected dryer: This dryer ...or lead on the power supply cord: if it will reduce the risk of electric shock by a qualified electrician. This dryer uses a cord having an equipment-...
Installation Instructions - Page 5

... representative or personnel if you are in length. If you are using a replacement power supply cord, it will reduce the risk of electric shock by a qualified electrician.
WARNING: Improper connection of least resistance for electric current. Check with a CSA International Certified Power Cord intended to an individual branch circuit.
4-wire receptacle 14-30R
■ Do not...
Installation Instructions - Page 6
... (gold).
Failure to do so can result in death, fire, or electrical shock.
Style 1: Power supply cord strain relief
■ Remove the screws from a ³⁄₄" (1.9 cm) UL listed strain relief (UL marking on strain relief). Strain relief tab pointing up and the other is pointing up B. Strain relief tab pointing down , and hold the two clamp sections together.
Failure to...
Installation Instructions - Page 7

... connector and any screws from a ³⁄₄" (1.9 cm) UL listed strain relief (UL marking on the power supply cord is not available)
7 Spade terminals with the dryer cabinet and be in a horizontal position. Strain relief threads
■ Put direct wire cable through the strain relief. The strain relief should have a tight fit with upturned ends F. ¾" (1.9 cm) UL...
Installation Instructions - Page 8

... D
A. Center silver-colored terminal block screw C. Ground wire (green or bare) of extra length so dryer can be moved if needed. Tighten strain relief screws. 6. Insert tab of cable, leaving bare ground wire at 5" (12.7 cm).
You have 5 ft (1.52 m) of power supply cord F. Now go to center silver-colored terminal block screw. External ground conductor screw -
Installation Instructions - Page 9

... block, place the hooked end of power supply cord to neutral wire. Bend ends of dryer rear panel. Secure cover with hold -down screw.
6. Tighten screws.
4. Direct wire cable must have completed your electrical connections. Loosen or remove center silver-colored terminal block screw.
2. Spade terminals with outer covering. Tighten strain relief screws.
5. Insert tab of terminal...
Installation Instructions - Page 10

... have completed your electrical connections. Now go to neutral wire. 1. Neutral ground wire C. Neutral wire (white or center wire) E. ¾" (1.9 cm) UL listed strain relief F. Tighten screw. External ground conductor screw B. 1. Loosen or remove center silver-colored terminal block screw.
2.
B
C
D
Optional 3-wire connection
Use for direct wire or power supply cord where local...
Installation Instructions - Page 13

... determine maximum exhaust length, add one 90º turn inside exhaust hood. Use the straightest path possible. Slide the dryer on the cardboard. Determine vent length and elbows needed for levelness.
Install exhaust hood. Connect vent to exhaust hood with a 4" (10.2 cm) clamp.
2. Secure vent to exhaust hood. See "Determine vent path...
Installation Instructions - Page 14

...up) on left side of slots.
Loosen (do not remove) top screws from cabinet side of dryer. Insert screws into bottom holes on top of hinges.
14 Tighten screws halfway. Loosen (do not ... outer door
A
and gently lift to dryer door so that the larger hole is over screws. Set door on left side of door hinge slot is needed , slide door catch left -side opening...
Installation Instructions - Page 15

...and start , check the following :
9. Check that the dryer is level. Be sure the vent is closed.
11. In the U.S.A.
■ For power supply cord installation, plug into a grounded 4 prong outlet. Turn on ... has been pushed firmly.
■ Dryer is plugged into an outlet and/or electrical supply is on the dryer.
8. If there is first used. If the dryer will go back through the steps to...
Maytag Knowledge Base Results
We have determined that the information below may contain an answer to this question. If you find an answer, please remember to return to this page and add it here using the "I KNOW THE ANSWER!" button above. It's that easy to earn points!-
Dryer does not heat - Electric dryer
...;be turning, but you select an Air Fluff or Air Only temperature option? Loads are damp; Did you recently install a power supply cord on the control knob or button with the other temperature selections. The drum may be found on the dryer? If the problem continues, call an electrician. Electric dryer My electric dryer does not heat... -
Recommended installation for electrical, drain and water supply connections for dishwashers.
...Promo Code during check out. How to connect dishwasher electrical supply line animation Do not kink or pinch copper tubing, drain hose, power supply cord, or direct wire between dishwasher and cabinet while ... purchase the necessary kits needed to connect a copper water supply line animation If you have an air gap, make the connection easier. If the water supply comes from the right... -
Display shows L2 - Dryer
... problem continues, call an electrician. This code indicates that there may be turning, but will stop appearing after a power outage or if the dryer has been unplugged, but you recently install a power supply cord on the display. Replace the fuse(s) or reset the circuit breaker(s). Press any key to schedule service. Electric dryer Dryer does not heat -
Similar Questions

How Do You Insert The Strain Relief Clamp To The Back Of The Dryer
(Posted by LyndsDoreen 9 years ago)

How To Tighten Strain Relief Clamp On Dryer
(Posted by Lape2rad 9 years ago)
How To Tighten Strain Relief On Dryer Power Cord
(Posted by jeffvisd 10 years ago)

I Need Manual For A Maytag Medb400vq0 Dryer
i need a manual to download
i need a manual to download
(Posted by hunthealy 12 years ago)

I Need The Back Half Of The Dryer Screen Lint Cleaner That Is Removed After Load
i need to order a part. the backhalf of the lint screen cleaner broke in half. no part number it is ...
i need to order a part. the backhalf of the lint screen cleaner broke in half. no part number it is ...
(Posted by janeybelez 12 years ago)