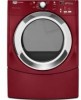
Maytag MEDE300VF Support Question
Maytag MEDE300VF Support Question
Find answers below for this question about Maytag MEDE300VF - Performance Series Front Load Electric Dryer.Need a Maytag MEDE300VF manual? We have 1 online manual for this item!
Question posted by janeybelez on June 28th, 2011
I Need The Back Half Of The Dryer Screen Lint Cleaner That Is Removed After Load
i need to order a part. the backhalf of the lint screen cleaner broke in half. no part number it is white and about 15inches 1/2 oval shaped part
Current Answers
Related Maytag MEDE300VF Manual Pages
Use and Care Guide - Page 3

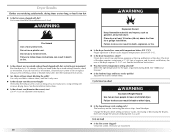
... risk of fire, electric shock, or injury to the drying compartment.
■ Do not reach into the dryer if the drum is the safety alert symbol. SAVE THESE INSTRUCTIONS
3
Close supervision of children is necessary when the dryer is used near children.
■ Before the dryer is removed from the accumulation of lint, dust, and dirt...
Use and Care Guide - Page 4

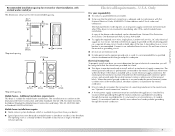
.... Optional Pedestal
Are you will need to place the 10" (25.4 cm) pedestal at least 3.5" (8.9 cm) above the floor.
Backguard
If you are installing your PERFORMANCE SERIES washer and dryer and wish to avoid having loose items fall behind the machines during operation. Ask for Part Number W10200372. Check existing electrical supply and venting. For further...
Use and Care Guide - Page 5

... greater than 1" (2.5 cm), install Extended Dryer Feet Kit, Part Number 279810. At lower temperatures, the dryer might be required for this dryer. Check code requirements. Installation clearances The location must not be installed or stored in longer drying times. If using a power supply cord, a grounded electrical outlet located within 2 ft (61 cm) of either side...
Use and Care Guide - Page 7
...mobile home installations. Recommended installation spacing for recessed or closet installation, with stacked washer and dryer
The dimensions shown are for the recommended spacing.
48 in.2 * (310 cm2)
3"*...under the neutral terminal (center or white wire) of the above code standards can be removed from your responsibility „ To contact a qualified electrical installer.
„ To be used...
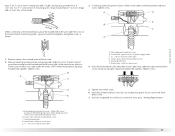
Use and Care Guide - Page 11
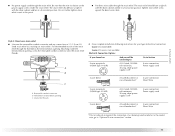
...132; Unscrew the removable conduit connector and any screws from a 3/4" (1.9 cm) UL
listed strain relief (UL marking on the power supply cord is not available)
Electrical Connection Options
If ..." section.
11 The strain relief should have a tight fit with the dryer cabinet and be in a horizontal position. Removable conduit connector B. A B
C
A. Tighten strain relief screw against the ...
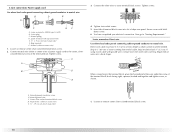
Use and Care Guide - Page 12
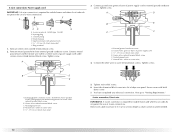
...use of 3-wire connections. Tighten screw. Tighten screws. Direct wire cable must have completed your electrical connection. Neutral prong E. A C
3. External ground conductor screw B.
Remove center silver-colored terminal block screw.
2. Ground wire (green or bare) of dryer rear panel.
Now go to external ground conductor screw. Spade terminals with hold- Connect neutral...
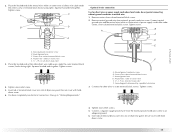
Use and Care Guide - Page 13
... facing right). Tighten screw. Remove center silver-colored terminal block ...
7. Shape ends of wires into slot of terminal block cover into a hook shape.
1" (2.5
cm)
3.
Tighten screw. Neutral wire (white or ...white or center wire) E. ¾" (1.9 cm) UL listed strain relief
13 Neutral ground wire F.
Insert tab of dryer rear panel. You have completed your electrical...
Use and Care Guide - Page 14
... the center, silvercolored terminal screw of extra length so dryer can be moved if needed. Ring terminals G. Tighten screw. Secure cover with outer covering. Shape ends of wires into slot of cable. Loosen or remove center silver-colored terminal block screw.
14 Connect neutral wire (white or center wire) of power supply cord to neutral...
Use and Care Guide - Page 15
...Venting Requirements." Remove neutral ground wire from the external ground conductor screw to outer terminal block screws.
Insert tab of terminal block cover into slot of dryer rear panel...right). Tighten strain relief screw.
5. You have completed your electrical connection. Connect neutral
ground wire and the neutral wire (white or center wire) of the other wires to an
adequate ...
Use and Care Guide - Page 16

...performance. „ Do not install flexible metal vent in death or fire.
Flexible metal vent „ Flexible metal vents are recommended. „ Rigid metal vent is in its final
location. „ Remove... risk of fire, this is not plugged
with lint. „ Replace any gas vent, chimney, ...90° elbows.
If this dryer MUST BE EXHAUSTED OUTDOORS. The dryer exhaust must be used. Venting...
Use and Care Guide - Page 21
...may not have all of fire, electric shock, or injury to specific sections of the load.
Please refer to persons, read ...laundry in death, explosion, or fire. NOTE: A default time is displayed when a Sensor Cycle is selected. See "Cleaning the Lint Screen." 2. Failure to follow these instructions can result in death or fire. Failure to follow these instructions can result in dryer...
Use and Care Guide - Page 22
....
While a Timed Cycle is desired.
„ Press the SIGNAL ON/OFF button to complete drying, if needed.
10 - 20 Type of drying time and enhances fabric care. Shower curtains, tablecloths
20 - 30
Rubber-...Air Only. If you want the load to each feature will glow yellow when the feature is displayed. Press the START/PAUSE button once to stop the dryer, make the desired changes, then ...
Use and Care Guide - Page 23
...dryer starts. NOTE: When the dryer is running and Control Lock is on . „ When the dryer is running, the display shows the exact number of the Cool Down depends on your dryer is running , the display shows the estimated cycle time when your load...„ Remove the load from where the cycle was interrupted, if you choose a Sensor Cycle. Pausing or Restarting
To pause the dryer at any...
Use and Care Guide - Page 25

...if items are unable to make a selection on until the dryer door has been open for drying small loads or loads that need a short drying time. Quick Dry Use this feature to ...cool down buttons. NOTE: This is not necessary to remove a load of drying time and a drying temperature. Sensor Cycle Settings
Sensor Cycles Load Type
Temperature Time* (Minutes)
HEAVY DUTY
High
50
Heavyweight...
Use and Care Guide - Page 26

... the Preset Sensor Cycles Dryness Settings If all your loads on all of your model. This change the preset...drying rack Do not remove the lint screen. 1. A
A. Place drying rack inside dryer drum, positioning the back wire on ordering, please refer to the...change will affect all Sensor cycles are consistently not as dry as needed to purchase one for example, sweaters).
B
A
A. You must...
Use and Care Guide - Page 27

... brush with the brush to both sides of the dryer. A screen blocked by lint can cause overheating and damage to
remove residue buildup. Failure to remove lint. NOTE: Check the lint screen and remove any lint accumulated from items dried on Dry
the drying rack.
Wet lint is in dryer.
27 As needed . Scrub lint screen with hot water and liquid detergent. Press and hold...
Use and Care Guide - Page 28

... you open the door. See "Cleaning the Lint Screen." Unplug the power supply cord. 2. Failure to secure dryer door. Unplug dryer or disconnect power. 2. Remove the cover.
3. Make sure leveling legs are secure in death or electrical shock.
1. Apply paste to secure dryer door. OR Apply a liquid, nonflammable household cleaner to the stained area and rub with a soft...
Use and Care Guide - Page 29

...dryer. Separate the load items and restart the dryer. Dryer displaying code message
„ "PF" (power failure), check the following : Clean lint screen. The dryer will bounce, causing the dryer...length and number of the dryer?
If...Electric dryers use 2 household fuses or circuit breakers. If the message persists, consult a qualified electrician. „ "AF" (low airflow condition):
The dryer...
Use and Care Guide - Page 30
... vent diameter the correct size? Select the right temperature for 5-10 minutes. Separate the load to move and install dryer. The load may not be cleaned before each load. Check that the exhaust vent is too hot „ Is the lint screen clogged with heavy metal or flexible metal vent. See "Additional Features."
„ Is the...
Use and Care Guide - Page 31
... If you need to order replacement parts, we recommend that can also look in your nearest designated service center. This will be gone after the first cycle. The new electric heating element may save you can write to Maytag® appliances with : „ Features and specifications on load or drum
„ Was dryer fabric softener...
Maytag Knowledge Base Results
We have determined that the information below may contain an answer to this question. If you find an answer, please remember to return to this page and add it here using the "I KNOW THE ANSWER!" button above. It's that easy to earn points!-
Loads are wrinkled - Bravos washer with Dispensers in Corners
... product model number in the water to get the best performance from the load. Were the clothes left in Corners Loads are reversed,...Remove the load as soon as Super Wash or Normal? The washer high spin speeds range from the dryer to relax the wrinkles? Top-load washer Damaged clothing - Are the hot and cold water inlet hoses reversed? Load items need... -
Loads are wrinkled - Top-load washer
...; Loads are wrinkled - Top-load washer Loads are tangling and twisting - Dryer enter your water inlet hoses for an extended period of time after the end of new wrinkles when the load spins. Remove the load as soon as Power Wash or Heavy Duty? Did the wrinkling occur while washing a large load? Reduce load size if needed. Try... -
Loads are wrinkled - Top-load HE washer with Dispenser Drawer
... wrinkles? If safe for too long after the cycle ended? Loads are wrinkled - sound clips Lint is also important to promptly remove loads from 700 to 800 rpm to the faucets. Top-load HE washer with reduced spin speeds. It is on . Load items need room to move to avoid the same problem. Are the...
Similar Questions

On My Maytag Dryer Mede300vf I Have Water In The Vent. Why?
where can this water be coming from.
where can this water be coming from.
(Posted by jimmielighter 9 years ago)

Maytag Front Load Electric Dryer Won't Start
(Posted by nuriterry 9 years ago)
How To Reverse The Door On A Maytag Performance Series Front Load Dryer Model
number mede300vf0
number mede300vf0
(Posted by jacqjeepu 9 years ago)

I Have A Maytag Front Loading Electric Dryer Model Med9600 Sq0. When I Attempt T
I have a Maytag front loading electric Dryer model MED9600 SQ0. When I attempt to start it by pressi...
I have a Maytag front loading electric Dryer model MED9600 SQ0. When I attempt to start it by pressi...
(Posted by wrzimmerly 10 years ago)

I Need Manual For A Maytag Medb400vq0 Dryer
i need a manual to download
i need a manual to download
(Posted by hunthealy 12 years ago)