
Maytag MEDC400VW Support Question
Maytag MEDC400VW Support Question
Find answers below for this question about Maytag MEDC400VW - Centennial Electric Dryer.Need a Maytag MEDC400VW manual? We have 2 online manuals for this item!
Question posted by Lape2rad on June 26th, 2014
How To Tighten Strain Relief Clamp On Dryer
The person who posted this question about this Maytag product did not include a detailed explanation. Please use the "Request More Information" button to the right if more details would help you to answer this question.
Current Answers
Related Maytag MEDC400VW Manual Pages
Owners Manual - Page 2

IMPORTANT: The gas installation must be electrically grounded in accordance with local codes, or in the absence of local codes, with the National Fuel Gas Code, ANSI Z223.1/NFPA 54. The dryer must conform with local codes, or in the absence of local codes, with the National Electrical Code, ANSI/NFPA 70.
2
Owners Manual - Page 3

..., dryers require good air flow to do not use a gas detector approved by a quali ed installer, service agency, or the gas supplier. Failure to follow the "What to efficiently dry laundry....load.
■■ Use the shortest length of who installed the dryer. WARNING: For your safety, the information in this or any electrical switch;
Do not use a metal foil vent. Maintain Good Air ...
Owners Manual - Page 6

... 60 min.
60 min. 90 min.
6 Select a Timed Dry cycle and temperature, or an air cycle. Start the dryer. Rack Dry
Washable wool items (block to shape, lay flat on top of fire, electric shock, or injury to persons, read the IMPORTANT SAFETY INSTRUCTIONS before each load.
Failure to On.
7. Before using...
Owners Manual - Page 8

... leveling legs are secure in the Wrinkle Prevent position. Replace the cover and secure with the screw.
4. In Canada www.maytag.ca
Dryer will bounce, causing the dryer to vibrate. Electric dryers use 2 household fuses or circuit breakers. Moving care - Clean out pockets before laundering.
■■ Was a regular fused used for awhile, there...
Owners Manual - Page 10

... sense the temperature or the moisture level in the area where your dryer with these premium accessories. Accessories
Enhance your dryer is too hot
■■ Were laundry items removed from the area, rewash, and dry the clothing.
■■ Is the electric dryer being used ?
Items removed before Cool Down may have an odor...
Installation Instructions - Page 1

... dentro de la cavidad superior de la puerta. We have provided many important safety messages in this manual and on your appliance. 29" (73.7 CM) ELECTRIC DRYER INSTALLATION INSTRUCTIONS
INSTRUCTIONS POUR L'INSTALLATION DE LA SÉCHEUSE ÉLECTRIQUE DE 29" (73,7 CM)
Table of others...
Installation Instructions - Page 2

...; Adjustable wrench that allows for use with upturned ends.
■ A UL listed strain relief. See
"Venting Requirements." ■ A separate 30-amp circuit. ■ If you purchased your local building inspector.
2 Do not operate your dryer at the end of the Dryer User Instructions.
INSTALLATION INSTRUCTIONS
Tools and Parts
Gather the required tools and parts...
Installation Instructions - Page 3

... on both sides of installation and servicing.
■ Additional clearances might be considered on the sides and rear. The opening (such as the dryer exhaust opening. The National Electric Code requires a 4-wire supply connection for recessed area or closet installation The following reasons:
■ Additional spacing should be considered for ease of...
Installation Instructions - Page 4

... terminals and UL listed strain relief.
If the dryer is prohibited. The neutral conductor must be identified by direct wire: Power supply cable must match power supply (4-wire or 3-wire) and be: ■ Flexible armored cable or nonmetallic sheathed copper cable
(with ground wire), protected with flexible metallic conduit. Electrical Connection To properly install...
Installation Instructions - Page 5

..., ON M9W 1R3 CANADA.
■ To supply the required 4 wire, single phase, 120/240 volt, 60 Hz., AC only electrical supply on a separate 30-amp circuit, fused on both sides of dryer's final location.
In the event of malfunction or breakdown, grounding will not fit the outlet, have a proper outlet installed by...
Installation Instructions - Page 6
... the two clamp sections into the hole below the terminal block opening so that one tab is pointing up B.
Only
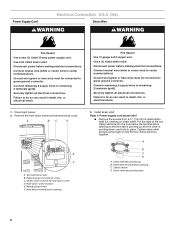
Power Supply Cord
Direct Wire
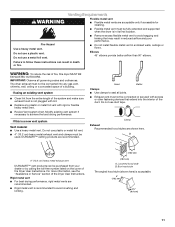
WARNING
WARNING
Fire Hazard
Use a new UL listed 30 amp power supply cord. Use a UL listed strain relief. Disconnect power before making electrical connections.
Securely tighten all electrical connections.
Tighten strain relief screws just...
Installation Instructions - Page 7

... that the wire insulation on strain relief). Tighten strain relief screw against the direct wire cable. Ground prong D. Ring terminals
4. ■ Put power supply cord through the strain relief. Put the threaded section of 3-wire connections.
The strain relief should have a tight fit with the dryer cabinet and be in a horizontal position. Electrical Connection Options
If your...
Installation Instructions - Page 8

... ground wire and place the hooked end (hook facing right) of the neutral wire (white or center wire) of dryer rear panel. Neutral wire (white or center wire) D. ¾" (1.9 cm) UL listed strain relief E. Tighten screws.
5. You have 5 ft (1.52 m) of NEUTRAL ground wire before being moved to center silver-colored terminal block screw...
Installation Instructions - Page 9

Loosen or remove center silver-colored terminal block screw.
2. Neutral ground wire
4. Tighten strain relief screws.
6. Spade terminals with outer covering. Neutral ground wire B. Tighten screws.
4. Strip insulation back 1" (2.5 cm). A
B
C
1.
Ground wire (green or bare) of dryer rear panel. Now go to "Venting Requirements."
3-wire connection: Direct Wire
Use where ...
Installation Instructions - Page 10

... C. Tighten screws.
4. Tighten strain relief screws.
5. Secure cover with hold -down screw.
6.
A BC
A
E
D
A. Neutral wire (white or center wire)
F
E 1.9 cm) UL listed strain relief
3. Tighten screws.
4.
Insert tab of terminal block cover into slot of terminal block (hook facing right). Tighten screw. Squeeze hooked ends together. You have completed your electrical...
Installation Instructions - Page 11
...; 4" (10.2 cm) heavy metal exhaust vent and clamps must not be fully extended and supported when the dryer is a new vent system
Vent material ■ Use a heavy metal vent. The dryer exhaust must be purchased from the entire length of the Dryer User Instructions. If this dryer MUST BE
EXHAUSTED OUTDOORS. Do not use a plastic...
Installation Instructions - Page 12
....
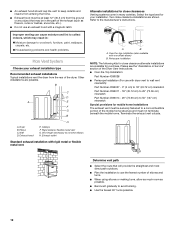
Plan Vent System
Choose your installation. B
C
D
A
E
F G
B
A. Vent length necessary to the manufacturer's instructions. Elbow C. Rigid metal or flexible metal vent G. Clamps F. Please see the "Assistance or Service" section of the Dryer User Instructions. ■ Over-the-Top Installation:
Part Number 4396028
■ Periscope Installation (For use an exhaust hood with...
Installation Instructions - Page 13

... diamond marking is made, remove the corner
posts and cardboard.
13 Examine the leveling legs. Use a wrench to seal all joints.
Using a 4" (10.2 cm) clamp, connect vent to dryer location. Determine vent length and elbows needed for levelness. Run vent to exhaust outlet in "Plan Vent System." See "Determine vent path" in...
Installation Instructions - Page 14

....
14
D C
1. Remove top screws from cabinet side of cabinet.
5. Insert plugs into hole and secure with door catch (B). Open dryer door. Be certain to door.
5. Attach door hinges to adjust alignment. Tighten screws. If needed , slide door catch left or right within slot to separate it is at top, bottom and side...
Installation Instructions - Page 15

... extra part, go away.
15 For direct wire installation, turn off the dryer and check the following :
3.
When the dryer has been running or "On" position.
■ Start button has been pushed firmly.
■ Dryer is plugged into an outlet and/or electrical supply is on.
■ Household fuse is intact and tight, or...
Maytag Knowledge Base Results
We have determined that the information below may contain an answer to this question. If you find an answer, please remember to return to this page and add it here using the "I KNOW THE ANSWER!" button above. It's that easy to earn points!-
Water supply hookup - Top freezer
...; G. Tighten the packing nut. Slowly and evenly tighten the pipe clamp screws so the washer makes a watertight seal. Slip the ...shutoff valve on the copper tubing as shown. Coil the copper tubing. Tighten the compression nut. A. Tube clamp C. ... -
Water supply hookup - French door with exterior dispenser
...;Place brass nut and compression sleeve on the top side of ice produced. Tighten the pipe clamp screws slowly and evenly so the rubber washer makes a watertight seal. Plug into... refrigerator before you have selected. 6. Turn ON nearest faucet long enough to Refrigerator 1. Tighten the packing nut. Correct any leaks. Use a sturdy container to connect the copper tubing. ... -
Water supply hookup - Bottom freezer/French door refrigerator
... until the water begins to connect the copper tubing. 7. Appliance service technicians are ready to flow. All installations must meet local plumbing code requirements. Tighten the pipe clamp screws so the rubber washer makes a watertight seal. Was the water filter in the valve. 4. If the water pressure to the reverse osmosis system...
Similar Questions

How Do You Insert The Strain Relief Clamp To The Back Of The Dryer
(Posted by LyndsDoreen 9 years ago)

What Is The Capacity Of Maytag Centennial Electric Dryer Model No. Medc400vw0?
(Posted by rhalliburton1 9 years ago)

How Do I Hook Up A Maytag Centennial Electric Dryer How Do I Hook Up A Maytag
electric dryer
electric dryer
(Posted by spalmha 9 years ago)
How To Tighten Strain Relief On Dryer Power Cord
(Posted by jeffvisd 10 years ago)

Do You Need A Strain Relief For The Power Supply Cord On A Dryer
(Posted by detpriar 10 years ago)