
Maytag MEDC300XW Support Question
Maytag MEDC300XW Support Question
Find answers below for this question about Maytag MEDC300XW.Need a Maytag MEDC300XW manual? We have 3 online manuals for this item!
Question posted by nancy54285 on May 25th, 2012
What Size Is The Dryer
The person who posted this question about this Maytag product did not include a detailed explanation. Please use the "Request More Information" button to the right if more details would help you to answer this question.
Current Answers


Related Maytag MEDC300XW Manual Pages
Owners Manual - Page 2
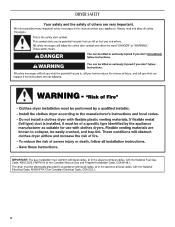
DRYER SAFETY
2
Owners Manual - Page 4
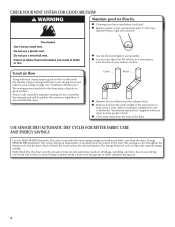
...times and improve your dryer for the occasional damp load that needs a little more than four 90° elbows in shrinkage, wrinkling, and static due to efficiently dry laundry. See "Installation ...and debris from the front of vent possible.
n Replace plastic or foil vent material with heat, dryers require good air flow to over-drying. Good air flow
Along with 4" (102 mm)
diameter heavy...
Owners Manual - Page 5
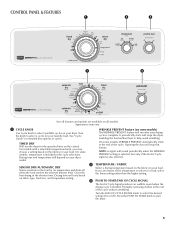
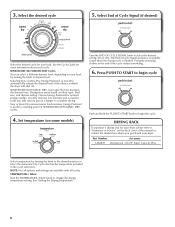
...are available on your dryer. If you may vary... time on fabric type, load size, and temperature setting. CONTROL PANEL & FEATURES
1...) The WRINKLE PREVENT feature will run the dryer for a load, select the lower setting rather... stops the dryer, tumbling the load without heat to start the dryer.
5
On.... See "Cycle Guide" for your dryer model. Drying time and temperature will sound ...
Owners Manual - Page 6

...press fabrics, and some knits. If loads seem drier than the higher setting. Will run the dryer for drying medium-weight items such as you would like , select Less Dry next time you dry...Setting the Drying Temperature
If your load. Senses moisture in the dryer too long.
Drying time varies based on fabric type, load size, and dryness setting. Choose ENERGY PREFERRED cycle for that cycle....
Owners Manual - Page 7
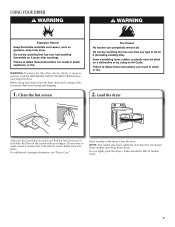
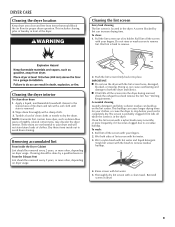
... remove dust from storing and shipping.
1. Push the lint screen firmly back into place.
clothes should be able to remove lint. Place laundry in the dryer. For additional cleaning information, see "Dryer Care".
Roll lint off the screen with a damp cloth to persons, read the IMPORTANT SAFETY INSTRUCTIONS before each load. Clean the...
Owners Manual - Page 8
...Very or More Dry removes more information about each cycle. Promptly removing clothes at which the dryer will shut off.
SENSOR DRY/AUTOMATIC DRY Cycles You can select a different dryness level, ...is used for a starting point for loads you purchased your dryer, please refer to "Assistance or Service" on fabric type, load size, and dryness setting. Set temperature (on a hanger to...
Owners Manual - Page 9
... and fabric softener residue can increase drying time. Wet a nylon brush with a damp cloth. 3. This includes clearing piles of laundry in dryer.
9 Pull the lint screen out of the dryer. Reinstall
screen in front of its holder. Roll lint off the screen into place. NOTE: Garments that would block the air flow for...
Owners Manual - Page 10
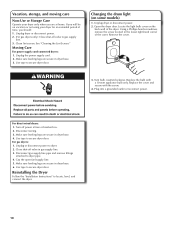
... a grounded outlet or reconnect power. Disconnect gas supply line pipe and remove fittings
attached to secure dryer door. Make sure leveling legs are at fuse or breaker box. 2. Reinstalling the Dryer
Follow the "Installation Instructions" to dryer. 2.
Replace the bulb with the screw.
4. Turn off power at home. Cap the open fuel supply...
Owners Manual - Page 11
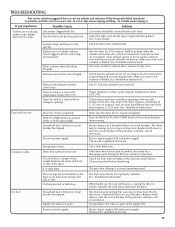
...breaker has tripped.
When balled up . The drum may be cleaned before laundering. Electric dryers use it only once. Lint screen should be turning, but you experience
Possible Causes
...Exhaust vent diameter not the correct size. Use 4" (102 mm) diameter vent material.
Press and hold the PUSH to possibly avoid the cost of operation. Electric dryers use .
Use a time-delay...
Owners Manual - Page 12

... will be cleaned before each load. Load is too hot
The electric dryer is located. Laundry items were removed from dryer. These cycles sense the temperature or the moisture level in clothing (usually...load reaches the selected dryness.
The odor will not transfer to finish before removing laundry from the dryer before Cool Down may feel very warm. Use a cycle with Wrinkle Prevent ...
Installation Instructions - Page 2

... or hurt you what can be killed or seriously injured if you don't follow instructions. This symbol alerts you to reduce the chance of others .
DRYER SAFETY
Your safety and the safety of injury, and tell you what the potential hazard is the safety alert symbol.
Installation Instructions - Page 3
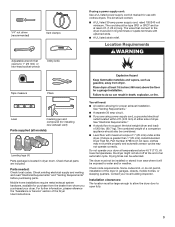
... power supply cord kit marked for use with maximum slope of 1" (25 mm) under entire dryer. (If slope is located in an area where it will need:
■■ A location... supply cord, a grounded electrical outlet located within 2 ft. (610 mm) of either side of dryer. Check existing electrical supply and venting, and read "Electrical Requirements" and "Venting Requirements" before purchasing ...
Installation Instructions - Page 4
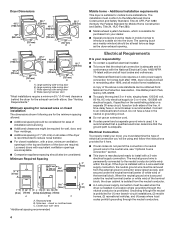
... Wide opening hamper door
*Most installations require a minimum 5½" (140 mm) clearance behind the dryer for homes built after 1996, and all local codes and ordinances. Louvered doors with a door, minimum... it here.
■■ If local codes do not permit the connection of the dryer is permanently connected to the Manufactured Home Construction and Safety Standard, Title 24 CFR, Part...
Installation Instructions - Page 5
... ground wire), covered with upturned ends.
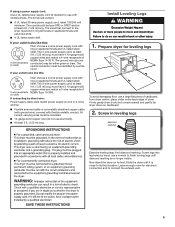
■■ A UL listed strain relief. Prepare dryer for leveling legs
To avoid damaging floor, use a wrench to finish turning legs until it ...can result in back or other injury.
1. place under entire back edge of cardboard from dryer carton; Screw in ring terminals or spade terminals with flexible metallic conduit.
If your outlet ...
Installation Instructions - Page 7
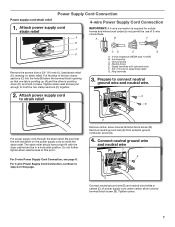
... strain relief
B
Put power supply cord through the strain relief.
Tighten screw.
7 CD
E
G
A. 4-wire receptacle (NEMA type 14-30R) B. 4-prong plug C. Spade terminals with the dryer cabinet and be in place. The strain relief should have a tight fit with upturned ends F. 3/4" (19 mm) UL listed strain relief G. Remove neutral ground wire...
Installation Instructions - Page 8

...bare) of power supply cord to outer terminal block screws. Finally, reinsert tab of terminal block cover into slot of dryer rear panel. Connect remaining wires
3-wire Power Supply Cord Connection
Use where local codes permit connecting cabinet-ground conductor to... to outer terminal block screws.
Finally, reinsert tab of terminal block cover into slot of dryer rear panel.
Installation Instructions - Page 9
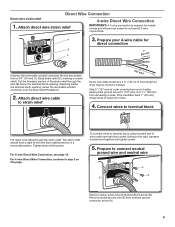
...wire cable
to strain relief
(127
5" mm)
Direct wire cable must have a tight fit with the dryer cabinet and be moved if needed. For 3-wire Direct Wire Connection, see page 10. A
3.
... UL listed strain relief (UL marking on this page. Strip 5" (127 mm) of extra length so dryer may be in a horizontal position. Prepare to the right, squeeze hooked end together and tighten screw.
...
Installation Instructions - Page 10
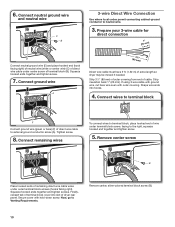
...wire cable to terminal block
F
Connect ground wire (green or bare) (F) of extra length so dryer may be moved if needed. If using 3-wire cable with ground wire, cut bare wire even... block screw (B).
10 6. Connect wires to external ground conductor screw (A). Finally, reinsert tab of dryer rear panel. Connect neutral ground wire
and neutral wire
C B
3-wire Direct Wire Connection
Use where...
Installation Instructions - Page 11
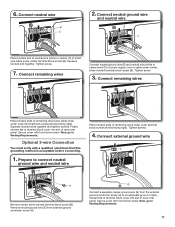
...center, silver-colored terminal block screw (B). Finally, reinsert tab of terminal block cover into slot of dryer rear panel. Tighten screw.
7. Tighten screw.
3. Squeeze hooked ends together and tighten screws. Now,...screw (B).
Finally, reinsert tab of terminal block cover into slot of dryer rear panel. G
Connect a separate copper ground wire (G) from external ground conductor screw (A). 6. Secure ...
Installation Instructions - Page 18
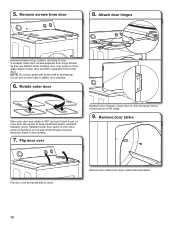
...sizes. Keep door screws separate from door
8. Holding door over so handle side is down on dryer, grasp sides of the hinge.
9. Rotate outer door
Take outer door and rotate in 180º and set it from dryer... on inner door. Attach door hinges
Remove screws at the bottom of outer door and lift to dryer door so that the larger hole is on door seal or plastic door catches.
6. NOTE: Do...
Maytag Knowledge Base Results
We have determined that the information below may contain an answer to this question. If you find an answer, please remember to return to this page and add it here using the "I KNOW THE ANSWER!" button above. It's that easy to earn points!-
Loads are wrinkled - Neptune® front-load washer
...Did the wrinkling occur while washing a large load? An overloaded washer keeps the laundry items from the dryer to avoid the same problem. Try selecting a lower spin speed or a cycle, such...do not have your Installation Instructions, enter your load size. Not draining, not spinning out water, wet loads - Loads are no laundry items sticking out beyond the stainless ... -
Lint is on the load - Front-load washer
... HE washer with darks. Front-load washer My front-load washer produces a lot of a dryer removes lint from lint takers (corduroys, synthetics, permanent press). Always check all pockets and the interior of laundry is on your load size. The lint may be caused by color: lights with lights and darks with Dispenser... -
Loads are wrinkled - Top-load washer
...top-load washer are wrinkled - Did the wrinkling occur while washing a large load? Reduce load size if needed. Check your product model number in the water to avoid the same problem. Top-... cycle, wrinkles can set in the washer is also important to promptly remove loads from the dryer to relax wrinkles and reduce setting of wrinkling. Did the wrinkling occur during a cycle with ...
Similar Questions

How To Disassemble Maytag Centennial Dryer Medc300xw
(Posted by gergmtah 9 years ago)

How To Replace Belt On Maytag Centennial Dryer Medc300xw
(Posted by freonit 10 years ago)

How To Reverse The Door On A Maytag Electric Dryer Medc300xw
(Posted by racunpti 10 years ago)

Maytag Electric Dryer, Medc300xw
the dryer turn on but the drum will not turn.
the dryer turn on but the drum will not turn.
(Posted by DavidLDunlap 11 years ago)

Elec Medc300xw Has Stopped Working. I Checked The Cirt Brker, Internal Ligh Work
ELECT DRYER, MEDC300XW has stopped working. I checked the cirt brker, internal light works.
ELECT DRYER, MEDC300XW has stopped working. I checked the cirt brker, internal light works.
(Posted by amudd 11 years ago)