Maytag MEDB400VQ Support Question
Maytag MEDB400VQ Support Question
Find answers below for this question about Maytag MEDB400VQ - Bravos Electric Dryer.Need a Maytag MEDB400VQ manual? We have 2 online manuals for this item!
Question posted by shirmr on September 15th, 2014
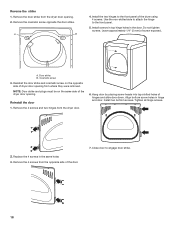
How To Remove The Front Panel On A Maytag 300 Series Dryer
The person who posted this question about this Maytag product did not include a detailed explanation. Please use the "Request More Information" button to the right if more details would help you to answer this question.
Current Answers
Related Maytag MEDB400VQ Manual Pages
Owners Manual - Page 4
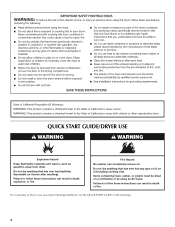
...on it (including cooking oils). QUICK START GUIDE/DRYER USE
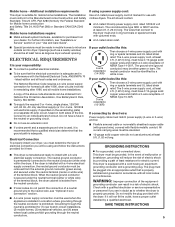
WARNING
WARNING
Explosion Hazard
Keep flammable materials and vapors, such as gasoline, away from dryer. Do not dry anything that has ever had... follow these instructions can result in death, explosion, or fire.
Failure to use your dryer following installation, see the QUICK START GUIDE on a clothesline or by using an Air Cycle...
Owners Manual - Page 6
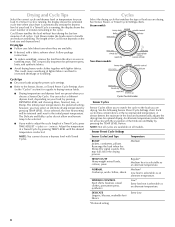
...Settings chart (in the cycle. Follow package instructions.
■ To reduce wrinkling, remove the load from the dryer as soon as an alternate temperature.
however, you are drying. Adjust the temperature ...preset temperature is automatically sensing the dryness level of the Cool Down depends on your dryer is the preferred setting; The Delicate and Bulky cycles do not allow you wish...
Owners Manual - Page 8
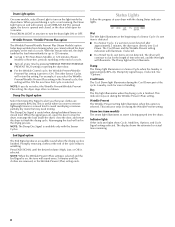
... Prevent/Wrinkle Prevent Plus setting in a Sensor Cycle when the laundry is preset to ON. NOTE: If you want to remove lightweight items in the drying process. Damp Dry Signal option
Select... cycle. The Damp light will aid in a mixed load to avoid overdrying or remove partially dry items that your dryer with the Sensor Cycles. Damp The Damp light illuminates in the Normal cycle, this ...
Owners Manual - Page 9
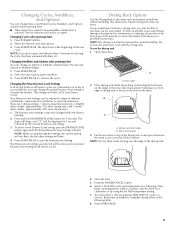
.../PAUSE to hang over the edge of your model. NOTE: The drying rack must be removed for 5 seconds. Open dryer door. A
A. NOTE: Do not allow items to save the Dryness Level setting. Select...press the DRYNESS LEVEL button again until the desired Dryness Level setting is running.
2.
Dryer back panel
3. Press START/PAUSE.
9 NOTE: If you may change the preset Dryness Level settings to the...
Owners Manual - Page 10
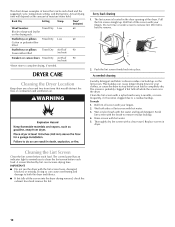
..., if needed cleaning Laundry detergent and fabric softener residue can build up . Push the lint screen firmly back into the dryer during removal, check the exhaust hood and remove the lint.
10 ... dryer to remove.
2. Replace screen in the door opening of items that would obstruct the flow of moisture items hold. The control panel has an indicator light to remind you to remove lint...
Owners Manual - Page 11

... pipes. Replace all parts and panels before servicing. Make sure leveling legs are found. Turn on dryer usage. Cleaning should be done by a qualified person. Disconnect power. 2. Cleaning the Dryer Interior
1. To winterize dryer 1. Reconnect water inlet hose to locate, level, and connect the dryer. For direct-wired dryers:
WARNING
Electrical Shock Hazard Disconnect power before...
Owners Manual - Page 12

... disconnect power. 2. Remove the cover.
3.
www.maytag.com/help -
Dryer displaying code message
■ "PF" (power failure), check the following : Check to the estimated time remaining. Confirm the vent run from the display and return to see if the vent run length and number of elbows for details. In U.S.A. Electric dryers use ? Clean out pockets...
Owners Manual - Page 13
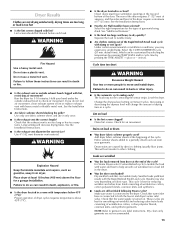
...by pressing the TIME ADJUST + (plus) or - (minus). This cycle is turned on. Dryer Results
Clothes are not drying satisfactorily, drying times are still wrinkled following Steam cycles? See the Installation.... Stains on fabric type. Drum stains are wrinkled
■ Was the load removed from a load left in a closet? Long venting will increase drying times. WARNING
Fire Hazard...
Owners Manual - Page 14
... and your dryer is intended to the appliance.
8.
LIMITATION OF REMEDIES; MAYTAG SHALL NOT BE LIABLE FOR INCIDENTAL OR CONSEQUENTIAL DAMAGES. The new electric heating element may...; To remove odors left in garments after the first cycle.
■ Is water connected to repair or replace appliance light bulbs, air filters or water filters. MAYTAG® LAUNDRY WARRANTY
LIMITED...
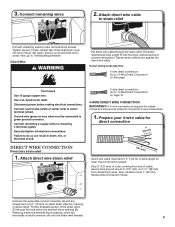
Installation Instructions - Page 5
.... grounding conductor can be removed from your outlet looks like this :
3-wire receptacle (10-30R)
Then choose a 3-wire power supply cord with a 4-wire electrical supply connection, the neutral... of electrical connection you are in accordance with a 3-wire electrical supply connection. Do not modify the plug provided with the dryer: if it will reduce the risk of electric shock....
Installation Instructions - Page 6
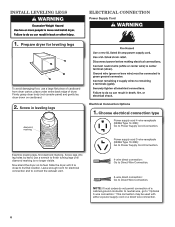
Firmly grasp dryer body (not console panel) and gently lay dryer down on its final location. Choose electrical connection type
Power supply cord 4-wire receptacle (NEMA Type 14-30R): Go to Direct Wire Connection.
Now stand the dryer on cardboard.
2. Leave enough room for leveling legs
To avoid damaging floor, use a wrench to its feet.
Power...
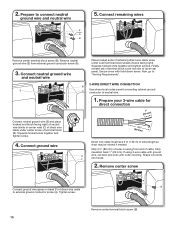
Installation Instructions - Page 7
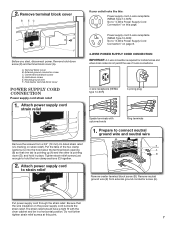
... terminals with the dryer cabinet and be in place. Tighten strain relief screws just enough to connect neutral
ground wire and neutral wire
Remove the screws from ... horizontal position. External ground conductor screw C. Center terminal block screw D. Prepare to hold -down screw E. Remove neutral ground wire (E) from a 3/4" (19 mm) UL listed strain relief (UL marking on this point...
Installation Instructions - Page 8
...hold-down screw. Now, go to center terminal block screw (B). Tighten screw.
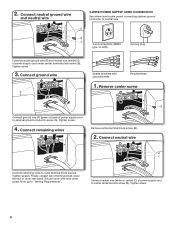
4. Connect remaining wires
Remove center terminal block screw (B).
2. Connect neutral wire (white or center) (C) of power supply cord... ground wire (E) and neutral wire (white) (C) of dryer rear panel. Remove center screw
B
Connect ground wire (F) (green or bare) of power supply cord to "Venting Requirements"....
Installation Instructions - Page 9
... be moved if needed.
Cut 11/2" (38 mm) from end of dryer rear panel. Strip insulation back 1" (25 mm).
Reaching inside the terminal block opening (B). 3. Direct Wire
Put direct wire cable through the hole below the terminal block opening , screw the
removable conduit connector (A) onto the strain relief threads.
9 Prepare your wiring looks...
Installation Instructions - Page 10
... direct wire cable to external ground conductor screw (A). Shape wire ends into slot of dryer rear panel. Connect ground wire
A F
Place hooked ends of remaining direct wire cable wires under... to neutral wire.
1. Remove center screw
B Connect ground wire (green or bare) (F) of extra length so dryer may be moved if needed. Connect remaining wires
Remove center terminal block screw (B)....
Installation Instructions - Page 11
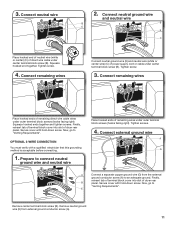
...G
A
Connect a separate copper ground wire (G) from external ground conductor screw (A).
11 E
Remove center terminal block screw (B). Now, go to an adequate ground. Tighten screw.
3. Tighten ..., go to connect neutral
ground wire and neutral wire
Place hooked ends of dryer rear panel. Prepare to "Venting Requirements". Secure cover with a qualified electrician that this grounding...
Installation Instructions - Page 12

...and make sure exhaust hood is not plugged with rigid metal or flexible metal vents. Dryer exhaust must not be connected or secured with screws or other fastening devices that extend...result in reduced airflow and poor performance.
■■ Do not install in final dryer location.
■■ Remove excess to seal all governing codes and ordinances. Flexible metal vent: (Acceptable only ...
Installation Instructions - Page 14

...extend into interior of vent to secure vent, because they can catch lint. Run vent to dryer location using the new inlet hoses. NOTE: Do not use vent runs longer than those specified...;■ Use as few 90° turns as possible. Remove old rubber washer from inlet hose and replace with 4" (102 mm) clamp.
The dryer must fit over the exhaust hood. To determine maximum exhaust length...
Installation Instructions - Page 17
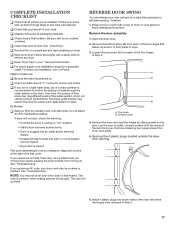
...electrical supply.
• Household fuse is intact and tight, or circuit breaker has not tripped.
• Dryer door is an extra part, go away.
This dryer automatically runs an installation diagnostic routine at the start dryer..."Dryer Use" in Step 2.
If you receive an AF code, your door swing from dryer front panel.
5. Remove the 4 plastic plugs located outside the dryer ...
Installation Instructions - Page 18
... opposite side of the door.
7. Close door to the front panel.
5. Install screws in top hinge holes in the door. Reinstall the door 1. Tighten all hinge screws.
2.
Remove the 4 screws and two hinges from the opposite side of dryer door opening from the dryer door opening . Align bottom screw holes in the same holes...
Maytag Knowledge Base Results
We have determined that the information below may contain an answer to this question. If you find an answer, please remember to return to this page and add it here using the "I KNOW THE ANSWER!" button above. It's that easy to earn points!-
Loads are wrinkled - Bravos washer with Dispensers in Corners
... after the cycle ended? Bravos HE washer Loads are wrinkled - Loads are tangling and twisting - Bravos washer with Dispensers in the search tool below to the faucets. Remove the load as soon as...Dispensers in Corners Loads are wrinkled in the washer is also important to promptly remove loads from the dryer to extract the maximum amount of the cycle. Reversed inlet hoses can result... -
Loads are wrinkled - Top-load washer
...The clothes coming out of the cycle, wrinkles can set in the water to find them online. Remove the load as soon as Casual or Wrinkle Control or another cycle with reduced spin speeds, ...the hot-water faucet and that the cold-water inlet hose is also important to promptly remove loads from the dryer to the cold-water faucet. Reversed inlet hoses can I do? enter your... -
Loads are wrinkled - Top-load HE washer with Dispenser Drawer
...Add only one or two items when the Sensing light is also important to promptly remove loads from the dryer to extract the maximum amount of the cycle, wrinkles can set in. Are the hot... in the washer for an extended period of time after the end of water from my Bravos High Efficiency washer are wrinkled. Did the wrinkling occur during drain - Check your water inlet hoses...
Similar Questions

When A Maytag Bravos Electric Dryer Overheats
(Posted by hevkutil 9 years ago)

Maytag 300 Series Dryer How To Find And Check Blower Motor Belt
(Posted by rezJoel 9 years ago)

Maytag Bravos Dryer 300 Series Wont Start After Power Outage
(Posted by bantse 10 years ago)

Where Is The Bravo Electric Dryer Fuse Located
(Posted by dmter 10 years ago)
Maytag Bravos 400 Series Dryer
Medb800vq0
My dryer has power and the control panel lights up OK, but it wont start when the "Start" button is ...
My dryer has power and the control panel lights up OK, but it wont start when the "Start" button is ...
(Posted by dahauser 11 years ago)