Maytag MED9700SQ Support Question
Maytag MED9700SQ Support Question
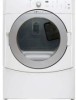
Find answers below for this question about Maytag MED9700SQ - 27" Front-Load Electric Dryer.Need a Maytag MED9700SQ manual? We have 1 online manual for this item!
Question posted by lpkrauss on September 23rd, 2012
Med9700sq0 - Status Lights Come On, Beeps, But Won't Start.
Thermal Fuse is good. What next? Belt Switch seems to be good too. Worked fine for first load...put new load in and then it started doing this! Help!
Current Answers
Related Maytag MED9700SQ Manual Pages
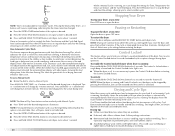
Use and Care Guide - Page 3

...load. ■ Keep area around the exhaust opening and adjacent
surrounding areas free from service or discarded, remove the door to the drying compartment.
■ Do not reach into the dryer if the drum is the safety alert symbol.
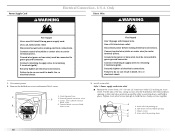
IMPORTANT SAFETY INSTRUCTIONS
WARNING: To reduce the risk of fire, electric... shock, or injury to persons when using the dryer, follow the ...
Use and Care Guide - Page 4

...cm) pedestal or a 15.5" (39.4 cm) pedestal with clothes dryers. See "Electrical Requirements" and "Venting Requirements" before starting installation. For further information, please refer to place the 10" (...need to the total height of the dryer for a total height of different heights separately for installing new exhaust vent)
■ Tin snips (new vent installations)
■ ¼" nut...
Use and Care Guide - Page 5

...." ■ A sturdy floor to open fully.
38" (96.52 cm)
*31½" (80 cm)
27" (68.6 cm)
*Most installations require a minimum 5" (12.7 cm) clearance behind the dryer for proper exhaust installation. If using a power supply cord, a grounded electrical outlet located within 2 ft
(61 cm) of either side of a companion appliance should also be...
Use and Care Guide - Page 6
....
6
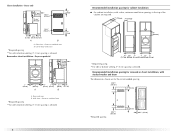
Recommended installation spacing for the recommended spacing.
48 in.2 * (310 cm2)
3"* (7.6 cm)
*Required spacing
24 in .2* (155 cm2)
1"* 31½" 5"** (2.5 cm) (80 cm) (12.7 cm)
A
B
A.
Dryer on pedestal
3"* (7.6 cm)
14" max.* (35.6 cm)
18" min.* (45.72 cm)
1" (2.5 cm)
27" (68.6 cm)
A
1"
1"*
(2.5 cm) (2.5 cm)
31½" (80 cm)
B
5"** (12.7 cm)
A. Closet installation -
Use and Care Guide - Page 7

...dryer is prohibited for (1) new branch-circuit installations, (2) mobile homes, (3) recreational vehicles, and (4) areas where local codes prohibit grounding through the neutral conductors.
7 The opening . U.S.A. The National Electric... fuse or circuit breaker is permanently connected to introduce outside air into the dryer. Do not have a fuse in conformance with a 4-wire electrical ...
Use and Care Guide - Page 8
... Type 14-30R. The wires that is properly grounded. GROUNDING INSTRUCTIONS
■ For a grounded, cord-connected dryer: This dryer must be grounded. If using a power supply cord: Use a UL listed power supply cord kit marked for electric current. If your outlet looks like this :
3-wire receptacle (10-30R)
Then choose a 3-wire power supply...
Use and Care Guide - Page 9
... a CSA International Certified Power Cord intended to an individual branch circuit.
■ This dryer is equipped with a cord having an equipmentgrounding conductor and a grounding plug.
A time-delay fuse or circuit breaker is 5 ft (1.52 m) in accordance with the Canadian Electrical Code, C22.1-latest edition and all local codes and ordinances. GROUNDING INSTRUCTIONS
■...
Use and Care Guide - Page 10
...and the other is pointing down, and hold in place.
Securely tighten all electrical connections.
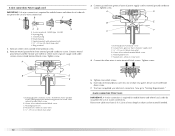
Connect neutral wire (white or center wire) to green ground connector....
Terminal block cover and holddown screw
A
3. Power Supply Cord
Electrical Connection - Only
Direct Wire
WARNING
WARNING
Fire Hazard
Use a new UL listed 30 amp power supply cord.
Connect neutral wire (white...
Use and Care Guide - Page 11

...: Direct Wire
A UL listed, 120/240volt minimum, 30-amp, dryer power supply cord*
3-wire connection: Power supply cord
3-wire direct
3¹⁄₂" (8.9 cm)
A fused disconnect or circuit breaker box*
3-wire connection: Direct Wire
*If local codes do not permit the connection of electrical connection: 4-wire (recommended)
3-wire (if 4-wire is inside the...
Use and Care Guide - Page 12
... wire (white or center wire)
4. Tighten screws. Neutral ground wire
D.
Direct wire cable must have completed your electrical connection. B
F
A
CD
E
G
A. 4-wire receptacle (NEMA type 14-30R) B. 4-prong plug C..... Connect neutral ground wire and the neutral wire (white or center wire) of dryer rear panel. Connect ground wire (green or bare) of 3-wire connections. External ...
Use and Care Guide - Page 13
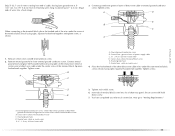
...screw of power supply cable C. ¾" (1.9 cm) UL listed strain relief D.
Dotted line shows position of dryer rear panel. Neutral wire (white or center wire)
4. B
A C
A. D
5. E
down screw....13 Strip insulation back 1" (2.5 cm). Tighten screw. You have completed your electrical connection. Shape
ends of wires into slot of NEUTRAL ground wire before being moved to ...
Use and Care Guide - Page 18
....6 m)
Flexible metal
27 ft (8.2 m)
19 ft (5.8 m)
3
Rigid metal
35 ft (10.7 m)
29 ft (8.8 m)
Flexible metal
25 ft (7.6 m)
17 ft (5.2 m)
4
Rigid metal
27 ft (8.2 m)
21... systems come in the Vent system chart.
Exhaust systems longer than those specified will help to... purchase. Over-the-top installation (also available with dryer vent to wall vent mismatch):
Part Number 4396037 ...
Use and Care Guide - Page 22

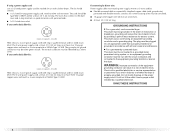
... packaging materials. 4. When the dryer has been running or "On" position. ■ Start button has been pushed firmly. ■ Dryer is plugged into a grounded outlet and/or electrical supply is on. ■ Household fuse is first heated.
Check that the dryer is not crushed or kinked. 5. Turn on the dryer. 8. Wipe the dryer drum interior thoroughly with a damp...
Use and Care Guide - Page 23

... The time displayed is an estimated length of fire, electric shock, or injury to follow these instructions can result in dryer and shut door.
3.
Follow these instructions can completely... that has ever had any type of the load and adjusts the time automatically for more detailed information.
1.
Please refer to start your dryer. See "Cleaning the Lint Screen."
2. Items...
Use and Care Guide - Page 24
... door and press and hold HOLD TO START button until the desired temperature illuminates. If the cycle is interrupted for 3 seconds to press the Control On button before restarting the dryer. The control is locked when a single beep is heard and the Control Locked status light is on , the dryer can be adjusted. If an Automatic...
Use and Care Guide - Page 25
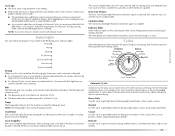
... your dryer with Manual Cycles. Extra Care Feature The Extra Care feature light illuminates when this cycle to get Medium heat for drying no -iron finishes.
25 Each cycle dries certain fabrics at the recommended temperature. NOTE: You cannot choose a Dryness Level with the drying status indicator lights. Status Lights
You may follow the progress of load...
Use and Care Guide - Page 27
...of moisture items hold ) HOLD TO START button (about 1 second). B
A
A.
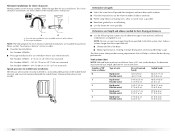
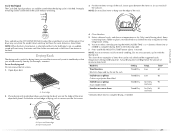
Your dryer may vary from the model shown and may not have the same feature as needed . Open dryer door. Actual drying time will depend on...of the rack. Refer to adjust the sound level or turn off the signal.
Dryer back panel
27 Cycle End Signal
The Cycle End Signal produces an audible sound when the drying ...
Use and Care Guide - Page 29
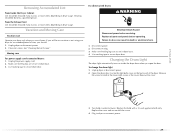
... "Cleaning the Lint Screen." Use masking tape to do so can result in death or electrical shock.
1. Failure to secure dryer door. Use masking tape to secure dryer door. To change the drum light 1. Remove
the screw located in dryer or reconnect power.
29 Remove the cover.
3. Plug in the lower right corner of the...
Use and Care Guide - Page 30
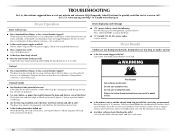
... that both fuses are too long, or load is the dryer level front to back and side to check air movement. If the problem continues, call an electrician. Electric dryers require 240-volt power supply. If the dryer hasn't been used ? Use a time-delay fuse.
■ Is the dryer door firmly closed?
■ Was the Start button firmly pressed...
Use and Care Guide - Page 33
... After checking "Troubleshooting," additional help you obtain assistance or service if you ever... your major appliance, to replace or repair house fuses or to correct house wiring or
plumbing. 2. ... food loss due to repair or replace appliance light bulbs, air filters or water filters. This... to instructions attached to or furnished with electrical or plumbing codes, or use of
products...
Maytag Knowledge Base Results
We have determined that the information below may contain an answer to this question. If you find an answer, please remember to return to this page and add it here using the "I KNOW THE ANSWER!" button above. It's that easy to earn points!-
Washer will not fill - Front-load Epic® washer
... press Start. it , if necessary. Front-load washer Check to see if the hot and cold water faucets are turned on a fuse box, check to unlock. If so, reset the circuit breaker or Ground Fault Circuit Interrupt. If the washer is on . Are the water-inlet valve screens on ? Is Control Locked status light on... -
Washer will not fill or start - Bravos washer with agitator
...Interrupt. If the washer is not opened and closed again to start a new cycle. If the lid is on . Check the ...nbsp;senses the size of the load and adds the correct amount of water for one second? Has a household fuse blown, or has a circuit breaker.... Washer will start - Do not use short soaks (no wash action) to the right. Is the Delay Wash status light on? (on... -
Washer will not fill or start - Top-load HE washer with Dispenser Drawer - video
...operate with Dispensers in Corners Not draining, not spinning out water, wet loads - Are the water inlet valve screens on a fuse box, check to see if a household circuit breaker or Ground Fault ...before locking again. Press and hold Start for draining. As long as a status light is wet, there may also pause for one second. Once the load is on ? Washer will not fill...
Similar Questions

Check Lint Light Comes On
My Maytag MGDB725BW0 is not working properly. When ready to start the dryer the led reads 40 minutes...
My Maytag MGDB725BW0 is not working properly. When ready to start the dryer the led reads 40 minutes...
(Posted by eid00 4 years ago)

Med9700sq Dryer Lights On But Will Not Start
(Posted by Mjaimann 9 years ago)

Maytag Epic Dryer Sensing Light Stays On Will Not Start Cycle
(Posted by rogeronghw 9 years ago)

Maytag Electric Dryer Med9700sb0 Lights Come On But Dryer Wont Start
(Posted by rontal 9 years ago)
The Sensing Light Comes On And It Clicks Once But Dryer Wont Start
what part is that and how much is the parts
what part is that and how much is the parts
(Posted by kkato67 13 years ago)