Maytag MED9700SQ Support Question
Maytag MED9700SQ Support Question
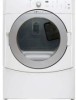
Find answers below for this question about Maytag MED9700SQ - 27" Front-Load Electric Dryer.Need a Maytag MED9700SQ manual? We have 1 online manual for this item!
Question posted by Mjaimann on June 28th, 2014
Med9700sq Dryer Lights On But Will Not Start
The person who posted this question about this Maytag product did not include a detailed explanation. Please use the "Request More Information" button to the right if more details would help you to answer this question.
Current Answers
Related Maytag MED9700SQ Manual Pages
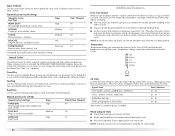
Use and Care Guide - Page 3

... solvents, or other flammable or explosive substances as they give off vapors that could cause a load to catch fire.
■ Do not dry articles that have provided many important safety messages in...followed. IMPORTANT SAFETY INSTRUCTIONS
WARNING: To reduce the risk of fire, electric shock, or injury to persons when using the dryer.
■ Do not place items exposed to reduce the chance of...
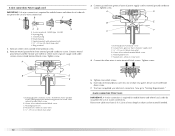
Use and Care Guide - Page 4

... that connect to the "Assistance or Service" section. You may select a 10" (25.4 cm) pedestal or a 15.5" (39.4 cm) pedestal with clothes dryers. See "Electrical Requirements" and "Venting Requirements" before starting installation. The kit should be
type SRD or SRDT and be at least 9" (22.9 cm) above the floor.
4 Leveling legs
NOTE: Do...
Use and Care Guide - Page 5

... circuit. ■ If you will need to water and/or weather. See "Electrical Requirements." ■ A sturdy floor to open fully.
38" (96.52 cm)
*31½" (80 cm)
27" (68.6 cm)
*Most installations require a minimum 5" (12.7 cm) clearance behind the dryer for the exhaust vent with a door, minimum ventilation openings in death, explosion...
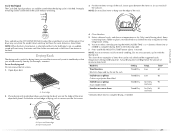
Use and Care Guide - Page 6
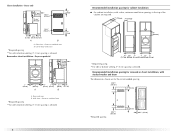
... in the top of the
cabinet are for cabinet installation ■ For cabinet installation, with stacked washer and dryer
The dimensions shown are required.
7"* (17.8 cm) 7"* (17.8 cm)
9"* (22.9 cm)
5"** 31¹ ₂" 1"*
1" 27" 1"
(12.7 cm) (80.0 cm) (2.5 cm) (2.5 cm)(68.6 cm) (2.5 cm)
*Required spacing **For side or bottom venting, 0" (0 cm) spacing...
Use and Care Guide - Page 7

... all mobile home installations. 6"* (15.2 cm)
76" (193 cm)
*Required spacing
5"* (12.7 cm)
1" (2.5 cm)
27" (68.6 cm)
1" (2.5 cm)
Mobile home - The National Electric Code requires a 4-wire power supply connection for mobile home installations.
Additional installation requirements
This dryer is prohibited.
Do not have a fuse in the neutral or grounding circuit.
■ Do not...
Use and Care Guide - Page 8
...-30R. The kit should be
type SRD or SRDT and be plugged into an appropriate outlet that connect to whether the dryer is properly installed and grounded in a risk of electric shock by a qualified electrician. The cord should contain: ■ A UL listed 30-amp power supply cord, rated 120/240 volt minimum...
Use and Care Guide - Page 9
... is 5 ft (1.52 m) in the "Assistance or Service" section. It is recommended that you are in death or electrical shock. This dryer is equipped with the dryer: if it is your responsibility ■ To contact a qualified electrical installer.
■ To be plugged into a grounded 4 prong outlet.
SAVE THESE INSTRUCTIONS
4-wire receptacle 14-30R
■...
Use and Care Guide - Page 11

...(1.9 cm) UL
listed strain relief (UL marking on the power supply cord is not available)
Electrical Connection Options
If your home has:
And you will be in a horizontal position. A B... or circuit breaker box*
4-wire connection: Direct Wire
A UL listed, 120/240volt minimum, 30-amp, dryer power supply cord*
3-wire connection: Power supply cord
3-wire direct
3¹⁄₂" (8.9 cm)
A...
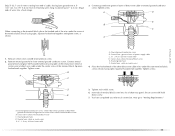
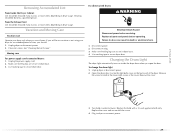
Use and Care Guide - Page 12
...terminals with hold- Ring terminals
1.
A
D
B
E
C
F
A. Dotted line shows position of dryer rear panel. Center silver-colored terminal block screw
C. Insert tab of terminal block cover into slot of...of extra length so dryer can be moved if needed.
12 Now go to center silvercolored terminal block screw. Direct wire cable must have completed your electrical connection. Ground prong ...
Use and Care Guide - Page 13
... of wires into slot of cable, leaving bare ground wire at 5" (12.7 cm). Remove neutral ground wire from end of dryer rear panel. Connect neutral
ground wire and place the hooked end (hook facing right) of the neutral wire (white or center ... terminal block screw E.
Cut 1¹⁄₂" (3.8 cm) from 3 remaining wires. Tighten screws. You have completed your electrical connection.
Use and Care Guide - Page 14

...Strip 3¹⁄₂" (8.9 cm) of outer covering from end of dryer rear panel. A.
C A
B
D
E
3. Direct wire cable must have completed your electrical connection. Neutral wire (white or center wire) E 1.9 cm) UL...power supply cord to neutral wire. You have 5 ft (1.52 m) of extra length so dryer can be moved if needed. Neutral (white or center wire)
1. Neutral ground wire C....
Use and Care Guide - Page 22

Complete Installation
1. For direct wire installation, turn off the dryer and check the following : ■ Controls are set in a running or "On" position. ■ Start button has been pushed firmly. ■ Dryer is plugged into a grounded outlet and/or electrical supply is on. ■ Household fuse is an extra part, go away.
22 Turn on...
Use and Care Guide - Page 23

...electric shock, or injury to persons, read the IMPORTANT SAFETY INSTRUCTIONS before or after washing). Place laundry in death or fire. Rotate the dial to be dried on it (even after each cycle.
Failure to start your dryer. See "Cleaning the Lint Screen."
2. Your dryer... Select DRYNESS LEVEL to adjust how dry you want the load to select either an Automatic or Manual Cycle then press ...
Use and Care Guide - Page 24
...On button before restarting the dryer.
The control is locked when a single beep is heard and the Control Locked status light is on the approximate load size, cycle, dryness ...; Press and hold HOLD TO START button until dryer starts (about 1 second). Cool Down tumbles the load without heat during dryer operation. Stopping Your Dryer
To stop the dryer and clear the settings, allowing ...
Use and Care Guide - Page 25
...item has not been detected within 10 minutes, the Sensing
light will remain on your dryer with Manual Cycles. Control Locked The Control Locked light illuminates when this cycle to get High heat for drying no.... Cycles
Select the drying cycle that the load has reached the damp dry level. The Wet light will turn on with Manual Cycles. Laundry is first turned on and the selected cycle...
Use and Care Guide - Page 26
... loads
High
27
Additional Features
Extra Care Feature When you are slow to "On."
Timed Dry
Use this cycle to complete drying, if needed.
Manual preset cycle settings Manual Cycles Load ...periodically tumbles, rearranges and fluffs the load to help smooth out wrinkles from such items as clothes packed in a suitcase or items wrinkled from the dryer as soon as it stops, wrinkles ...
Use and Care Guide - Page 27
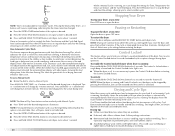
... dry (for normal tumbling. B
A
A. Dryer back panel
27 NOTE: Do not allow items to complete drying.
Your dryer may vary from the model shown and may ...START button (about 1 second). Put the wet items on the ledge of drying rack to adjust the sound level or turn off the signal.
Press and release the CYCLE END SIGNAL to secure over the edge of the rack. Open dryer...
Use and Care Guide - Page 29
... in dryer base. 4. Changing the Drum Light
The dryer light automatically turns on vacation or not using your dryer only when you are secure in the lower right corner of the dryer. Turn... supply cord. 2. Make sure leveling legs are secure in death or electrical shock.
1. Open the dryer door. Remove
the screw located in dryer base. 3. Replace the bulb with the screw.
4. See "Cleaning ...
Use and Care Guide - Page 30
... vibrate if not properly installed. In U.S.A. Use a time-delay fuse.
■ Is the dryer door firmly closed?
■ Was the Start button firmly pressed? Check that both fuses are too long, or load is the dryer level front to back and side to vibrate. www.maytag.com/help -
Electric dryers use 2 household fuses or circuit breakers.
Use and Care Guide - Page 31
... for a garage installation. See "Additional Features."
■ Is the load too large and heavy to move and install dryer. Add dryer fabric softener sheets at the top and bottom of the cycle? ■ Was the dryer overloaded? If so, ventilate the area.
The new electric heating element may not be gone after the first cycle...
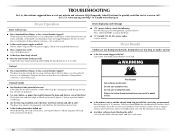
Maytag Knowledge Base Results
We have determined that the information below may contain an answer to this question. If you find an answer, please remember to return to this page and add it here using the "I KNOW THE ANSWER!" button above. It's that easy to earn points!-
Dryer does not heat - Electric dryer
... power supply cord is properly installed. The drum may be incorrectly installed. Review the Installation Instructions to the dryer. Electric dryers use 2 household fuses or circuit breakers. Dryer does not heat - The power supply cord may be found on the dryer? Gas dryer FAQs Knowledgebase search tips My dryer will not start Damp loads or long drying times - -
Compactor won't operate
Top-load washer My dryer will not start Washer will not fill or start - -
Washer will not fill or start - Top-load HE washer with Dispenser Drawer - video
...operate with Dispensers in the cycle? Check electrical source or call an electrician. Has a cycle been selected, but Start has not been selected and held for leaks. Top-load HE washer with dry items only. Washer... and remove the inlet hoses from the water inlet valve screens. Is the Delay Wash status light on a fuse box, check to see if the hot and cold water faucets are completed...
Similar Questions

Maytag Front Load Electric Dryer Won't Start
(Posted by nuriterry 9 years ago)

I Have A Maytag Front Loading Electric Dryer Model Med9600 Sq0. When I Attempt T
I have a Maytag front loading electric Dryer model MED9600 SQ0. When I attempt to start it by pressi...
I have a Maytag front loading electric Dryer model MED9600 SQ0. When I attempt to start it by pressi...
(Posted by wrzimmerly 10 years ago)

The Control Locked Light Is On And I Cannot Get My Dryer To Start. What Can I Do
The "control Locked" light is on and I can't start my dryer. Why is this occuring and how do I fix t...
The "control Locked" light is on and I can't start my dryer. Why is this occuring and how do I fix t...
(Posted by pipelayer30 11 years ago)
The Control Locked Light Is On And It Won't Let Me Start The Dryer
The control locked light is on and it won't let me start the dryer
The control locked light is on and it won't let me start the dryer
(Posted by hdachel 12 years ago)

The Sensing Light Comes On And It Clicks Once But Dryer Wont Start
what part is that and how much is the parts
what part is that and how much is the parts
(Posted by kkato67 13 years ago)