Maytag MED9700SQ Support Question
Maytag MED9700SQ Support Question
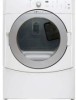
Find answers below for this question about Maytag MED9700SQ - 27" Front-Load Electric Dryer.Need a Maytag MED9700SQ manual? We have 1 online manual for this item!
Question posted by hdachel on July 2nd, 2011
The Control Locked Light Is On And It Won't Let Me Start The Dryer
The control locked light is on and it won't let me start the dryer
Current Answers
Related Maytag MED9700SQ Manual Pages
Use and Care Guide - Page 3

...this Use and Care Guide or in published user-repair instructions that could cause a load to potential hazards that can be killed or seriously injured if you don't follow ...are very important. Items contaminated with controls.
■ Do not repair or replace any part of fire, electric shock, or injury to play on your dryer. SAVE THESE INSTRUCTIONS
3
WARNING
You...
Use and Care Guide - Page 4

...drawer.
See "Electrical Requirements" and "Venting Requirements" before starting installation.
If using a power supply cord: Use a UL listed power supply cord kit marked for this dryer. To do... (recommended)
■ Tape measure
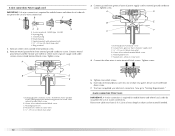
Parts supplied Remove parts packages from whom you placing the dryer on a pedestal. Parts needed Check local codes. The cord should contain: ■ A...
Use and Care Guide - Page 5

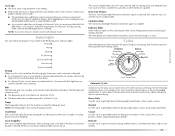
... allows for spacing of an automatic cycle. This dryer has been tested for proper exhaust installation. Dryer only
0" (0 cm)
38" min. (96.52 cm)
*Required spacing
1"* (2.5 cm)
27" (68.6 cm)
1"* (2.5 cm)
5
You will be exposed to water and/or weather. If using a power supply cord, a grounded electrical outlet located within 2 ft
(61 cm) of...
Use and Care Guide - Page 6
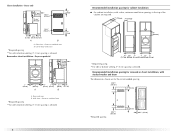
... ventilation openings in .2* (155 cm2)
1"* 31½" 5"** (2.5 cm) (80 cm) (12.7 cm)
A
B
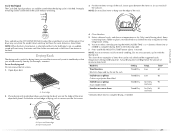
A. Closet door with stacked washer and dryer
The dimensions shown are required.
7"* (17.8 cm) 7"* (17.8 cm)
9"* (22.9 cm)
5"** 31¹ ₂" 1"*
1" 27" 1"
(12.7 cm) (80.0 cm) (2.5 cm) (2.5 cm)(68.6 cm) (2.5 cm)
*Required spacing **For side or bottom venting, 0" (0 cm) spacing...
Use and Care Guide - Page 7

... codes permit and a separate ground wire is used when the appliance is installed in mobile homes to the neutral conductor (white wire) within the dryer. Electrical Connection To properly install your dryer, you must determine the type of electrical connection you will be using and follow the instructions provided for homes built after 1996...
Use and Care Guide - Page 8
...grounding will not fit the outlet, have a proper outlet installed by providing a path of electric shock by a qualified electrician.
The cord should contain: ■ A UL listed 30...-30R)
Then choose a 3-wire power supply cord with clothes dryers. WARNING: Improper connection of electric shock. Do not modify the plug on the dryer. The 4-wire power supply cord, at least 4 ft (1....
Use and Care Guide - Page 9
... in doubt as to be grounded. grounding conductor can result in conformance with a CSA International Certified Power Cord intended to whether the dryer is adequate and in death or electrical shock. Electrical Shock Hazard
Plug into a standard 14-30R wall receptacle.
Canada Only
WARNING
If you are in accordance with a cord having an...
Use and Care Guide - Page 11

... Options
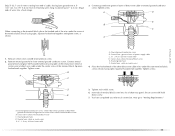
If your type of electrical connection: 4-wire (recommended)
3-wire (if 4-wire is inside the terminal block opening C. Hole below the terminal block opening. Be sure that the wire insulation on strain relief). A B
C
A. The strain relief should have a tight fit with the dryer cabinet and be in a horizontal position. Tighten strain relief...
Use and Care Guide - Page 12
... screw
C. Neutral ground wire
D. down screw. 7. Direct wire cable must have completed your electrical connection.
Center silver-colored terminal block screw E. Neutral wire (white or center wire)
4. ... screw. A C
3. Tighten screw. Connect ground wire (green or bare) of dryer rear panel. B. Tighten strain relief screws. 6. Ring terminals
1. Connect neutral ground wire...
Use and Care Guide - Page 13
...being moved to external ground conductor screw.
Shape
ends of wires into slot of dryer rear panel. C
1. Remove center silver-colored terminal block screw. 2. Connect ....
6. Neutral ground wire D.
Strip insulation back 1" (2.5 cm).
D
5. You have completed your electrical connection. Remove neutral ground wire from end of power supply cable C. ¾" (1.9 cm) UL listed...
Use and Care Guide - Page 14

... to outer terminal block screws. Strip 3¹⁄₂" (8.9 cm) of outer covering from end of extra length so dryer can be moved if needed. C A
B
D
E
3. Direct wire cable must have completed your electrical connection. Connect the other wires to neutral wire. Center silver-colored terminal block screw D. Tighten screws.
4. Loosen or remove...
Use and Care Guide - Page 15
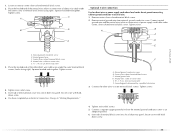
...the neutral wire (white or center wire) of dryer rear panel. Insert tab of terminal block cover into slot of dryer rear panel. Loosen or remove center silver-colored terminal...terminal block screws (hooks facing right). Secure cover with holddown screw.
15
You have completed your electrical connection.
F
A. Neutral ground wire D. Neutral wire (white or center wire) E 1.9 ...
Use and Care Guide - Page 16
...location.
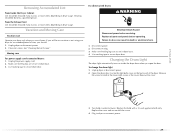
■ Remove excess flexible metal vent to achieve the best
drying performance.
The dryer exhaust must not be purchased from the entire length of the system and make sure exhaust... Use a heavy metal vent.
■ Flexible metal vent must be fully extended and supported when the dryer is a new vent system
Vent material ■ Use a heavy metal vent. Do not use plastic or...
Use and Care Guide - Page 22

... or kinked. 5. Dispose of/recycle all of your tools. 3. When the dryer has been running or "On" position. ■ Start button has been pushed firmly. ■ Dryer is plugged into a grounded outlet and/or electrical supply is level. See "Level Dryer." 6.
In Canada
■ Dryer door is first used. This odor is common when the heating...
Use and Care Guide - Page 23

...start your dryer.
WARNING: To reduce the risk of the load and adjusts the time automatically for the selected Dryness Level.
23 Clean lint screen before operating this manual for the cycle chosen will be . As the cycle runs, the control senses the dryness of fire, electric...before or after washing). Place laundry in death, explosion, or fire.
Your dryer may not have all of ...
Use and Care Guide - Page 24
... cycle time when your dryer is unlocked. Cool Down tumbles the load without heat during dryer operation. Press and hold HOLD TO START button until dryer starts (about 1 second). Drying tips ■ Follow care label directions when they tumble.
The control is locked when a single beep is heard and the Control Locked status light is on , the dryer can be stopped by...
Use and Care Guide - Page 25
... to drying various loads.
■ Drying temperature and Dryness Level are preset when you are drying. You can choose a different dryness level, depending on with Manual Cycles.
Status Lights
You may follow the progress of the cycle. The Cycle Complete light turns off and the dryer will remain on .
Control Locked The Control Locked light illuminates when this cycle...
Use and Care Guide - Page 27
..., an audible sound will depend on the ledge of moisture items hold ) HOLD TO START button (about 1 second). Open dryer door. Press (and hold . Do not use the drying rack Do not remove the lint screen. 1.
Dryer back panel
27
Press and release the CYCLE END SIGNAL to hang over the lint screen.
4. To...
Use and Care Guide - Page 29
....
3. Replace the cover and secure with a 10-watt appliance bulb only. See "Cleaning the Lint Screen." Failure to do so can result in death or electrical shock.
1. Changing the Drum Light
The dryer light automatically turns on inside the dryer drum when you are secure in the lower right corner of the cover. Open the...
Use and Care Guide - Page 30
... service call... There may require pressing and holding the Start button for the dryer. Replace the fuse or reset the circuit breaker. Large loads may be a thumping sound during the first few minutes.... See the Installation Instructions.
■ Are fabric softener sheets blocking the grille? Electric dryers require 240-volt power supply. www.maytag.com/help - Check the front and ...
Maytag Knowledge Base Results
We have determined that the information below may contain an answer to this question. If you find an answer, please remember to return to this page and add it here using the "I KNOW THE ANSWER!" button above. It's that easy to earn points!-
Washer will not fill - Front-load Epic® washer
... for each load. To test for leaks. Turn on the washer clogged? Are the water-inlet valve screens on the water. Reinstall hoses, turn off the Control Lock feature. Is Control Locked status light on the water...and soak. Display shows F21 or F02 - front-load washer will remain above the water level; Select the Normal cycle and press Start. Make sure the washer is empty. Wait for ... -
Sabbath Mode - Oven
... will stay in Sabbath Mode, it on before the Sabbath Mode is locked. If the oven light is reached. Control lock - All other functions except Bake (Timer, Keep Warm, Clean, etc.) are locked out or when the door is started , the temperature display will then be turned on . To cancel the Sabbath Mode: Press the... -
Sabbath Mode - Oven
...be no cycle active. Sabbath Mode cannot be turned on before the Sabbath Mode is started , the temperature display will immediately show the set , the Bake icon will end....If the oven light is set temperature, rather than the actual oven cavity temperature. Gemini® No preheat beep will also be turned on . Control lock - double-oven freestanding range Oven control - double ...
Similar Questions

Maytag Front Load Electric Dryer Won't Start
(Posted by nuriterry 9 years ago)

I Have A Maytag Front Loading Electric Dryer Model Med9600 Sq0. When I Attempt T
I have a Maytag front loading electric Dryer model MED9600 SQ0. When I attempt to start it by pressi...
I have a Maytag front loading electric Dryer model MED9600 SQ0. When I attempt to start it by pressi...
(Posted by wrzimmerly 10 years ago)
Med9700sq0: Won't Shut Off
Dryer does not shut off. Control panel status lights are not lighted, buttons do not function. dryer...
Dryer does not shut off. Control panel status lights are not lighted, buttons do not function. dryer...
(Posted by dtgreen 11 years ago)

The Control Locked Light Is On And I Cannot Get My Dryer To Start. What Can I Do
The "control Locked" light is on and I can't start my dryer. Why is this occuring and how do I fix t...
The "control Locked" light is on and I can't start my dryer. Why is this occuring and how do I fix t...
(Posted by pipelayer30 11 years ago)

Get Dryer,maytag Med9700sq0, Running
Dryer stuck in Control Locked. Unplugged and then Replugged. Same thing
Dryer stuck in Control Locked. Unplugged and then Replugged. Same thing
(Posted by tcollins2400 13 years ago)