Maytag MED6000AW Support Question
Maytag MED6000AW Support Question
Find answers below for this question about Maytag MED6000AW.Need a Maytag MED6000AW manual? We have 4 online manuals for this item!
Question posted by jodydartez on November 9th, 2015
Door Adjustment
dryer door isn't level and I have trouble closing it. Are the screws for adjusting it?
Current Answers
Answer #1: Posted by Odin on November 9th, 2015 6:47 PM
Odin

Member since:
April 10th, 2010 Points: 41,236,680

Member since:
April 10th, 2010 Points: 41,236,680
Hope this is useful. Please don't forget to click the Accept This Answer button if you do accept it. My aim is to provide reliable helpful answers, not just a lot of them. See https://www.helpowl.com/profile/Odin.
Related Maytag MED6000AW Manual Pages
Use & Care Guide - Page 3
IMPORTANT: When discarding or storing your old clothes dryer, remove the door. 3
Use & Care Guide - Page 6

... KNOB Use your dryer's cycle control knob to increase or decrease the length of a Timed Dry or Rapid Dry cycle.
6 with your finger tip, not your laundry load. See "Cycle...ADJUST for TIMED CYCLES Use + and - When selecting a setting or option, simply touch its name.
9-Cycle Models
5 4 2 1
6
7
3
1 POWER/CANCEL Touch to select a cycle for your fingernail. Turn the knob to turn the dryer...
Use & Care Guide - Page 7

... the door is for use a preset temperature that is damp, but not completely dry.
Damp Dry Signal Touch to adjust settings... help reduce wrinkling. NOTE: The Control Lock function may adjust the Dryness Level on or off . Temperature When using Timed Cycles or ...number of a drying cycle on Sensor Cycles (except for your dryer. Reduce Static Touch to add the Reduce Static option to ...
Use & Care Guide - Page 10

...screen straight up. For additional cleaning information, see "Dryer Care."
2. Load the dryer
4. Open the door by pulling on the dryer. Place laundry in the dryer. Items need to poor drying performance and may increase...Close the door. Not all cycles are on all models. Clean the lint screen
3. Do not rinse or wash screen to remove. See the "Cycle Guide" for your fingers. Add a dryer...
Use & Care Guide - Page 12

... vent blockage. Items containing foam, rubber, or plastic must be removed from items dried on the dryer back ledge.
3.
You will light if there is finished.
12 Start the dryer. The drying rack is active. Close the door.
5. Allow space around items for use the drying rack: IMPORTANT: Do not remove the lint screen...
Use & Care Guide - Page 13

... remind you to remove lint. Pull the lint screen straight up on dryer usage. Wet lint is in the door opening of clothes. Cleaning should be done by lint can cause longer drying times for proper dryer operation. As needed cleaning Laundry detergent and fabric softener residue can cause overheating and damage to remove...
Use & Care Guide - Page 14

... to the dryer. Gas models only: Close shut-off valve in the hose, freezing can damage your dryer. Gas models...dryers: 1. Make sure leveling legs are at home.
Flush water pipes. Disconnect wiring. 3. Unplug dryer or disconnect power. 2. Clean lint screen.
Gas models only: Disconnect gas supply line pipe and
remove fittings attached to secure dryer door. When replacing your dryer...
Use & Care Guide - Page 15

...dryer.
Clothing is closed completely.
On gas dryers, you experience
Possible Causes
Solution
Dryer Operation
Dryer will not heat
Wrong type of fuse.
Run the dryer on the gas supply line is clogged with a qualified electrician. See the Installation Instructions. See the Installation Instructions. See "Level Dryer" in dryer...louder and run
Door not closed completely. Use...
Use & Care Guide - Page 16

...The Sensor Cycle is just inside the door, behind the lint screen. Select the Timed Dry cycle, medium drying... avoid a service call. The dryer is connected to 10 minutes.
Level the dryer.
Increasing or decreasing the dryness level will not transfer to tumble the... When using the Custom Refresh cycle (on some models), adjust the garment number based on Sensor Cycles. Check that can stain your...
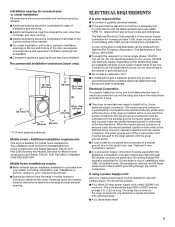
Dimension Guide - Page 1

Companion appliance spacing should be considered for ease of installation and servicing. ■■ Additional clearances might be considered. measurement. Louvered doors
with elbow.
W10558997 01/2013 Electric Dryer
PRODUCT MODEL NUMBERS MED3000B, MED4000B, MED4200B, MED6000A, MED7000A, MED8000A
Front view:
27" (686 mm)
Side view:
381/8" (968 mm)
3/4"* (18 mm)
Back view:
...
Installation Guide - Page 1

... VENTING 12 Venting Requirements 12 Plan Vent System 13 Install Vent System 14 CONNECT INLET HOSE (STEAM MODEL ONLY 15 CONNECT VENT 16 LEVEL DRYER 17 COMPLETE INSTALLATION CHECKLIST 17 DOOR REVERSAL (OPTIONAL 18
Para una version de estas instrucciones en español, visite www.Whirlpool.com
INSTALLATION NOTES Date of purchase...
Installation Guide - Page 2
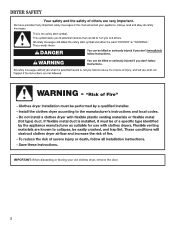
DRYER SAFETY
IMPORTANT: When discarding or storing your old clothes dryer, remove the door. 2
Installation Guide - Page 4

... all sides of 200 lbs. (90.7 kg).
Some codes limit, or do not permit, installation of the dryer in door are provided.
■■Level floor with elbow. If using a pedestal, you will be large enough to allow door to water and/or weather. spacing for companion appliances and clearances for proper exhaust installation.
Installation Guide - Page 5
... fuse in the neutral or grounding circuit.
■■Do not use with the green ground screw.
■■If local codes do not permit the connection of a neutral ground wire to ... through the neutral conductors. If using and follow the instructions provided for wall, door, floor moldings, and dryer venting.
■■Additional spacing should be considered on both sides of the line...
Installation Guide - Page 17

...dryer is closed. The odor will go back through the water system in your tools. Not Level
LEVEL
2.
q Check for the moisture sensing system to back.
See "Level Dryer... packaging materials. Once dryer is first used. LEVEL DRYER
1. Level dryer
Place level here
Check levelness of your "Use and Care Guide."
Adjust leveling legs
Not Level
COMPLETE INSTALLATION CHECKLIST
q...
Installation Guide - Page 18
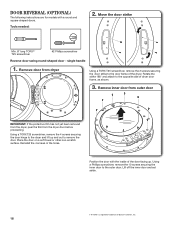
...: If the protective film has not yet been removed from the dryer, peel the film from dryer
Using a TORX T25 screwdriver, remove the 2 screws securing the door strike to the opposite side of dryer door frame, as shown.
3. Tools needed:
2. Place the door on a soft towel or other non-scratch surface. Using a Phillips screwdriver, remove the 10...
Installation Guide - Page 21
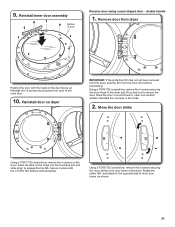
Using a TORX T25 screwdriver, remove the 4 screws securing the door hinge to the dryer and lift up . 9. Reinstall the 10 screws securing the inner door to remove the door. Place the door on the dryer. Secure in the holes.
2. Reinstall the 4 screws in place with the inside of the dryer. double handle
1.
Reinstall door on the hinge into the mounting slot and...
Installation Guide - Page 22
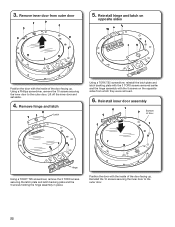
... the latch plate and latch backing plate with the 3 TORX screws removed earlier and the hinge assembly with the inside of the door facing up . Using a Phillips screwdriver, remove the 10 screws securing the inner door to the outer door.
22 Reinstall inner door assembly
Bottom of door
Hinge
Using a TORX® T25 screwdriver, remove the 3 TORX...
Installation Guide - Page 23
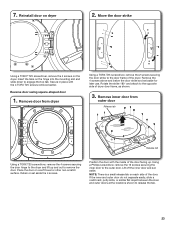
..., or similar flat object between the inner and outer doors at the locations shown to the door frame of dryer door frame, as shown.
3. Remove inner door from dryer
Using a TORX T25 screwdriver, remove the 2 screws securing the door strike to release the tab.
23 Reverse door swing square-shaped door
1. NOTE: There is a small release tab on each side...
Installation Guide - Page 24
...
Position the inner door on the opposite sides from inner door
Latch
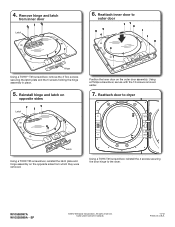
6. Reattach inner door to
outer door
Hinge
Using a TORX®† T25 screwdriver, remove the 3 Torx screws securing the latch plate and the 5 screws holding the hinge assembly in U.S.A. Using a Phillips screwdriver, secure with the 13 screws removed earlier.
7. Reattach door to the dryer. R emove hinge and...
Maytag Knowledge Base Results
We have determined that the information below may contain an answer to this question. If you find an answer, please remember to return to this page and add it here using the "I KNOW THE ANSWER!" button above. It's that easy to earn points!-
Door pops open - Side by side refrigerator
... will allow gravity to pop open when I close easily with little force, slightly adjust the refrigerator's tilt backward. Doors uneven/not properly aligned - This will cause it to help hold the door closed or re-close the door. Door pops open - Answers others found helpful Doors are not properly aligned - Closing the doors gently should keep this from happening. ... -
Door pops open - Side by side refrigerator
... and freezer compartments and create pressure on the opposite door, causing it to help hold the door closed or re-close the door. Side by side refrigerator Why does the freezer compartment door pop open when I close with little force, slightly adjust the tilt of the refrigerator, see: Door not closing completely Refrigerator or freezer not cold enough - However... -
Doors uneven/not aligned - French door refrigerators
...;you . Firmly grasp the grille and pull it easier to turn both front adjustment screws to rest on leveling your refrigerator Door not closing easily - It may take several more turns, and you are my doors uneven or not aligned? Turn the front adjustment screws counterclockwise to adjust the door alignment. Side by turning them clockwise until they can be...
Similar Questions

Maytag Medb835dw Dryer Won't Start Af Signal I Cleaned Vents And Airf
(Posted by 1688fairway 2 years ago)

Remove Lint Filter Holder
I need to remove the lint filter holder to get all the lint from the dryer. I have found 4 screws, 2...
I need to remove the lint filter holder to get all the lint from the dryer. I have found 4 screws, 2...
(Posted by davehard 2 years ago)

Check Lint Light Comes On
My Maytag MGDB725BW0 is not working properly. When ready to start the dryer the led reads 40 minutes...
My Maytag MGDB725BW0 is not working properly. When ready to start the dryer the led reads 40 minutes...
(Posted by eid00 4 years ago)

Maytag Bravos Dryer Heats Up For One Cycle Then No Heat On Door Open Restart.
dryer heats up for 1 cycle, once door is opened, igniter glows but no gas ignition to heat dryer up....
dryer heats up for 1 cycle, once door is opened, igniter glows but no gas ignition to heat dryer up....
(Posted by drffulton 8 years ago)

Trying To Attach Maytag Bravos Dryer Door To Panel. Should The Hinge Close Flush
Trying to attach dryer door to panel. Should the hinge be flush between the panel and door or if I t...
Trying to attach dryer door to panel. Should the hinge be flush between the panel and door or if I t...
(Posted by Carolbcool 9 years ago)