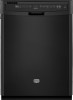
Maytag MDB7749AWB Support Question
Maytag MDB7749AWB Support Question
Find answers below for this question about Maytag MDB7749AWB.Need a Maytag MDB7749AWB manual? We have 5 online manuals for this item!
Question posted by croeper on February 15th, 2014
Drawer Removal
How do I remove the drawer from the pedestal? Maxima Model: MHW6000XW
Current Answers
Related Maytag MDB7749AWB Manual Pages
Owners Manual - Page 2

... in accordance with the circuit conductors and connected to the washing compartment when removing an old dishwasher from each for such a period, before electrical power is flammable, do ...Do not touch the heating element during this time.
■ Remove the door or lid to the equipment-grounding terminal or lead on the dishwasher.
■ Under certain conditions, hydrogen gas may be run...
Owners Manual - Page 3
...; When loading silverware, always place sharp items pointing down and inward to run a wash cycle soon,
run a rinse cycle. Wash only plastic items marked "dishwasher safe." Remove labels from containers before
starting a cycle.
It is closed detergent container in better
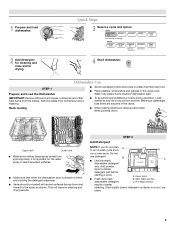
cleaning. STEP 2
Add Detergent
NOTE: If you do not touch one another...
Owners Manual - Page 8
... to near freezing temperatures or is recommended - If your dishwasher.
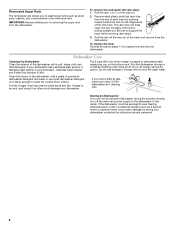
Dishwasher Care
Cleaning the Dishwasher
Clean the exterior of the track and remove from the dishwasher. Do not use liquid dishwasher detergent on the bottom rack.
Clean the interior of the dishwasher, with the wash water. Storing the Dishwasher
If you have a drain air gap, check and clean...
Owners Manual - Page 9
... (green light is connected to collect water droplets.
Use of the rack for the dishwasher to the dishwasher. WATER REMAINS IN THE TUB/ WILL NOT DRAIN
Be sure the cycle has completed ... that the float is closed and latched. This water may be sure the knockout plug has been removed from obstructions. If lights other items when unloading.
■ Unload the bottom rack first.
■...
Owners Manual - Page 10
...Use the proper amount of white vinegar in a glass measuring cup in a dishwasher. Confirm that is level. Remove all silverware and metal items. Put 2 cups (500 mL) of fresh detergent... the cycle. If the cloudiness disappears, it is needed. To remove spotting, run a vinegar rinse through the dishwasher by pre-washing. More detergent is necessary for heavier-soiled loads and...
Owners Manual - Page 11

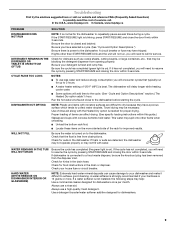
...rust, or oxidation of your major appliance, to instruct you on major appliances with original model/serial numbers that existed when this major appliance was purchased.
If you .
Cosmetic damage, ... in materials or workmanship in these parts that prevent function of the dishwasher and that have been removed, altered or cannot be easily determined.
11. Replacement parts or repair...
Dimension Guide - Page 2
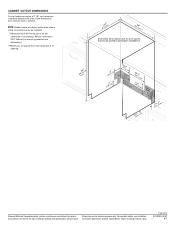
... locations require a 2" (5.1 cm) minimum clearance between the side of 2
W10329314-D-MT 6/11 Page 2 of the dishwasher door and the wall or cabinet. May be reduced to 33⁷⁄₈" (86 cm) by removing wheels from dishwasher.
**Minimum, measured from narrowest point of opening .
1³(⁄4₄".4 cm)
(5.12"cm)
Because Whirlpool Corporation...
Installation Guide - Page 2
...Moisture Barrier (under a wood countertop 11 Prepare Dishwasher 11
INSTALLATION INSTRUCTIONS (CONT.) Make Power Supply Cord...Remove shipping materials, drain hose and lower rack.
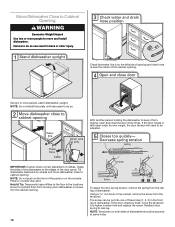
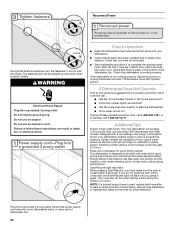
WARNING
Tip Over Hazard Do not use dishwasher until latched.
■ Observe all governing codes and ordinances.
■ Install this manual and on some models 14 Choose Attachment Option 15 Move Dishwasher...
Installation Guide - Page 10
...trap and at least 20" (50.8 cm) above the floor where the dishwasher will be installed.
with large silver drain hose clamp (provided). Use needle-nose pliers to remove plug.
3. Use a rubber hose (not provided) with large silver drain hose...
5. NOTE: Do not cut ribbed section.
2. no air gap
1. Use needle-nose pliers to remove plug.
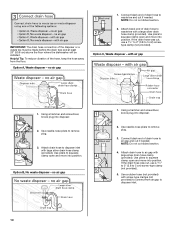
3. Option A, Waste disposer -
Installation Guide - Page 11

....
2. Make sure the area under a wood countertop)
Tip Over Hazard Do not use dishwasher until installed in back or other injury. Use a rubber hose (not provided) with a...2" (3.8 to underside of the countertop along the front edge of dishwasher door frame and place dishwasher on open and move and install dishwasher. Remove the backing of the moisture barrier and apply to 5.1 cm) screw...
Installation Guide - Page 12
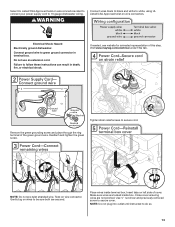
Using a ¹⁄₄" hex head socket, nut driver or Phillips screwdriver, remove terminal box cover. Route cord so that it does not touch dishwasher motor to lower part of your dishwasher. Strain relief is provided with the installation of dishwasher tub. NOTE: If using Option B, proceed to "Determine Cabinet Opening," to the left when...
Installation Guide - Page 13
...dishwasher.
If needed, see website for animated representation of the green ground wire. Reattach and tighten the green screw. Place wires inside box. Make sure wires are tucked inside terminal box. Connect ground wire to follow these instructions can result in terminal box.
Remove... connect your power supply cord to 16-gauge dishwasher wiring. Visit www.maytag.com/electrical under FAQ...
Installation Guide - Page 14
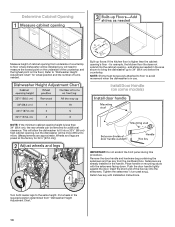
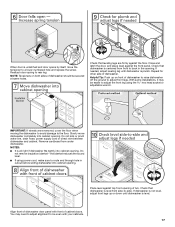
...8324; turn past snug. Turn both leveler legs to "Dishwasher Height Adjustment Chart" for additional clearance. Install Door Handle (on some models)
NOTE: If the minimum cabinet opening height is less ... on mounting studs with Installation Instructions. Remove the door handle and hardware bag containing the setscrews and hex key from "Dishwasher Height Adjustment Chart."
14 Setscrews are ...
Installation Guide - Page 15
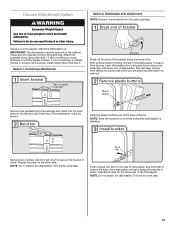
... the brackets using Option Number 1 if the countertop is wood, laminate or another hard surface, install using Option Number 2. Option 1, Countertop attachment:
Option 2, Dishwasher side attachment: NOTE: Remove the brackets from the package and insert into pump area when you are two brackets found in the parts bag.
Push the plastic buttons...
Installation Guide - Page 16
...NOTE: Do not push on the front of the panel or on both sides of dishwasher should be secured at the edges of the door panel. Panel or console may dent.
Reattach door ...or more people, stand dishwasher. If the door closes by itself, move and install dishwasher. If the door closes or falls open and close to rear leg. Using a nut driver or hex socket, remove the screw from the ...
Installation Guide - Page 17
...; If using the hex head socket or adjustable wrench. Align front of dishwasher door panel with your cabinets.
17
If dishwasher is not level, adjust front legs up on both sides of dishwasher should be even with front of dishwasher. Do
not remove insulation blanket - When door is unlatched and door opens by itself, move...
Installation Guide - Page 20
... secure cover.
Place wires inside box. Use ¹⁄₄" nut driver and previously removed screw to countertop with two, #10 x ¹⁄₂" Phillips-head screws (included). The dishwasher must be secured to keep screws from shifting when door is still level front-to-back and side-to countertop.
Check that...
Installation Guide - Page 21
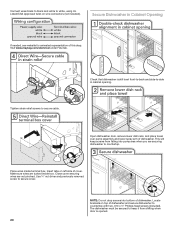
...Remove towel from dishwasher. Tighten bracket screws. If they do not rub against the dishwasher leg.
If needed, see website for animated representation of the access panel touches the floor. When dishwasher.... Adjust if necessary.
21
Complete Installation
Open door and check that space between dishwasher cabinet opening and tub is equal on both sides. Place the plastic access panel...
Installation Guide - Page 22
... been installed and no steps were skipped.
Do not remove ground prong.
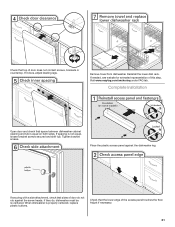
Check Operation
■ Read the Dishwasher User Instructions that came with rinse aid for future reference...Check that dishwasher is not working properly. Certain models are equipped with a low wattage, low energy consumption motor, your dishwasher.
■ Check that all tools used.
■ Start dishwasher and ...
Warranty Information - Page 1
... including scratches, dents, chips or other rights that have been removed, altered or cannot be borne by Maytag.
5. Some states ... through tenth years from defects in accordance with original model/serial numbers that vary from state to state or ... province to determine if another warranty applies. MAYTAG® DISHWASHER LIMITED WARRANTY
FIRST YEAR LIMITED WARRANTY (PARTS AND LABOR) ...
Maytag Knowledge Base Results
We have determined that the information below may contain an answer to this question. If you find an answer, please remember to return to this page and add it here using the "I KNOW THE ANSWER!" button above. It's that easy to earn points!-
How do I clean my front-load washer dispensers?
... console Leaking water - Unlock the dispenser drawer by pressing the Dispenser Release Lever. Remove the drawer. To clean the dispenser housing area, use a small soft brush to the housing. How do I find my model number? Remove the inserts from the drawer. The inserts are not working correctly - Enter Model Number How do I clean my front... -
Caring for my compactor
... or wet trash should be performed by using a vacuum designed to wear protective gloves since there may be bits of the drawer out until it out. Lift the front of days, remove the compactor bag. Your new compactor is designed to properly maintain your compactor. To clean exterior stainless steel surfaces: See... -
How do I clean my Epic® or Neptune® front-load washer?
... the machine freshness, please evaluate your model number into the Manual and Literature search below.) Remove the drawer. Use mild soap and water. Remove the inserts (the siphon from the ...then be interrupted by pressing the release lever. (See "Using the Dispenser" in the dishwasher. Select the hottest wash water temperature available (not all areas under running water. Do not...
Similar Questions

How To Get A Pedestal Drawer Removed
How do you remove a pedestal drawer from a front load maytag washer
How do you remove a pedestal drawer from a front load maytag washer
(Posted by bjstark 8 years ago)


Pedestal Drawer Removal
How do I remove the drawer on a 4000 series pedestal so I can re-level?
How do I remove the drawer on a 4000 series pedestal so I can re-level?
(Posted by kwalkersr 10 years ago)

What Is The Minimum Height For Maytag Dishwasher Mdb7749awb
(Posted by rdhn2trvl 11 years ago)
How Do I Remove Sprayer Arms To Clean In The 7749.
How do I clean drain area at bottom?
How do I clean drain area at bottom?
(Posted by rfodell 12 years ago)