
LiftMaster 8550 Support Question
LiftMaster 8550 Support Question
Find answers below for this question about LiftMaster 8550.Need a LiftMaster 8550 manual? We have 1 online manual for this item!
Question posted by ronfukuchi on December 17th, 2015
Liftmaster 8550 Gdm
Twice in the last 3 years all three car remotes have lost their ability to open the garage door. I reprogram the remotes and they work fine. Why does this happen?
Current Answers


Related LiftMaster 8550 Manual Pages
8550 Manual - Page 1

... 26-27 OPERATION 28 FEATURES 29 DOOR CONTROL 30-31 REMOTE CONTROLS 32-33 TO ERASE THE MEMORY 33 TO OPEN THE DOOR MANUALLY ......34 MAINTENANCE 34 TROUBLESHOOTING 35-36 REPAIR PARTS 37-38 ACCESSORIES 39 WARRANTY 40 NOTE: If you are installing the garage door opener on a one -piece door, visit www.liftmaster.com for future reference: Serial...
8550 Manual - Page 2

... center of the door must not exceed 1/4 inch (6 mm). Preparation
Safety Symbol and Signal Word Review
This garage door opener has been designed and tested to avoid malfunction and damage.
1/2
5/8
1/4
7/16 9/16
7/16
2 Any gap between the floor and the bottom of the door. See installing the Header Bracket section. The hazard may not work properly.
5.
8550 Manual - Page 3

GARAGE DOOR OPENER ASSEMBLY
A. Pulley and bracket
C. Curved door arm
E. Rail I
3
MyQ™ AND SECURITY✚®2.0 ACCESSORIES
880LM Smart Control Panel®
895MAX Remote Control
829LM Garage Door Monitor
Hardware
Assembly H1 Hex Screw #8x3/8" (3) [packed with the sprocket cover] Installation H2 Hex Bolt 5/16"-18 x 7/8" (4) H3 Lag Screw 5/16"-9 x 1-5/8" (2) H4 Lag Screw 5/...
8550 Manual - Page 4

... (3)
Hex Screw #8x3/8" (Packed with the previously removed
bolts.
1.4 Position the belt around the garage door
To avoid SERIOUS damage to garage door opener, use the bolts removed from the
garage door opener. operating opener.
1.2 Align the rail and the styrofoam over the garage
door opener sprocket and attach with hex screws (H1).
. Cut the tape from the top of the
•...
8550 Manual - Page 6

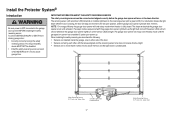
... INSTALLATION WARNINGS AND INSTRUCTIONS. 2. ALL repairs to avoid accidental release. 7. DO NOT enable the Timer-to do so 8. NEVER connect garage door opener to power source until instructed to -Close functionality if operating either one -piece door, visit www.liftmaster.com for installation instructions. 6 They could result in plain view on a one -piece or swinging...
8550 Manual - Page 7

... door, visit www.liftmaster.com for the top edge of the door. You can attach it to the ceiling when clearance is out of balance. Draw an intersecting horizontal line on the wall upside down if necessary, to the highest point of which are installing the garage door opener on header wall or ceiling, otherwise garage door might...
8550 Manual - Page 9

... until instructed. Slide the outer trolley toward the garage door opener.
H11 H5
HARDWARE
H5
Clevis Pin 5/16"x2-3/4"
H11
Ring Fastener
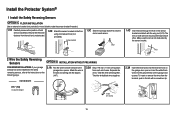
4 Position the garage door opener
To prevent damage to garage door, rest garage door opener rail on 2x4 placed on top section of door.
4.1 Remove the packing material and lift the
garage door opener onto a ladder. NOTE: Use the packing material as...
8550 Manual - Page 10

... finished ceilings, use the lag screws
(H3) to attach a support bracket (not provided) to the structural supports before installing the garage door opener.
5.2 Make sure the garage door opener is
aligned with the bolts (H2), lock
door. H4 (2)
Lag Screw 5/16"- 18x1-5/8"
HARDWARE
H9 (2)
Lock Washer 5/16"-16
H8 (2)
Nut 5/16"-18
H2 (2)
Hex Bolt 5/16"- 18x7...
8550 Manual - Page 11
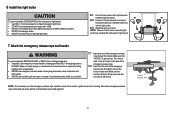
...6 feet (1.83 m) above the top of all vehicles to disengage trolley ONLY when garage door is clear of the end panel or light socket: • Use ONLY A19 incandescent... inch (2.5 cm) from a falling garage door: • If possible, use handle to pull door open door falling rapidly and/or unexpectedly. • NEVER use emergency release handle unless garage doorway is
CLOSED.
or
or
To ...
8550 Manual - Page 12
...; Use top and bottom or side to check with your door manufacturer for an opener installation door reinforcement kit.
proceed to create a U-shaped support.
Note correct UP placement, as follows, depending on the previously marked vertical centerline used for lightweight garage doors (fiberglass, aluminum, steel, doors with 5/16"x2" carriage bolts, lock washers and nuts (not...
8550 Manual - Page 13

Attach
Slide the outer trolley back (away from
with the ring fastener (H11). Select two aligned holes (as
toward the garage door opener until the
far apart as possible) and attach using the bolts
trolley release arm is horizontal.
The
(H2), nuts (H8) and lock washers (H9). trolley ...
8550 Manual - Page 14

...garage door:
accessories.
NOTE: Older LiftMaster accessories and third party products are not compatible.Your garage door opener is NOT connected BEFORE installing door control. • Connect ONLY to cross path of the door...from electrocution: • Be sure power is compatible with door control push buttons or remote control transmitters. To prevent possible SERIOUS INJURY or DEATH from...
8550 Manual - Page 15

... over the screw and slide down into place.
1.6 Lift the push bar up and mark the top hole.
1.7 Remove the door control from the door control to the garage door opener
HARDWARE
H17 (10)
Insulated Staple
2.1 Run the white and red/white wire from the wall
and drill a 5/32 inch (4 mm) hole for gang box...
8550 Manual - Page 17
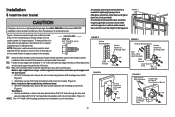
... flash 10 times. This required safety device MUST NOT be connected and aligned correctly before the garage door opener will move in the down until the garage door opener has completed 5 cycles upon power up.
The sleep mode shuts the garage door opener down direction.
IMPORTANT INFORMATION ABOUT THE SAFETY REVERSING SENSORS
The safety reversing sensors must be disabled...
8550 Manual - Page 19
... (10)
Insulated Staple
7/16" (11 mm)
2.3A Insert the white wires into the white terminal on the garage door opener. Twist the white/black wires together.
H13
2 Wire the Safety Reversing
Sensors
OPTION A INSTALLATION WITHOUT PRE-WIRING
PRE-WIRED INSTALLATIONS: ...).
(not provided)
IGWnsaairdlalege
1.3C Slide the carriage bolt (H12) into the grey terminal on
the garage door opener.
8550 Manual - Page 26

... unplugged.
2.2 Open and close the door using the
remote control or door control.
Use a Phillips
head screwdriver to remove the battery cover on the garage door opener.
1.3 Partially ... maintenance. • Use ONLY LiftMaster part # 485LM for replacement battery. • Do NOT dispose of the garage door opener.
NOTE: Make sure the garage door opener is charging.
26 Check with ...
8550 Manual - Page 30

... be the primary method of the garage door opener from remote controls while still allowing activation from the fully open garage door and the safety reversing sensor infrared...garage door opener lights on the door control can be programmed to the garage door opener by accessing the menu using the garage door opener light as a work if the garage door opener is set to off .
Test the door...
8550 Manual - Page 32

... www.liftmaster.com. TO ADD, REPROGRAM, OR CHANGE A REMOTE CONTROL/KEYLESS ENTRY PIN USING THE DOOR CONTROL
1 Press the navigation button
below "MENU" to view the Features menu.
2 Use the navigation buttons
to scroll to "PROGRAM".
3 Select "REMOTE" or
"KEYPAD" to continue.
TO REMOTE
4 Remote Control:
Press the button on the side of your choice on the garage door opener.
Remote...
8550 Manual - Page 37
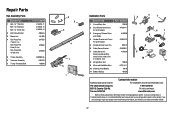
... garage door opener. for 8 foot door Belt - If you
are calling about a Troubleshooting issue, it is recommended that you are ordering a repair part please have the following information: part number, part name, and model number.
37 Tucson, AZ 85706
For installation and service information call: 1-800-528-9131 Or visit us online at:
www.liftmaster...
8550 Manual - Page 39
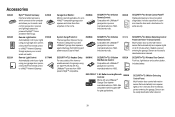
... Light Switch:
990LM
Automatically control your lights
using your garage door opener, a Security+®2.0 remote control or a MyQ™ Internet Gateway. SECURITY+®2.0 3-Button Remote Control: Compatible with ALL LiftMaster® openers from 1999present. Works with LiftMaster® garage door openers manufactured since 1993.
Accessories
828LM 823LM 825LM
MyQ™ Internet...
Similar Questions


My Opener Works Fine From The Wall Unit. None Of The Remotes Work.
The wall unit works fine but the remotes just stopped working. I reset the codes and can not reset t...
The wall unit works fine but the remotes just stopped working. I reset the codes and can not reset t...
(Posted by Nelsoneric84 11 years ago)

Liftmaster Will Not Stay In Adjustment For Travel Down Or Up
Lately, I adjust my opener to close all the way and go up and stop short of the stop bolt, but it on...
Lately, I adjust my opener to close all the way and go up and stop short of the stop bolt, but it on...
(Posted by bcultrera 11 years ago)

Liftmaster 8550 Error Code 15 On Remote
How do I reset this error code?
How do I reset this error code?
(Posted by jackscat48 11 years ago)

Doesnt Stop Opening .closing Works Fine It Doesnt Brake Opening I Set The Limits
i set the limits both ways as the manual says and closing works fine but it doesnt stop opening
i set the limits both ways as the manual says and closing works fine but it doesnt stop opening
(Posted by jacobneta 12 years ago)