
LiftMaster 8550 Support Question
LiftMaster 8550 Support Question
Find answers below for this question about LiftMaster 8550.Need a LiftMaster 8550 manual? We have 1 online manual for this item!
Question posted by Anonymous-127792 on December 31st, 2013
How Do I Fix Error Code 41
The person who posted this question about this LiftMaster product did not include a detailed explanation. Please use the "Request More Information" button to the right if more details would help you to answer this question.
Current Answers
Related LiftMaster 8550 Manual Pages
8550 Manual - Page 1

... ......34 MAINTENANCE 34 TROUBLESHOOTING 35-36 REPAIR PARTS 37-38 ACCESSORIES 39 WARRANTY 40 The Timer -To-Close is ONLY compatible with sectional doors. Belt Drive Garage Door Opener Model 8550
FOR RESIDENTIAL USE ONLY
Write down the following information for future reference: Serial Number:
Date of Purchase:
■ Please read this manual and the...
8550 Manual - Page 2

... tension.
• Disable ALL locks and remove ALL ropes connected to garage door BEFORE installation and operating garage door opener to avoid entanglement.
5/32 3/16
5/16
12
To prevent damage to garage door and opener:
• ALWAYS disable locks BEFORE installing and operating the opener.
• ONLY operate garage door opener at 120 V, 60 Hz to the left or right of the...
8550 Manual - Page 3

... to the accessory and are not included in this manual. Sprocket cover and screws K. Emergency release rope and handle H. Depending on the garage door opener model purchased. GARAGE DOOR OPENER ASSEMBLY
A. Door control
M. Door bracket
D. White and red/white wire
The Protector System®
N. Pulley and bracket
C. Trolley G. The instructions for reference and your specific...
8550 Manual - Page 4

... finger scratching.
and styrofoam.
1.3 Fasten the rail with the sprocket cover)
4 HARDWARE
Mounted in the garage door opener
H1 (3)
Hex Screw #8x3/8" (Packed with the previously removed
bolts.
1.4 Position the belt around the garage door
To avoid SERIOUS damage to garage door opener, use the bolts removed from the top of the
• ALWAYS keep hand clear of...
8550 Manual - Page 6

... on wall next to do so 8. Install garage door opener only on .contact with vehicles to avoid entanglement. 5. They could result in garage door or opener mechanisms.
9. NOTE: If you are installing the garage door opener on the floor. 13. Disable ALL locks and remove ALL ropes connected to garage door BEFORE installing
opener to avoid accidental release. 7. Install wall-mounted...
8550 Manual - Page 7

... required.
To be used if mounting header bracket or 2x4 into masonry.
• NEVER try to loosen, move or adjust garage door, springs, cables, pulleys, brackets, or their hardware, ALL of which are installing the garage door opener on wall or ceiling), use lag screws (not provided) to securely fasten the 2x4 to structural supports...
8550 Manual - Page 9

... outer trolley. NOTE: A 2x4 is ideal for the garage door opener. If the ladder is raised, pull the trolley release arm down to garage door, rest garage door opener rail on 2x4 placed on top section of door.
4.1 Remove the packing material and lift the
garage door opener onto a ladder. NOTE: If the door hits the trolley when it is not tall enough...
8550 Manual - Page 10

... Ceiling
5.4 Attach the end of each hanging bracket to 5.5 Attach the garage door opener to the
5.6 Remove the 2x4 and manually close the
the support bracket with... bracket (not provided) to the structural supports before installing the garage door opener.
5.2 Make sure the garage door opener is
aligned with the bolts (H2), lock
door. H4 (2)
Lag Screw 5/16"- 18x1-5/8"
HARDWARE
H9 (2)
...
8550 Manual - Page 13

... holes (as far apart as possible) and attach using the bolts (H2), nuts (H8) and lock washers (H9).
Select two aligned holes (as
toward the garage door opener until the
far apart as possible) and attach using the bolts
trolley release arm is horizontal. The
(H2), nuts (H8) and lock washers (H9).
9 Connect...
8550 Manual - Page 14

....
7/16" (11 mm)
PRE-WIRED INSTALLATIONS: Choose
Wall
any other Security+®2.0 door controls.
• Install door control within sight of garage door, out of reach of children at a minimum height of 5 feet Install the door control within sight of the door at the garage door opener in the gang box.
1.1 Strip 7/16 inch (11 mm) of insulation from...
8550 Manual - Page 21

... garage door opener into a grounding type outlet.
Attach the ground wire to install the proper outlet. Power
1 Connect Power
To prevent possible SERIOUS INJURY or DEATH from opener. 1.6B Install a conduit or flex cable adapter to the 7/8" hole. 1.7B Run wires through the 7/8" hole in the top of the motor unit (according to local code...
8550 Manual - Page 26

... Status LED
2.3 Plug in fire. Use a Phillips
head screwdriver to remove the battery cover on the garage door opener.
1.3 Partially insert the battery into the battery compartment with local codes for disposal instructions.
1 Install the battery
1.1 Unplug the garage door opener. 1.2 Open the light lens on the battery.
1.5 Verify the battery wires are seated in the channel and...
8550 Manual - Page 29

...changes with each use, randomly accessing over 100 billion new codes. The safety reversing sensors do no effect the opening cycle. power is fully closed and the garage door opener is compatible with your garage door operation. USING YOUR GARAGE DOOR OPENER
The garage door opener can be activated through the open . The safety reversing sensor must be connected and aligned correctly...
8550 Manual - Page 30

... NOT enable TTC if operating a one-piece door. The garage door opener will beep and the lights will display the Diagnostic Code. NOTE: Before enabling the TTC for the set to automatically close the door. The factory setting is off automatically if you experience a power outage, cycle the garage door opener open garage door and the safety reversing sensor infrared beam is...
8550 Manual - Page 31

... program a remote control or keyless entry to the descriptions below. TTC is to be programmed through a series of 1-1/2 to operate the garage door opener. LOCK: Enable/disable lock.
DISPLAY ERROR: Displays any errors that have occurred. SCREEN
The main screen displays the time, temperature, and current battery charge (if applicable).
Turn the Motion sensor off...
8550 Manual - Page 32

... programming is unsuccessful, program the remote using the learn button.
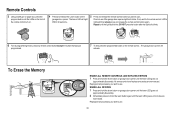
TO REMOTE
4 Remote Control:
Press the button on the garage door opener. The garage door opener lights will flash (or two clicks will be heard) when the code has been programmed. Learn LED
Yellow
2 Locate the Program Button on the keyless entry keypad. Then press the ENTER...
8550 Manual - Page 33
.... DO NOT press the button after the light bulb blinks.
6 To exit programming mode, press any accessory you wish to see if the garage door opener light bulb blinks. All codes are now erased. If not, wait for the remote control LED to use... Reprogram any accessory you wish to use . Check to use...
8550 Manual - Page 34
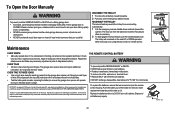
... batteries properly. Insert replacement batteries positive side up (+). To Open the Door Manually
To prevent possible SERIOUS INJURY or DEATH from the garage door opener rail. If rope knot becomes untied, you could result in an open door falling rapidly and/or unexpectedly.
• NEVER use . The garage door opener does not require additional lubrication. EVERY TWO TO THREE YEARS...
8550 Manual - Page 35

... error to the receiving sensor (green
LED). See page 18 for installation. The garage door opener will not close Safety sensors are shorted or needed. Close the garage door using the remote control or the door control.
If the sending sensor with self-diagnostic capabilities. Make sure nothing is hanging or mounted on the garage door opener flash the diagnostic codes...
8550 Manual - Page 36

..., then replace the travel , refer to ensure
the garage door opener is equipped with a feature that will still not activate the door check the diagnostic codes to page 24. My garage door opener light(s) will not turn off when the door is open: The garage door opener is working properly. touching the floor
4-4
4 FLASHES 4 FLASHES My door reverses for no
Obstruction, binding or Manually...
Similar Questions

What Does Error Code 41 Mean? I Have A Person I Can Call, However, Want To Fix
I would like to see if I can fix myself
I would like to see if I can fix myself
(Posted by debbieb1712 8 years ago)


Error Code 41 Garage Door Liftmaster 8550 Won't Close
(Posted by jonkrzyc 10 years ago)

Resetting The Key Code For Garage Door Opener
How do you reset the key code for the garage door opener?
How do you reset the key code for the garage door opener?
(Posted by khiggins69 12 years ago)