
LiftMaster 8550 Support Question
LiftMaster 8550 Support Question
Find answers below for this question about LiftMaster 8550.Need a LiftMaster 8550 manual? We have 1 online manual for this item!
Question posted by girlzfive on November 16th, 2012
How Do I Keep My Gate Open
The person who posted this question about this LiftMaster product did not include a detailed explanation. Please use the "Request More Information" button to the right if more details would help you to answer this question.
Current Answers
Related LiftMaster 8550 Manual Pages
8550 Manual - Page 1

... 34 TROUBLESHOOTING 35-36 REPAIR PARTS 37-38 ACCESSORIES 39 WARRANTY 40 Belt Drive Garage Door Opener Model 8550
FOR RESIDENTIAL USE ONLY
Write down the following information for installation instructions.
. NOTE: If you are installing the garage door
opener on a one -piece door, visit www.liftmaster.com for future reference: Serial Number:
Date of Purchase:
■ Please...
8550 Manual - Page 2

....
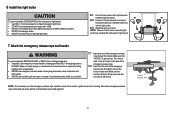
• Disable ALL locks and remove ALL ropes connected to garage door BEFORE installation and operating garage door opener to avoid entanglement.
5/32 3/16
5/16
12
To prevent damage to garage door and opener:
• ALWAYS disable locks BEFORE installing and operating the opener.
• ONLY operate garage door opener at 120 V, 60 Hz to avoid malfunction and damage.
1/2
5/8
1/4
7/16...
8550 Manual - Page 3

... (2) H15 Screw 6-32 x 1" (2) H16 Drywall Anchors (2) H17 Insulated Staples (10)
Straight door arm A
B
CF G
D E
F. The instructions for reference and your garage door opener. The images throughout this manual. GARAGE DOOR OPENER ASSEMBLY
A. Header bracket
B. Garage door opener
K
J. Door bracket
D. Emergency release rope and handle H. Pulley and bracket...
8550 Manual - Page 4

... the
• ALWAYS keep hand clear of the opener. HARDWARE
Mounted in the top of sprocket while
garage door opener. Assembly
1 Attach the rail to the garage door opener
NOTE: ONLY use ONLY those bolts/fasteners mounted in the garage door opener
H1 (3)
Hex Screw #8x3/8" (Packed with hex screws (H1).
. from moving garage door opener:
1.1 Remove the two bolts from the rail...
8550 Manual - Page 6

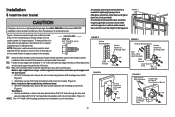
... object (or a 2x4 laid fl at least 6 feet (1.83 m) above floor. 6. NEVER wear watches, rings or loose clothing while installing or servicing opener. NOTE: If you are installing the garage door opener on inside of 5 feet (1.5 m). • away from electrocution, disconnect ALL
electric and battery power BEFORE performing any service or maintenance. 14. To...
8550 Manual - Page 7

... if mounting header bracket or 2x4 into masonry.
• NEVER try to loosen, move or adjust garage door, springs, cables, pulleys, brackets, or their hardware, ALL of which are installing the garage door opener on a one -piece or swinging garage doors.
1 Determine the header bracket location
To prevent possible SERIOUS INJURY or DEATH:
• Header bracket MUST...
8550 Manual - Page 9

... a protective base for setting the distance between the rail and the door. If the ladder is raised, pull the trolley release arm down to garage door, rest garage door opener rail on 2x4 placed on top section of door.
4.1 Remove the packing material and lift the
garage door opener onto a ladder.
Insert the clevis pin (H5) through the holes in...
8550 Manual - Page 10

... Attach the end of each hanging bracket to 5.5 Attach the garage door opener to structural supports. Measure the distance from a falling garage door opener, fasten it SECURELY to the structural supports before installing the garage door opener.
5.2 Make sure the garage door opener is
aligned with the bolts (H2), lock
door. H4 (2)
Lag Screw 5/16"- 18x1-5/8"
HARDWARE
H9 (2)
Lock Washer 5/16...
8550 Manual - Page 11
...at least 1 inch (2.5 cm) from a falling garage door: • If possible, use handle to avoid ...open or closed.
Make sure the handle is 6 feet (1.83 m) above the top of the emergency release
rope through the hole in the trolley release arm.
Ensure the emergency release rope and handle are above the floor and secure with a match or lighter to disengage trolley ONLY when garage door...
8550 Manual - Page 12
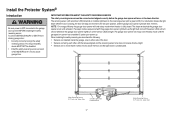
A horizontal reinforcement brace should cover the height of door bracket. FIGURE 1
Figure 1 shows one piece of Garage Door
8.1 Center the door bracket on the previously marked vertical centerline used to check with your garage door manufacturer for an opener installation door reinforcement kit. NOTE: Many door reinforcement kits provide for the header bracket
installation. HARDWARE
H10 ...
8550 Manual - Page 13

... holes (as far apart as possible) and attach using the bolts (H2), nuts (H8) and lock washers (H9). Select two aligned holes (as
toward the garage door opener until the
far apart as possible) and attach using the bolts
trolley release arm is activated.
.
Disconnect the trolley by 9.2 Attach the straight...
8550 Manual - Page 14

... 6-32x1"
H16 (2)
Drywall Anchors
NOTE: For gang box installations it can be seen clearly, is properly adjusted, and there are not compatible.Your garage door opener is compatible with door control push buttons or remote control transmitters. can be connected to cross path of the wire and separate the wires.
Use the existing holes...
8550 Manual - Page 15

... for the top screw.
1.8 Position the bottom hole of the wire near the garage door opener.
7/16" (11 mm)
H15
GANG BOX
2.3 Connect the wire to
the garage door opener.
RED WHITE WHITE GREY
PRE-WIRED INSTALLATIONS: When wiring
the door control to the garage door opener
H17
make sure you use the same wires that are
connected to the...
8550 Manual - Page 17
... DEATH from closing , the door will stop and reverse to the garage door opener BEFORE installing the safety reversing sensor.
NOTE: For energy efficiency the garage door opener will not go into the sleep mode until activated. The garage door opener will enter sleep mode when the door is NOT connected to the full open position, and the garage door opener lights will light. Safety...
8550 Manual - Page 19
... the sensor brackets to the floor
using concrete anchors (not provided).
(not provided)
IGWnsaairdlalege
1.3C Slide the carriage bolt (H12) into the
slot on
the garage door opener. Separate the wires. To insert or remove the wires from each sensor. H12
1.4C Insert the bolt through the hole in the tab with the...
8550 Manual - Page 20
...to the yellow wire and the white/black wire would connect to the grey terminal on the garage door opener. Insert the wires that you choose the same color pre-installed wires for each sensor. ...the tab with wire nuts
making sure there is enough wire to the
white terminal on the garage door opener.
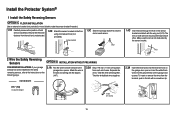
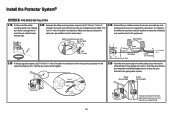
Install the Protector System®
OPTION B PRE-WIRED INSTALLATION
2.1B Cut the end of ...
8550 Manual - Page 21

... and set aside. 1.3B Remove the attached green ground terminal. 1.4B Cut black and white wires and strip away 1/2" (1 cm) of electric shock, your garage door opener has a grounding type plug with wire nuts provided. PERMANENT WIRING CONNECTION
Black Wire
Ground Wire
Ground Tab Green Ground Screw White Wire
Wire Nuts
21 ...
8550 Manual - Page 22
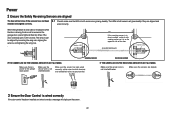
... glowing steadily. Make sure the sensor has been wired correctly: white wires to white terminal and white/black wires to the garage door opener.
Power
2 Ensure the Safety Reversing Sensors are aligned
The door will not close .
Amber LED
If the receiving sensor is on the screen.
22 The LEDs in both sensors will...
8550 Manual - Page 23
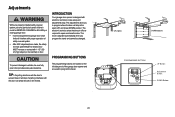
... interfere with electronic controls to make setup and adjustments easy. The adjustments allow you program the travel . INTRODUCTION
Your garage door opener is adjusted automatically when you to program where the door will stop in the open and close (DOWN) position. TIP: If anything interferes with 1-1/2" (3.8 cm) high object (or 2x4 laid flat) on floor...
8550 Manual - Page 39
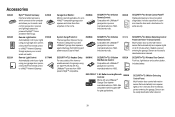
...; Internet Gateway.
includes a push bar to open /closed status for 5 minutes when it detects a person entering the garage. Easy to
4 MyQ™ compatible garage door
openers and close the door and a lock feature for 5 minutes when it detects a person entering the garage. Also compatible with Encrypted DIP for gate applications.
886LM
SECURITY+®2.0 Motion Detecting Control...
Similar Questions

Garage Door Opens After Shutting.
My Lift master 8550 inside keypad is Inside wall pad is model #880LM. outside keypad Model # is 877M...
My Lift master 8550 inside keypad is Inside wall pad is model #880LM. outside keypad Model # is 877M...
(Posted by BONNIECA92 2 years ago)

Gate Opener Stuck On Stop.
Old liftmaster gate opener LA4000 have power but stop light is on and can't get it to work?Diagnosti...
Old liftmaster gate opener LA4000 have power but stop light is on and can't get it to work?Diagnosti...
(Posted by emadxnick 2 years ago)

Gate Opens From The Motor But Will Not Close From The Motor Or The Remotes.
(Posted by kdmcfall 4 years ago)

Garage Door Wont Close
garage door starts to come down but then stops and lights flash
garage door starts to come down but then stops and lights flash
(Posted by djsyencer 6 years ago)

Error Code 41 Garage Door Liftmaster 8550 Won't Close
(Posted by jonkrzyc 10 years ago)