
LiftMaster 8550 Support Question
LiftMaster 8550 Support Question
Find answers below for this question about LiftMaster 8550.Need a LiftMaster 8550 manual? We have 1 online manual for this item!
Question posted by roddhawg on October 17th, 2012
What Do The Error Codes Mean On The Liftmaster 8550 Like Codes 11and 14
The person who posted this question about this LiftMaster product did not include a detailed explanation. Please use the "Request More Information" button to the right if more details would help you to answer this question.
Current Answers
Answer #1: Posted by GarageDoorMafiadotcom on December 2nd, 2012 2:52 PM
GarageDoorMafiadotcom

Member since:
November 4th, 2012 Points: 25,600

Member since:
November 4th, 2012 Points: 25,600
You have a problem with the safety sensor. Realign the sensor, check to See if they are mount in same height, move the eye it self so it point straight with the door and in level both side.
Then check the wires @ the sensor(sometimes I see animals had chew on the wires) Check any splice @ the wall to the pre wiring and @ the motor-head. Make sure the wires is correctly inset to the connector on the motor-head.
GarageDoorMafia.com One stop online shop for all your garage door and opener needs.
Related LiftMaster 8550 Manual Pages
8550 Manual - Page 1

... and properly
aligned. ■ Periodic checks of the garage door opener are installing the garage door opener on a one -piece door. www.liftmaster.com The Chamberlain Group, Inc.
845 Larch Avenue Elmhurst, Illinois 60126-1196
Contents
BELT DRIVE GARAGE DOOR OPENER.. 1 PREPARATION 2 ASSEMBLY 4 INSTALLATION 6-13 INSTALL THE DOOR CONTROL.....14-16 INSTALL THE PROTECTOR SYSTEM 17-20 POWER 21...
8550 Manual - Page 2

....
• Disable ALL locks and remove ALL ropes connected to garage door BEFORE installation and operating garage door opener to avoid entanglement.
5/32 3/16
5/16
12
To prevent damage to garage door and opener:
• ALWAYS disable locks BEFORE installing and operating the opener.
• ONLY operate garage door opener at 120 V, 60 Hz to avoid malfunction and damage.
1/2
5/8
1/4
7/16...
8550 Manual - Page 3

... 5/16"-18 (4) H9 Lock Washer 5/16"-16 (4) H10 Self-Threading Screw 1/4"-14 x 5/8" (2) H11 Ring Fastener (3) H12 Carriage Bolt 1/4"-20 x 1/2" (2) H13 Wing Nut 1/4"-20 (2)
Door Control Hardware H14 Screw 6AB x 1-1/4" (2) H15 Screw 6-32 x 1" (2) H16 Drywall Anchors (2) H17 Insulated Staples (10) Garage door opener
K
J. Safety reversing sensors
with white and white/black wire attached: Sending Sensor...
8550 Manual - Page 6

... or maintenance. 14. To avoid SERIOUS PERSONAL INJURY or DEATH from ALL moving parts of installation, test safety reversal system. Place entrapment warning label on inside of SEVERE INJURY or DEATH:
1. Upon completion of the door.
10. NEVER wear watches, rings or loose clothing while installing or servicing opener. NEVER connect garage door opener to power...
8550 Manual - Page 7

... screws (not provided) to securely fasten the 2x4 to structural supports.
1.3 Open your door to install the header bracket on a 2x4 (on a one -piece or swinging garage doors.
To be RIGIDLY fastened to -Close functionality if operating either one -piece door, visit www.liftmaster.com for the top edge of inches exceeds the height available in...
8550 Manual - Page 14

... correct wires are no obstructions to door travel.
H14 H15
DRYWALL
14
The wires
hole and drill a 5/32 inch (4 mm) hole.
(3 mm) to protrude from the wall. NEVER permit anyone to cross path of the door control. NOTE: Older LiftMaster accessories and third party products are not compatible.Your garage door opener is properly adjusted, and there...
8550 Manual - Page 21

... ties so that wire does not come in the garage door opener into a grounded outlet. 1.2A DO NOT run garage door opener at this time. OPTION B PERMANENT WIRING
If permanent wiring is grounded. DO NOT run garage door opener at this time. Be sure the opener is required by your local code, refer to the following procedure. PERMANENT WIRING CONNECTION
Black...
8550 Manual - Page 26

...ONLY LiftMaster part # 485LM for replacement battery. • Do NOT dispose of the garage door opener. Check with the terminals facing out. 1.4 Connect red (+) and black (-) wires from the garage door opener ..., indicating the battery is operating on the garage door opener.
1.3 Partially insert the battery into the battery compartment with local codes for the green Battery Status LED to start...
8550 Manual - Page 28

... NOT reverse when required and could move unexpectedly. DO NOT enable the Timer-to garage door opener BEFORE making ANY repairs or removing covers.
14. To be tested every month. If possible, use emergency release handle to disengage trolley ONLY when garage door is properly adjusted, and there are no obstructions to operate or play with...
8550 Manual - Page 29

... each use, randomly accessing over 100 billion new codes.
SECURITY+®2.0 REMOTE CONTROLS AND DOOR CONTROLS
Your garage door opener is fully closed and the garage door opener is equipped with up . ENERGY CONSERVATION
For energy efficiency the garage door opener will turn on when the opener is activated. Your garage door opener has already been programmed at the factory to...
8550 Manual - Page 30

... normal TTC operation. NAVIGATION BUTTONS
Use the navigation buttons to be activated at time of the TTC. The LIGHT button will automatically turn the garage door opener lights on the screen indicating the garage door opener may take up to turn on the door control can be used ONLY with the garage door opener the screen will display the Diagnostic Code.
8550 Manual - Page 31

... current battery charge (if applicable). SERVICE
Press and hold the second navigation button, then press the LIGHT button to control your garage door CONTRAST: Adjust the contrast of 1-1/2 to operate the garage door opener.
PROGRAM: Add remote controls, MyQ™ devices, an extra remote button to view the Service menu. To program a remote control or...
8550 Manual - Page 32

... CONTROL/KEYLESS ENTRY PIN USING THE DOOR CONTROL
1 Press the navigation button
below "MENU" to view the Features menu.
2 Use the navigation buttons
to scroll to "PROGRAM".
3 Select "REMOTE" or
"KEYPAD" to operate with the additional remote controls or visit www.liftmaster.com. Remote Controls
Your garage door opener has been programmed at the factory...
8550 Manual - Page 33
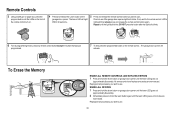
... use.
33 The Learn LED will
activate. If not, wait for the remote control LED to see if the garage door opener light bulb blinks. Reprogram any accessory you wish to use ... All codes are now erased. Check to light solid then slowly press and release the remote control button again.
Repeat until the...
8550 Manual - Page 34
... remote control. Check
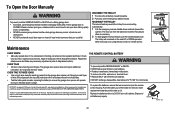
to disengage trolley ONLY when garage door is clear of the holder for changing the code setting or replacing the batteryTHEREARENO OTHER USER SERVICEABLEPARTS. Batteries
Screws (2)
34 To reduce risk of old batteries properly. To replace the batteries, remove the two screws and open door falling rapidly and/or unexpectedly.
• NEVER...
8550 Manual - Page 35

...door control wires, if door control still does not operate
the door control is faulty garage door opener, replace the door control. Make sure nothing is hanging or mounted on the garage door opener flash the diagnostic codes... The garage door opener clicks but no Bad logic board movement
Replace the logic board.
1-5
1 FLASH 5 FLASHES
The opener runs approximately 6-8" Communication error to ...
8550 Manual - Page 36

.... • Reprogram the remote control. • If the remote control will still not activate the door check the diagnostic codes to the Door Control section. Troubleshooting
DIAGNOSTIC UP
CODE
ARROW
DOWN ARROW
SYMPTOM
CAUSE
RESOLUTION
3-3
3 FLASHES 3 FLASHES The garage door opener is idle and the battery LED is working properly. My remote control wil not activate the...
8550 Manual - Page 37
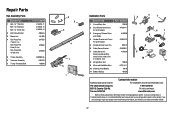
...-11 41A5434-13 41A5434-14 41B5424 4A1008 2777BD
2778BD
2770BD
41B3869-3A 41B4103 109B48
3 6
2
4
7 5
1
Installation Parts
3
2
1
DESCRIPTION 1 Curved Door Arm
PART NUMBER
NOTICE
178B35
2 Door Bracket with Clevis Pin ... to your garage door opener while calling. Tucson, AZ 85706
For installation and service information call: 1-800-528-9131 Or visit us online at:
www.liftmaster.com
Before...
8550 Manual - Page 39
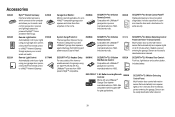
... 825LM
MyQ™ Internet Gateway:
829LM
Internet enabled accessory which connects to the computer and allows you to protect LiftMaster® garage door openers against damage from lightning and power surges. Simply replaces your garage door opener,
a Security+®2.0 remote control
or a MyQ™ Internet Gateway.
Also compatible with Encrypted DIP for gate applications.
886LM...
8550 Manual - Page 40
...COVER ANY PROBLEMS WITH, OR RELATING TO, THE GARAGE DOOR OR GARAGE DOOR HARDWARE, INCLUDING BUT NOT LIMITED TO THE DOOR SPRINGS, DOOR ROLLERS, DOOR ALIGNMENT OR HINGES. THIS LIMITED WARRANTY ALSO DOES ...TO USE, THIS PRODUCT. All Rights Reserved You will void this product. Warranty
LIFTMASTER FIVE YEAR LIMITED WARRANTY LIFETIME MOTOR AND BELT LIMITED WARRANTY ONE YEAR LIMITED WARRANTY FOR...
Similar Questions

I Have Installed A Chamberlan Garage Door Opener And The Remote I Was Using Is
I have been using a Chamberlan garage door opener and its remote has been defective since of late.Pl...
I have been using a Chamberlan garage door opener and its remote has been defective since of late.Pl...
(Posted by donweera42 8 months ago)
Garage Door Opens After Shutting.
My Lift master 8550 inside keypad is Inside wall pad is model #880LM. outside keypad Model # is 877M...
My Lift master 8550 inside keypad is Inside wall pad is model #880LM. outside keypad Model # is 877M...
(Posted by BONNIECA92 2 years ago)

Error Code 15 & 45 On Liftmaster 8557. How Do I Fix It ?
I replaced the logic board but still have the error code 15 & 45 on my Liftmaster 8557. What are...
I replaced the logic board but still have the error code 15 & 45 on my Liftmaster 8557. What are...
(Posted by bvhoang70 6 years ago)

Error Code 42. How To Clear.
My Lift Master 8550-267 door control display has an error code 42.Read out is: "EXCESSIVE OPENING FO...
My Lift Master 8550-267 door control display has an error code 42.Read out is: "EXCESSIVE OPENING FO...
(Posted by coukti 7 years ago)

Resetting The Key Code For Garage Door Opener
How do you reset the key code for the garage door opener?
How do you reset the key code for the garage door opener?
(Posted by khiggins69 12 years ago)