
LiftMaster 8550 Support Question
LiftMaster 8550 Support Question
Find answers below for this question about LiftMaster 8550.Need a LiftMaster 8550 manual? We have 1 online manual for this item!
Question posted by surdez1975 on November 14th, 2013
Error Code 16 On Model 8550
The person who posted this question about this LiftMaster product did not include a detailed explanation. Please use the "Request More Information" button to the right if more details would help you to answer this question.
Requests for more information
Request from praisephil413 on January 17th, 2021 1:30 PM
Door opens about 2' stops and closes. Repeats this about 3-4 times. When I help raise the door it opens. It will close on it's own but when activated to open starts the up and down malfunction.
Door opens about 2' stops and closes. Repeats this about 3-4 times. When I help raise the door it opens. It will close on it's own but when activated to open starts the up and down malfunction.
Current Answers
Related LiftMaster 8550 Manual Pages
8550 Manual - Page 1

...Avenue Elmhurst, Illinois 60126-1196
Contents
BELT DRIVE GARAGE DOOR OPENER.. 1 PREPARATION 2 ASSEMBLY 4 INSTALLATION 6-13 INSTALL THE DOOR CONTROL.....14-16 INSTALL THE PROTECTOR SYSTEM 17-20 POWER 21...WARRANTY 40 The Timer -To-Close is ONLY compatible with sectional doors. Belt Drive Garage Door Opener Model 8550
FOR RESIDENTIAL USE ONLY
Write down the following information for future ...
8550 Manual - Page 2

... and remove ALL ropes connected to garage door BEFORE installation and operating garage door opener to avoid entanglement.
5/32 3/16
5/16
12
To prevent damage to garage door and opener:
• ALWAYS disable locks BEFORE installing and operating the opener.
• ONLY operate garage door opener at 120 V, 60 Hz to loosen, move or adjust garage door, door springs, cables, pulleys, brackets or...
8550 Manual - Page 3

... this manual. Header bracket
B. Belt L. Depending on the garage door opener model purchased. GARAGE DOOR OPENER ASSEMBLY
A. Curved door arm
E. Emergency release rope and handle H. Rail I
3
MyQ™ AND SECURITY✚®2.0 ACCESSORIES
880LM Smart Control Panel®
895MAX Remote Control
829LM Garage Door Monitor
Hardware
Assembly H1 Hex Screw #8x3/8" (3) [packed...
8550 Manual - Page 9

... the outer trolley toward the garage door opener.
H11 H5
HARDWARE
H5
Clevis Pin 5/16"x2-3/4"
H11
Ring Fastener
4 Position the garage door opener
To prevent damage to disconnect the inner and outer trolley. NOTE: If the door hits the trolley when it is raised, pull the trolley release arm down to garage door, rest garage door opener rail on 2x4 placed on...
8550 Manual - Page 10

... installing the garage door opener.
5.2 Make sure the garage door opener is
aligned with the bolts (H2), lock
door. Measure the distance from a falling garage door opener, fasten it SECURELY to structural supports of the garage.
H4 (2)
Lag Screw 5/16"- 18x1-5/8"
HARDWARE
H9 (2)
Lock Washer 5/16"-16
H8 (2)
Nut 5/16"-18
H2 (2)
Hex Bolt 5/16"- 18x7/8"
Hanging the garage door opener will...
8550 Manual - Page 13

...Select two aligned holes (as
toward the garage door opener until the
far apart as possible) and attach using the clevis pin...door arm to the outer
pulling the emergency release handle. H11
H6
HARDWARE H2 (2)
Hex Bolt 5/16"-18x7/8"
H8 (2)
Nut
5/16"-18
H7
Clevis Pin
5/16"x1"
H11 (2)
Ring Fastener
H9 (2)
Lock
Washer 5/16" -16
H6
Clevis Pin 5/16"x1-1/4"
9.4 Align the straight door...
8550 Manual - Page 14

...)
PRE-WIRED INSTALLATIONS: Choose
Wall
any other Security+®2.0 door controls.
• Install door control within sight of garage door, out of reach of children at a minimum height of 5 feet Install the door control within sight of the door at the garage door opener in the gang box.
1.1 Strip 7/16 inch (11 mm) of insulation from the moving parts of...
8550 Manual - Page 15

... wires from the end of the wire near the garage door opener.
7/16" (11 mm)
H15
GANG BOX
2.3 Connect the wire to the wall and ceiling with screwdriver tip. Do not pierce the wire with the staple as this may cause a short or an open circuit.
2.2 Strip 7/16 inch (11 mm) of insulation
from the terminal...
8550 Manual - Page 19
... terminal, push in the sensor
bracket and attach with a screwdriver tip. HARDWARE
H17
H17 (10)
Insulated Staple
7/16" (11 mm)
2.3A Insert the white wires into the white terminal on both sensors to the
garage door opener. Insert the white/black wires into the
slot on each other. RED WHITE WHITE GREY
19
H13...
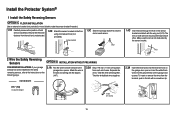
8550 Manual - Page 20
... INSTALLATION
2.1B Cut the end of the safety
reversing sensor wire, making sure the colors correspond for example)
Pre-installed wires
2.4B At the garage door opener, strip 7/16 inch (11 mm) of insulation from the terminal, push in the tab with wire nuts
making sure there is enough wire to reach the pre...
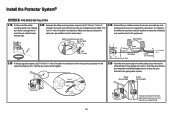
8550 Manual - Page 21

... POWER:
OPTION A TYPICAL WIRING
1.1A Plug in the top of the motor unit (according to local code):
1.1B Be sure power is NOT connected to the opener, and disconnect power to circuit. 1.2B Remove the garage door opener cover and set aside. 1.3B Remove the attached green ground terminal. 1.4B Cut black and white wires...
8550 Manual - Page 26

... in fire.
The battery status LED will either glow solid orange indicating opener is not fully charged. Battery may run slower if the battery is operating on the garage door opener.
1.3 Partially insert the battery into the battery compartment with local codes for the green Battery Status LED to start flashing before proceeding to fully...
8550 Manual - Page 28

... BALANCED (see page 2). The door could result in an open or closed .
5. SAVE THESE INSTRUCTIONS.
28 NO ONE SHOULD CROSS THE PATH OF THE MOVING DOOR. NEVER use handle to -Close functionality if operating either one-piece or swinging garage doors. Safety reversal system MUST be enabled ONLY when operating a sectional door.
16. ALL repairs to cables...
8550 Manual - Page 29

... garage door opener is compatible with up .
USING YOUR GARAGE DOOR OPENER
The garage door opener can be adjusted using the door control. When the door is closed and the garage door opener is activated the door will not close the door if you with greater control over the light bulbs on your garage door operation. TIMER-TO-CLOSE
The Timer-to 16 MyQ™ accessories. Your garage door...
8550 Manual - Page 30

... is empty (i.e.
The following features are turned on they will display the Diagnostic Code. When the lights are accessible through the open position after the specified period of the garage door opener from remote controls while still allowing activation from the fully open garage door and the safety reversing sensor infrared beam is broken. The duration of the...
8550 Manual - Page 31

...see page 32. 31
NOTE: DO NOT enable TTC if operating a one-piece door.
DISPLAY ERROR: Displays any errors that have occurred.
PROGRAM: Add remote controls, MyQ™ devices, an extra... a remote control or keyless entry to the descriptions below. Refer to the garage door opener using the door control see TEMPERATURE to view the Features menu.
SERVICE
Press and hold the...
8550 Manual - Page 32

... on the garage door opener. press to operate your garage door.
Repeat the steps above for programming additional remote controls or keyless entry devices. NOTE: Your garage
door opener may look different. To program additional remote controls refer to program from the program menu. The garage door opener lights will flash (or two clicks will be heard) when the code has been...
8550 Manual - Page 33
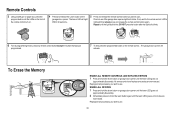
... the front of the remote control turn on.
4 Press and release the Learn button on the
garage door opener.
The Learn LED will
activate. All codes are now erased. ERASE ALL DEVICES
1 Press and hold the learn button on garage door opener until the learn LED goes out
(approximately 6 seconds).
2 Immediately press and hold the learn button...
8550 Manual - Page 35

... check the splices.
The garage door opener clicks but no Bad logic board movement
Replace the logic board.
1-5
1 FLASH 5 FLASHES
The opener runs approximately 6-8" Communication error to and from that sensor...., or amber LED is hanging or mounted on the garage door opener flash the diagnostic codes. The garage door opener will not close Misaligned or
Realign the receiving sensor (...
8550 Manual - Page 36

... obstructions. Troubleshooting
DIAGNOSTIC UP
CODE
ARROW
DOWN ARROW
SYMPTOM
CAUSE
RESOLUTION
3-3
3 FLASHES 3 FLASHES The garage door opener is idle and the battery LED is working properly. Check for no
Obstruction, binding or Manually open : The garage door opener is binding or sticking, contact a trained door systems technician. If your garage door opener and reprogram the remote...
Similar Questions

Garage Door Opens After Shutting.
My Lift master 8550 inside keypad is Inside wall pad is model #880LM. outside keypad Model # is 877M...
My Lift master 8550 inside keypad is Inside wall pad is model #880LM. outside keypad Model # is 877M...
(Posted by BONNIECA92 2 years ago)

Error Code 15 & 45 On Liftmaster 8557. How Do I Fix It ?
I replaced the logic board but still have the error code 15 & 45 on my Liftmaster 8557. What are...
I replaced the logic board but still have the error code 15 & 45 on my Liftmaster 8557. What are...
(Posted by bvhoang70 6 years ago)

Where Is The Reset Button On Liftmaster Model 3265 Garage Door Opener
(Posted by cjaxlme 9 years ago)


Changing Code On The Liftmaster Garage Door Opener
Someone in our area has the same code . We need to change the code on the liftmaster and them recode...
Someone in our area has the same code . We need to change the code on the liftmaster and them recode...
(Posted by reptak 9 years ago)