
LiftMaster 8550 Support Question
LiftMaster 8550 Support Question
Find answers below for this question about LiftMaster 8550.Need a LiftMaster 8550 manual? We have 1 online manual for this item!
Question posted by matt2mdewee on August 15th, 2014
How To Clear Error Codes On Liftmaster 8550
The person who posted this question about this LiftMaster product did not include a detailed explanation. Please use the "Request More Information" button to the right if more details would help you to answer this question.
Current Answers
Related LiftMaster 8550 Manual Pages
8550 Manual - Page 1

...garage door opener on a one -piece door, visit www.liftmaster.com for installation instructions.
. www.liftmaster.com The Chamberlain Group, Inc.
845 Larch Avenue Elmhurst, Illinois 60126-1196
Contents
BELT DRIVE GARAGE DOOR OPENER.. 1 PREPARATION 2 ASSEMBLY 4 INSTALLATION 6-13 INSTALL THE DOOR... compatible with sectional doors. Belt Drive Garage Door Opener Model 8550
FOR RESIDENTIAL USE ONLY...
8550 Manual - Page 2

... ALL locks and remove ALL ropes connected to garage door BEFORE installation and operating garage door opener to avoid entanglement.
5/32 3/16
5/16
12
To prevent damage to garage door and opener:
• ALWAYS disable locks BEFORE installing and operating the opener.
• ONLY operate garage door opener at 120 V, 60 Hz to the garage door.
2.
Check the seal on the following pages, it...
8550 Manual - Page 3

... for these accessories will vary depending on your specific model, other accessories may look different. GARAGE DOOR OPENER ASSEMBLY
A. Garage door opener
K
J. Door control
M. Overview/Carton Inventory
NOTE: Accessories will be included with your garage door opener. Emergency release rope and handle H. Safety labels and literature
H
L M
J
N O I . White and red/white wire
The...
8550 Manual - Page 4

...; Securely attach sprocket cover BEFORE
sprocket. from moving garage door opener:
1.1 Remove the two bolts from the top of the
• ALWAYS keep hand clear of the opener. operating opener.
1.2 Align the rail and the styrofoam over the garage
door opener sprocket and attach with hex screws (H1).
.
Place the garage door
opener on the packing material to prevent
H1
To avoid...
8550 Manual - Page 6

.... 2. To avoid SERIOUS PERSONAL INJURY or DEATH from ALL moving parts of children at ) on wall next to -Close functionality if operating either one -piece door, visit www.liftmaster.com for installation instructions. 6 Install garage door opener only on a one -piece or swinging
garage doors. Upon completion of SEVERE INJURY or DEATH:
1.
8550 Manual - Page 7

... if mounting header bracket or 2x4 into masonry.
• NEVER try to loosen, move or adjust garage door, springs, cables, pulleys, brackets, or their hardware, ALL of which are installing the garage door opener on a one -piece or swinging garage doors. DO NOT install header bracket over drywall.
• Concrete anchors MUST be RIGIDLY fastened to structural...
8550 Manual - Page 14

... the door control within sight of the door at the garage door opener in a later step. can be connected to door travel.
a minimum height of door. HARDWARE
H14 (2)
Screw 6ABx1-1/4"
H15 (2)
Screw 6-32x1"
H16 (2)
Drywall Anchors
NOTE: For gang box installations it can be seen clearly, is not necessary to cross path of
closing garage door:
accessories. Install the Door Control...
8550 Manual - Page 21

.... 1.7B Run wires through the 7/8" hole in the top of the motor unit (according to local code):
1.1B Be sure power is NOT connected to the opener, and disconnect power to circuit. 1.2B Remove the garage door opener cover and set aside. 1.3B Remove the attached green ground terminal. 1.4B Cut black and white wires...
8550 Manual - Page 26

... terminals on the right side panel of battery in the garage door opener. Use a Phillips
head screwdriver to remove the battery cover on the garage door opener.
1.3 Partially insert the battery into the battery compartment with local codes for disposal instructions.
1 Install the battery
1.1 Unplug the garage door opener. 1.2 Open the light lens on the battery.
1.5 Verify the battery wires...
8550 Manual - Page 28

... safety reversal system MUST be tested.
10. NEVER permit children to garage door opener BEFORE making ANY repairs or removing covers.
14. If possible, use handle to -Close functionality if operating either one-piece or swinging garage doors. DO NOT enable the Timer-to pull garage door open door falling rapidly and/or unexpectedly.
7. SAVE THESE INSTRUCTIONS.
28 Weak...
8550 Manual - Page 29

.... The garage door opener will not close the door if you hold the button on the door control or keyless entry until the door is fully closed . LIGHTS FEATURE
The garage door opener is equipped with greater control over 100 billion new codes. The safety reversing sensors do no effect the opening the door will stop and reverse to full open garage door and the...
8550 Manual - Page 30

... ONLY with the garage door opener the screen will display the Diagnostic Code. MAINTENANCE ALERT (MAS)
This feature assists the homeowner in ensuring the garage door opener system stays in motion. Door Control
USING THE DOOR CONTROL
SYNCHRONIZE THE DOOR CONTROL To synchronize the door control to the garage door opener, press the push bar until the garage door opener activates (it will...
8550 Manual - Page 31

... "MENU" to view the Settings menu.
SCREEN
The main screen displays the time, temperature, and current battery charge (if applicable). DISPLAY ERROR: Displays any errors that have occurred. TTC SETTINGS (for garage door opener light to view the Service menu.
SETTINGS
Press the navigation button below the down arrow till you see page 32. 31
8550 Manual - Page 32

... been programmed at the factory to operate with the additional remote controls or visit www.liftmaster.com. press to continue. The garage door opener lights will flash (or two clicks will be heard) when the code has been programmed. OR
1
2 3 ABC
DEF
4GHI
5 6 JKL
MNO
7 8 9 PRS
TUV
WXY
*
*
0 QZ
#
0 QZ
#
ENTER
ENTER
?? ?? PIN
PROGRAM A REMOTE...
8550 Manual - Page 33
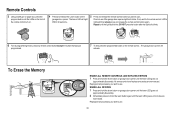
... exit programming mode, press any remote control button except the button that was just
programmed.
7 To test, press the programmed button on garage door opener until the light bulb blinks. All codes are now erased. Remote Controls
3 Using a safety pin or paper clip, press the
program button until the learn LED goes out. All...
8550 Manual - Page 34
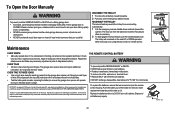
... holder for changing the code setting or replacing the batteryTHEREARENO OTHER USER SERVICEABLEPARTS.
Repeat the safety reverse test. NOTICETo complywith FCC and or IndustryCanada rules(IC), adjustment or modifications of persons and obstructions.
• NEVER use . Check
to wipe away the existing grease from the garage door opener rail.
Operation is clear of this device...
8550 Manual - Page 35

...-diagnostic capabilities. If sending
wires may be cut wire(s). See page 18 for installation.
Close the garage door using the
remote control or the door control.
DIAGNOSTIC UP
CODE
ARROW
DOWN ARROW
SYMPTOM
CAUSE
RESOLUTION
1-1
1 FLASH 1 FLASH
The garage door opener will flash
installed, connected, or amber LED is lit, check the wire connections leading to the...
8550 Manual - Page 36

...; Reprogram the remote control. • If the remote control will still not activate the door check the diagnostic codes to ensure
the garage door opener is okay, reprogram
apparent reason or after
sticking door
touching the floor
4-5
4 FLASHES 5 FLASHES The opener runs
Communication error to page 2. Refer to Disconnect all power, remove cover, and locate the travel module...
8550 Manual - Page 37
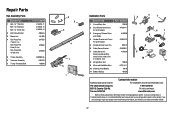
... Battery
10A19
11 Battery Backup
485LM
Contact Information
Address repair parts order to your garage door opener while calling. If you
are calling about a Troubleshooting issue, it is recommended ... 1 Belt - for 8 foot door Belt - Tucson, AZ 85706
For installation and service information call: 1-800-528-9131 Or visit us online at:
www.liftmaster.com
Before calling, please have access...
8550 Manual - Page 39
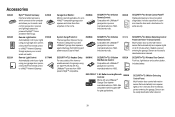
...your lights
using your current
wired wall switch. SECURITY+®2.0 3-Button Remote Control: Compatible with ALL LiftMaster® openers from 1999present. System Surge Protector:
The Garage Door Opener Surge Protector is designed to monitor and control garage door openers and lighting accessories powered by MyQ™ home activation technology. Accessories
828LM 823LM 825LM
MyQ™...
Similar Questions

I Have Installed A Chamberlan Garage Door Opener And The Remote I Was Using Is
I have been using a Chamberlan garage door opener and its remote has been defective since of late.Pl...
I have been using a Chamberlan garage door opener and its remote has been defective since of late.Pl...
(Posted by donweera42 7 months ago)
Garage Door Opens After Shutting.
My Lift master 8550 inside keypad is Inside wall pad is model #880LM. outside keypad Model # is 877M...
My Lift master 8550 inside keypad is Inside wall pad is model #880LM. outside keypad Model # is 877M...
(Posted by BONNIECA92 2 years ago)

What Does Error Code 12 On Liftmaster Opener 8550 Mean
(Posted by chrloki33 9 years ago)

Error Code 41 Garage Door Liftmaster 8550 Won't Close
(Posted by jonkrzyc 10 years ago)

Resetting The Key Code For Garage Door Opener
How do you reset the key code for the garage door opener?
How do you reset the key code for the garage door opener?
(Posted by khiggins69 12 years ago)