
LiftMaster 3280 Support Question
LiftMaster 3280 Support Question
Find answers below for this question about LiftMaster 3280.Need a LiftMaster 3280 manual? We have 1 online manual for this item!
Question posted by sodbuster130 on November 15th, 2019
How Do I Raise The Height Of My 3280 Door?
How do I raise the height of my 3280 door?
Current Answers
Answer #1: Posted by Odin on November 15th, 2019 12:06 PM
Odin

Member since:
April 10th, 2010 Points: 41,236,690

Member since:
April 10th, 2010 Points: 41,236,690
If I understand you correctly, this is answered in the manual pages starting at https://www.manualslib.com/manual/647328/Chamberlain-3280.html?page=8&term=height&selected=3. If the issue persists or if you require further advice, you'll have to consult the manufacturer, for which use the contact information at https://www.contacthelp.com/liftmaster/customer-service.
Hope this is useful. Please don't forget to click the Accept This Answer button if you do accept it. My aim is to provide reliable helpful answers, not just a lot of them. See https://www.helpowl.com/profile/Odin.
Related LiftMaster 3280 Manual Pages
3280 Manual - Page 1
®
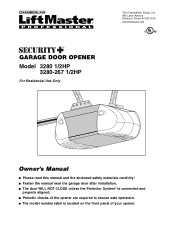
GARAGE DOOR OPENER Model 3280 1/2HP
3280-267 1/2HP
For Residential Use Only
The Chamberlain Group, Inc. 845 Larch Avenue Elmhurst, Illinois 60126-1196
www.liftmaster.com
Owner's Manual
■ Please read this manual and the enclosed safety materials carefully! ■ Fasten the manual near the garage door after installation. ■ The door WILL NOT CLOSE unless the...
3280 Manual - Page 2

...35
Repair Parts and Service
36
Warranty
36
INTRODUCTION
Safety Symbol and Signal Word Review
This garage door opener has been designed and tested to offer safe service provided it . Read them . ...
Operation
26-30
Operation safety instructions 26
Using your garage door opener 26
Using the wall-mounted door control 27
To open the door manually 27
Care of serious injury or death if ...
3280 Manual - Page 3
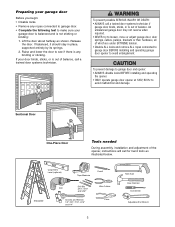
... and remove ALL ropes connected to garage door BEFORE installing and operating garage door opener to
avoid malfunction and damage. Lift the door about halfway as illustrated below. Release
the door. Raise and lower the door to see if there is any ropes connected to garage door. • Complete the following test to make sure your
garage door is balanced and is out...
3280 Manual - Page 4
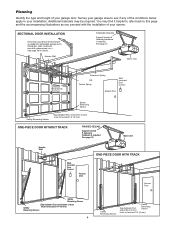
.... Motor Unit
Header Wall
Wallmounted Door Control
Access Door
ONE-PIECE DOOR WITH TRACK
Access Door
Safety Reversing Sensor
Gap between floor and bottom of Door
Extension Spring OR Torsion Spring
Wallmounted Door Control
Access Door
--- --- --
See page 19 for lightweight garage doors (fiberglass, steel, aluminum, door with the installation of your opener. See page 12. Safety...
3280 Manual - Page 5
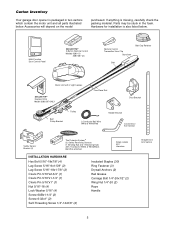
...Entry Model 3280-267 ONLY
One-Piece Rail
CEILING MOUNT ONLY UP
Door Bracket
Belt Pulley Bracket
Trolley
2-Conductor Bell Wire White & White/Red
Header Bracket
Curved Door Arm ...Drywall Anchors (2) Rail Grease Carriage Bolt 1/4"-20x1/2" (2) Wing Nut 1/4"-20 (2) Rope Handle
Straight Door Arm Section
5
Hardware for installation is also listed below . Parts may be stuck in two cartons...
3280 Manual - Page 6

...b16o/9lt2s-!5/U21s/9e2 -o6f/2a/9n2y other bolts will cause6/1s1e/9r2ious damage to opener, ONLY use any tools.
• Insert a screwdriver tip into the
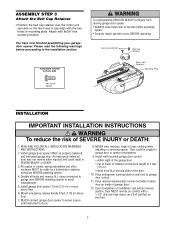
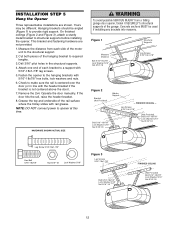
motor unitL....6 To avoid SERIOUS damage to door opener. • Position belt over sprocket. ASSEMBLY STEP 1
Attach the Rail to the Motor Unit
To avoid installation difficulties, do not run the garage door opener until instructed to do so....
3280 Manual - Page 7
... of reach of children at minimum height of 5 feet (1.5 m).
• away from moving parts of sprocket while operating opener.
• Securely attach sprocket cover BEFORE operating. You have now finished assembling your garage door opener. Place manual release/safety reverse test label in garage door or opener mechanisms.
9.
Install garage door opener ONLY on wall next to avoid...
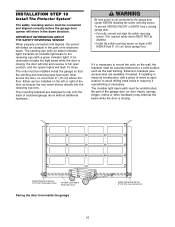
3280 Manual - Page 8
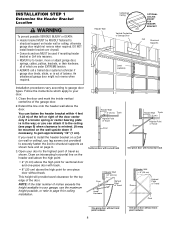
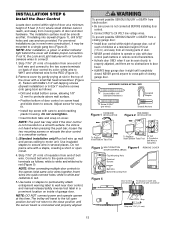
... support on header wall or ceiling, otherwise garage door might not reverse when required. DO NOT install header bracket over drywall. • Concrete anchors MUST be mounted on page 9.
3. Open your door to the highest point of balance.
You can attach it to gain approximately 1/2" (1 cm).
This height will provide travel as shown here and...
3280 Manual - Page 10
... is in the way you'll need help.
Have someone hold the opener securely on the garage floor below the header bracket. Header Wall Header Bracket Belt Pulley Bracket
Garage Door
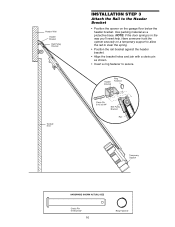
INSTALLATION STEP 3
Attach the Rail to the Header Bracket
• Position the opener on a temporary support to allow the rail to clear the spring...
3280 Manual - Page 11
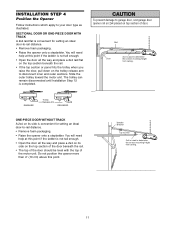
... cm) above this point if the ladder is used to garage door, rest garage door opener rail on 2x4 placed on the trolley release arm to -rail distance.
• Remove foam packaging.
• Raise the opener onto a stepladder. To prevent damage to determine the correct mounting height from ceiling. You will need help at this point if the...
3280 Manual - Page 12
... provided. 1. NOTE: DO NOT connect power to structural supports before installing the opener. Fasten the opener to required
lengths. 3. If the door hits the rail, raise the header bracket. 8. This bracket and fastening hardware are shown. Measure the distance from a falling garage door opener, fasten it SECURELY to structural supports of the hanging bracket to the hanging...
3280 Manual - Page 13
... low voltage wires.
INSTALLATION STEP 6
Install the Door Control
Locate door control within sight of garage door, out of
reach of children at this time. NOTE: DO NOT connect power and operate opener at a minimum height of 5 feet (1.5 m), and away from a closing garage door. The trolley will travel . • ALWAYS keep garage door in the top of the cover with...
3280 Manual - Page 14
... or light socket. NOTE: If it is necessary to cut the rope, heat seal the cut end with a match or lighter to vibration, replace with a Garage Door Opener bulb.
The lights will turn ON and remain lit for approximately 4-1/2 minutes when power is CLOSED. To prevent possible OVERHEATING of the endpanel or light...
3280 Manual - Page 15
... set the cover aside.
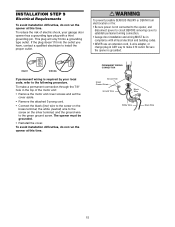
• Remove the attached 3-prong cord.
• Connect the black (line) wire to the following procedure. Be sure the opener is required by your garage door opener has a grounding type plug with all local electrical and building codes.
• NEVER use an extension cord, 2-wire adapter, or change plug in...
3280 Manual - Page 16
...;
The safety reversing sensor must be connected and aligned correctly before the garage door opener will move in masonry construction, add a piece of its electronic beam... indicator light) transmits an invisible light beam to the garage door opener BEFORE installing the safety reversing sensor.
The units must be installed inside the garage
16
Safety Reversing Sensor 6" (15 cm) max.
...
3280 Manual - Page 17

... bracket mounting holes as shown in one of each other across the garage door, with curved arms facing the door. Garage door track installation (preferred):
• Slip the curved arms over the rounded... sure power to the opener is recommended.
It should lie flush, with Concrete Anchors (Not Provided)
Indicator Light
Sensor Bracket
17 Be sure all door hardware obstructions are cleared....
3280 Manual - Page 19

... installation. SECTIONAL DOORS
1. A horizontal reinforcement brace should cover the height of door bracket.
For ...door bracket using a vertical angle iron brace between the door panel support and the door bracket:
• Drill 3/16" fastening holes. INSTALLATION STEP 11
Fasten the Door Bracket
Follow instructions which apply to your garage door manufacturer for an opener installation door...
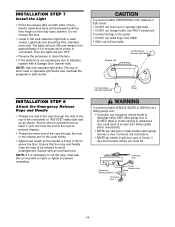
3280 Manual - Page 21

...
Follow instructions which apply to your door type as possible to increase door arm rigidity. SECTIONAL DOORS ONLY Make sure garage door is operated. Pull the emergency release... Bolt
5/16"x1-1/4" (Door Bracket) 5/16"-18x7/8"
Nuts 5/16"-18
Lock Washers 5/16"
Figure 3
Bolts 5/16"-18x7/8"
Cut This End
21 Trolley will re-engage automatically when opener is fully closed.
Figure...
3280 Manual - Page 22

...limit adjustment screw counter-clockwise 4 turns.
- Manually raise the door to make the connection.
• Secure with Backward Slant (Incorrect)
22 Door Arm
Door Arm Connector Hole
Emergency Release Handle
Closed Door
Inner Trolley
Outer Trolley
Correct Angle
Door Arm
Open Door
Door with a ring fastener.
• Run the opener through a complete travel limits must be necessary to...
3280 Manual - Page 27
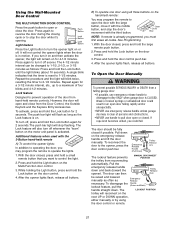
The push bar light will flash as long as the Lock feature is in an open door falling rapidly and/or unexpectedly.
• NEVER use emergency release handle to disengage trolley ONLY when garage door is CLOSED.
To Open the Door Manually
To prevent possible SERIOUS INJURY or DEATH from hand-held remote controls. Pull down . It...
Similar Questions

Photo Beam Sensor
why istall universal garage door gate sensor photobeam lift master ?
why istall universal garage door gate sensor photobeam lift master ?
(Posted by edgardorodriguez20 6 years ago)

I Have A Chamberlain Liftmaster 3280 Belt Drive. I Need A Screw Drive Door Opene
(Posted by apimpin8ntez 9 years ago)
Liftmaster 3280 Door Closing Problem
my liftmaster 3280 door won't close unless i keep pushing the button on the wall unit. Whati is wron...
my liftmaster 3280 door won't close unless i keep pushing the button on the wall unit. Whati is wron...
(Posted by marktaleff 11 years ago)
Mh Liftmaster Garage Door Will Not Open Intermittently.
On the occasion when the garage door will not open, there is power to the opener. Both leds on the p...
On the occasion when the garage door will not open, there is power to the opener. Both leds on the p...
(Posted by kellhowarda 11 years ago)