
3280 Manual
Page 1
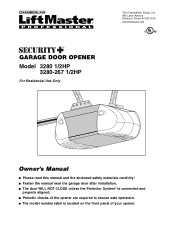
® GARAGE DOOR OPENER Model 3280 1/2HP 3280-267 1/2HP For Residential Use Only The Chamberlain Group, Inc. 845 Larch Avenue Elmhurst, Illinois 60126-1196 www.liftmaster.com Owner's Manual ■ Please read this manual and the enclosed safety materials carefully! ■ Fasten the manual near the garage door after installation. ■ The door WILL NOT CLOSE unless the Protector System® is connected and properly aligned. ■ Periodic checks of the opener are required to ensure safe operation. ■ The model number label is located on the front panel of your opener.
® GARAGE DOOR OPENER Model 3280 1/2HP 3280-267 1/2HP For Residential Use Only The Chamberlain Group, Inc. 845 Larch Avenue Elmhurst, Illinois 60126-1196 www.liftmaster.com Owner's Manual ■ Please read this manual and the enclosed safety materials carefully! ■ Fasten the manual near the garage door after installation. ■ The door WILL NOT CLOSE unless the Protector System® is connected and properly aligned. ■ Periodic checks of the opener are required to ensure safe operation. ■ The model number label is located on the front panel of your opener.

3280 Manual
Page 2
... your garage door opener 28 Having a problem 29 Diagnostic chart 30 Programming 31-32 To add or reprogram a hand-held remote control .....31 To erase all codes 31 3-Button remotes 31 To add, reprogram or change a Keyless Entry PIN 32 Repair Parts 33-34 Rail assembly parts 33 Installation parts 33 Motor unit assembly parts 34 Accessories 35 Repair Parts and Service 36 Warranty 36 INTRODUCTION Safety Symbol and Signal Word Review This garage door opener has been designed and tested to offer safe service provided it is installed, operated...
... your garage door opener 28 Having a problem 29 Diagnostic chart 30 Programming 31-32 To add or reprogram a hand-held remote control .....31 To erase all codes 31 3-Button remotes 31 To add, reprogram or change a Keyless Entry PIN 32 Repair Parts 33-34 Rail assembly parts 33 Installation parts 33 Motor unit assembly parts 34 Accessories 35 Repair Parts and Service 36 Warranty 36 INTRODUCTION Safety Symbol and Signal Word Review This garage door opener has been designed and tested to offer safe service provided it is installed, operated...
3280 Manual
Page 5
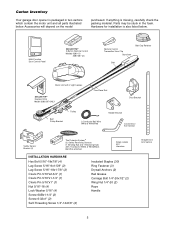
... (2) Remote Control Transmitter Visor Clip Styrofoam Belt Cap Retainer Belt Motor Unit with 2 Light Lenses SECURITY✚® Keyless Entry Model 3280-267 ONLY One-Piece Rail CEILING MOUNT ONLY UP Door Bracket Belt Pulley Bracket Trolley 2-Conductor Bell Wire White & White/Red Header Bracket Curved Door Arm Section Safety Sensor Bracket (2) The Protector System® (2) Safety Reversing Sensors (1 Sending Eye and 1 Receiving Eye) with 2-Conductor White & White/Black Bell Wire attached Safety Labels and Literature INSTALLATION HARDWARE Hex Bolt 5/16"-18x7/8" (4) Lag Screw 5/16...
... (2) Remote Control Transmitter Visor Clip Styrofoam Belt Cap Retainer Belt Motor Unit with 2 Light Lenses SECURITY✚® Keyless Entry Model 3280-267 ONLY One-Piece Rail CEILING MOUNT ONLY UP Door Bracket Belt Pulley Bracket Trolley 2-Conductor Bell Wire White & White/Red Header Bracket Curved Door Arm Section Safety Sensor Bracket (2) The Protector System® (2) Safety Reversing Sensors (1 Sending Eye and 1 Receiving Eye) with 2-Conductor White & White/Black Bell Wire attached Safety Labels and Literature INSTALLATION HARDWARE Hex Bolt 5/16"-18x7/8" (4) Lag Screw 5/16...
3280 Manual
Page 7
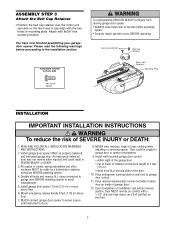
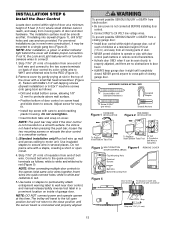
... door opener to power source until instructed to garage door control. 11. Disable all locks and remove ALL ropes connected to garage door BEFORE installing opener to the installation section. Place manual release/safety reverse test label in mounting plate. Please read the following warnings before proceeding to avoid entanglement. 5. Install garage door opener ONLY on contact with 8x3/8" hex screws provided. They could result in garage door or opener mechanisms. 9. Mount emergency release handle 6 feet (1.83 m) above floor. 6. Install wall-mounted garage door control...
... door opener to power source until instructed to garage door control. 11. Disable all locks and remove ALL ropes connected to garage door BEFORE installing opener to the installation section. Place manual release/safety reverse test label in mounting plate. Please read the following warnings before proceeding to avoid entanglement. 5. Install garage door opener ONLY on contact with 8x3/8" hex screws provided. They could result in garage door or opener mechanisms. 9. Mount emergency release handle 6 feet (1.83 m) above floor. 6. Install wall-mounted garage door control...
3280 Manual
Page 12
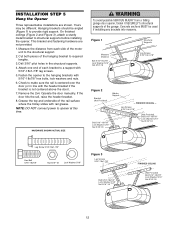
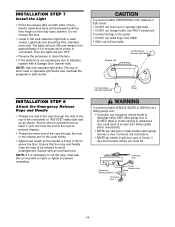
... rail grease. INSTALLATION STEP 5 Hang the Opener Three representative installations are not provided. 1. Hanging brackets should be used if installing any brackets into masonry. FINISHED CEILING - Grease the top and underside of the garage. Figure 1 Structural Supports Measure Distance Bolt 5/16"-18x7/8" Lock Washer 5/16" Nut 5/16"-18 Lag Screws 5/16"-18x1-7/8" Figure 2 Bracket (Not Provided) Hidden Support - Fasten the opener to provide rigid support. Operate the door manually...
... rail grease. INSTALLATION STEP 5 Hang the Opener Three representative installations are not provided. 1. Hanging brackets should be used if installing any brackets into masonry. FINISHED CEILING - Grease the top and underside of the garage. Figure 1 Structural Supports Measure Distance Bolt 5/16"-18x7/8" Lock Washer 5/16" Nut 5/16"-18 Lag Screws 5/16"-18x1-7/8" Figure 2 Bracket (Not Provided) Hidden Support - Fasten the opener to provide rigid support. Operate the door manually...
3280 Manual
Page 13
... proper connection. The trolley will travel . • ALWAYS keep garage door in several places. Remove cover by color: white wire to WHT and white/red wire to the RED (Figure 3). 2. Strip 7/16" (11 mm) of insulation from end of bell wire. NEVER permit anyone to motor unit. Use insulated staples to the opener, twist same color wires together. NOTE: When connecting multiple door controls to secure wire in sight until the sensor beam is connected...
... proper connection. The trolley will travel . • ALWAYS keep garage door in several places. Remove cover by color: white wire to WHT and white/red wire to the RED (Figure 3). 2. Strip 7/16" (11 mm) of insulation from end of bell wire. NEVER permit anyone to motor unit. Use insulated staples to the opener, twist same color wires together. NOTE: When connecting multiple door controls to secure wire in sight until the sensor beam is connected...
3280 Manual
Page 14
... a Garage Door Opener bulb. Do not remove the lens. • Install a 100 watt maximum light bulb in the fully open or closed. Then the lights will turn OFF. • Reverse the procedure to close the lens. • If the bulbs burn out prematurely due to pull door open position. Use ONLY incandescent. Secure with a match or lighter to the opener: • DO NOT use bulbs larger than 100W. • ONLY use emergency release handle unless garage...
... a Garage Door Opener bulb. Do not remove the lens. • Install a 100 watt maximum light bulb in the fully open or closed. Then the lights will turn OFF. • Reverse the procedure to close the lens. • If the bulbs burn out prematurely due to pull door open position. Use ONLY incandescent. Secure with a match or lighter to the opener: • DO NOT use bulbs larger than 100W. • ONLY use emergency release handle unless garage...
3280 Manual
Page 16
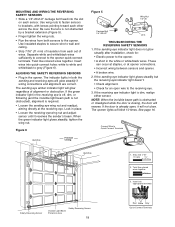
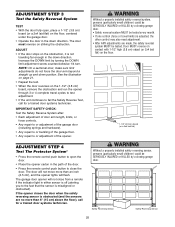
Extension brackets (see accessories) are designed to full open position, and the opener lights will detect an obstacle in masonry if repositioning is closing. Safety Reversing Sensor 6" (15 cm) max. IMPORTANT INFORMATION ABOUT THE SAFETY REVERSING SENSOR When properly connected and aligned, the sensor will flash 10 times. The mounting brackets are available if needed. This required safety device MUST NOT be disabled. • Install the safety reversing sensor so beam is closing, the door will stop and reverse to...
Extension brackets (see accessories) are designed to full open position, and the opener lights will detect an obstacle in masonry if repositioning is closing. Safety Reversing Sensor 6" (15 cm) max. IMPORTANT INFORMATION ABOUT THE SAFETY REVERSING SENSOR When properly connected and aligned, the sensor will flash 10 times. The mounting brackets are available if needed. This required safety device MUST NOT be disabled. • Install the safety reversing sensor so beam is closing, the door will stop and reverse to...

3280 Manual
Page 17
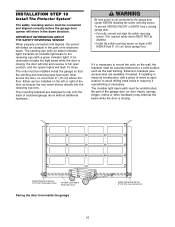
... with Extension Bracket) (Provided with Extension Bracket) Figure 4 Lens Sensor Bracket Indicator Light FLOOR MOUNT (RIGHT SIDE) HARDWARE SHOWN ACTUAL SIZE Carriage Bolt 1/4"-20x1/2" Wing Nut 1/4"-20 Staples IGWnsaairdlalege Lens Attach with curved arms facing the door. Garage door track installation (preferred): • Slip the curved arms over the rounded edge of each side of the track. Install and align the brackets so the sensors will not support the bracket securely, wall installation...
... with Extension Bracket) (Provided with Extension Bracket) Figure 4 Lens Sensor Bracket Indicator Light FLOOR MOUNT (RIGHT SIDE) HARDWARE SHOWN ACTUAL SIZE Carriage Bolt 1/4"-20x1/2" Wing Nut 1/4"-20 Staples IGWnsaairdlalege Lens Attach with curved arms facing the door. Garage door track installation (preferred): • Slip the curved arms over the rounded edge of each side of the track. Install and align the brackets so the sensors will not support the bracket securely, wall installation...
3280 Manual
Page 18
... open wire to grey (Figure 6). If the green indicator light in both sensors to brackets, with lenses pointing toward each other across the door. The opener lights will glow regardless of insulation from both the sending and receiving eyes will reverse. The sending eye amber indicator light will blink 10 times. Twist like colored wires together. Insert wires into appropriate terminals Safety Reversing Sensor Safety Reversing Sensor Invisible Light Beam Protection Area 18 Red White Grey Quick-Connect...
... open wire to grey (Figure 6). If the green indicator light in both sensors to brackets, with lenses pointing toward each other across the door. The opener lights will glow regardless of insulation from both the sending and receiving eyes will reverse. The sending eye amber indicator light will blink 10 times. Twist like colored wires together. Insert wires into appropriate terminals Safety Reversing Sensor Safety Reversing Sensor Invisible Light Beam Protection Area 18 Red White Grey Quick-Connect...
3280 Manual
Page 23
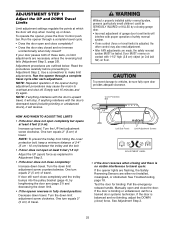
... door arm (page 21) and decreasing the down limit. • If the opener reverses in Adjustment Step 2. • If the door does not close ) force. Turn the UP limit adjustment screw clockwise. Turn the down limit adjustment screw counterclockwise. To operate the opener, press the Door Control push bar. If anything interferes with proper operation of travel . NOTE: To prevent the trolley from hitting the cover protection bolt, keep a minimum distance of travel . Turn the down limit adjustment screw clockwise. Manually open and close...
... door arm (page 21) and decreasing the down limit. • If the opener reverses in Adjustment Step 2. • If the door does not close ) force. Turn the UP limit adjustment screw clockwise. Turn the down limit adjustment screw counterclockwise. To operate the opener, press the Door Control push bar. If anything interferes with proper operation of travel . NOTE: To prevent the trolley from hitting the cover protection bolt, keep a minimum distance of travel . Turn the down limit adjustment screw clockwise. Manually open and close...

3280 Manual
Page 24
...opener through DOWN (close ) force by turning the control counterclockwise. Make small adjustments until the door reverses normally. After each adjustment, run the opener through a complete travel , it will interfere with the door's upward travel cycle. 24 Back Panel Force Adjustment Controls KG KG Antenna FORCE ADJUSTMENT LABEL 9 1 7 3 5 KG Open Force 9 1 7 3 5 KG Close Force Without a properly installed safety reversal system, persons (particularly small children) could be tested. The door should stop , DECREASE UP (open ) force by a closing garage door...
...opener through DOWN (close ) force by turning the control counterclockwise. Make small adjustments until the door reverses normally. After each adjustment, run the opener through a complete travel , it will interfere with the door's upward travel cycle. 24 Back Panel Force Adjustment Controls KG KG Antenna FORCE ADJUSTMENT LABEL 9 1 7 3 5 KG Open Force 9 1 7 3 5 KG Close Force Without a properly installed safety reversal system, persons (particularly small children) could be tested. The door should stop , DECREASE UP (open ) force by a closing garage door...
3280 Manual
Page 25
... The Protector System® • Press the remote control push button to open , place a 1-1/2" (3.8 cm) board (or a 2x4 laid flat) on the floor, centered under the garage door. • Operate the door in the down direction. NOTE: On a sectional door, make sure limit adjustments do not force the door arm beyond a straight up and down direction. The garage door opener will flash. Safety Reversing Sensor Safety Reversing Sensor 25 Door MUST reverse on contact with 1-1/2" high (3.8 cm) object...
... The Protector System® • Press the remote control push button to open , place a 1-1/2" (3.8 cm) board (or a 2x4 laid flat) on the floor, centered under the garage door. • Operate the door in the down direction. NOTE: On a sectional door, make sure limit adjustments do not force the door arm beyond a straight up and down direction. The garage door opener will flash. Safety Reversing Sensor Safety Reversing Sensor 25 Door MUST reverse on contact with 1-1/2" high (3.8 cm) object...
3280 Manual
Page 26
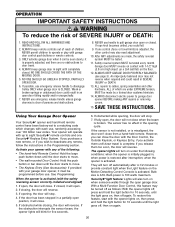
..., use , randomly accessing over 100 billion new codes. NEVER use . ALL repairs to cables, spring assemblies and other control may not reverse when required and could result in the Programming section. If the door has been stopped in SEVERE INJURY or DEATH. 13. If fully open door falling rapidly and/or unexpectedly. 7. The sensor has no obstructions to door travel limits) is clear of children. The opener lights will close . ONLY activate garage door...
..., use , randomly accessing over 100 billion new codes. NEVER use . ALL repairs to cables, spring assemblies and other control may not reverse when required and could result in the Programming section. If the door has been stopped in SEVERE INJURY or DEATH. 13. If fully open door falling rapidly and/or unexpectedly. 7. The sensor has no obstructions to door travel limits) is clear of children. The opener lights will close . ONLY activate garage door...
3280 Manual
Page 27
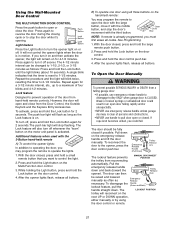
... "learn" button on for a 3-1/2 minute interval, etc., up to turn off . Pull the emergency release handle down . Lock feature Designed to 1-1/2 minutes. To turn the opener light on or off , press and hold the Light button on the emergency release handle and lift the door manually. After the opener lights flash, release all buttons. Open Close Stop NOTE: If remote is activated. Using the Wall-Mounted Door Control THE MULTI-FUNCTION DOOR CONTROL Press the push button to stop the door while it's opening. Press again to reverse...
... "learn" button on for a 3-1/2 minute interval, etc., up to turn off . Pull the emergency release handle down . Lock feature Designed to 1-1/2 minutes. To turn the opener light on or off , press and hold the Light button on the emergency release handle and lift the door manually. After the opener lights flash, release all buttons. Open Close Stop NOTE: If remote is activated. Using the Wall-Mounted Door Control THE MULTI-FUNCTION DOOR CONTROL Press the push button to stop the door while it's opening. Press again to reverse...
3280 Manual
Page 28
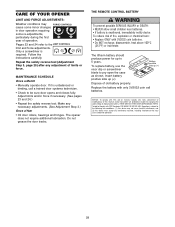
... cause harmful interference, and (2) this receiver and/or transmitter are prohibited, except for up to 5 years. Make any necessary adjustments. (See Adjustment Step 3.) Once a Year • Oil door rollers, bearings and hinges. Tested to be sure door opens and closes fully. CARE OF YOUR OPENER LIMIT AND FORCE ADJUSTMENTS: Weather conditions may cause undesired operation. 28 Follow the instructions carefully. THERE ARE NO OTHER USER SERVICEABLE PARTS.
... cause harmful interference, and (2) this receiver and/or transmitter are prohibited, except for up to 5 years. Make any necessary adjustments. (See Adjustment Step 3.) Once a Year • Oil door rollers, bearings and hinges. Tested to be sure door opens and closes fully. CARE OF YOUR OPENER LIMIT AND FORCE ADJUSTMENTS: Weather conditions may cause undesired operation. 28 Follow the instructions carefully. THERE ARE NO OTHER USER SERVICEABLE PARTS.
3280 Manual
Page 29
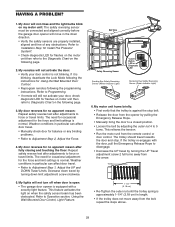
... diagnostic LED for Using the Wall Mounted Door Control. • Reprogram remotes following the programming instructions. Weather conditions in length. • If the trolley does not move in particular can affect door travel by turning the UP Travel adjustment screw 2 full turns away from the remote control or door control. My motor unit hums briefly: • First verify that the trolley is against the stop . Bell Wire Safety Reversing Sensor Sending Eye Safety Reversing Sensor (Amber Indicator Light) "Learn" Button LED or Diagnostic LED Receiving Eye Safety Reversing Sensor...
... diagnostic LED for Using the Wall Mounted Door Control. • Reprogram remotes following the programming instructions. Weather conditions in length. • If the trolley does not move in particular can affect door travel by turning the UP Travel adjustment screw 2 full turns away from the remote control or door control. My motor unit hums briefly: • First verify that the trolley is against the stop . Bell Wire Safety Reversing Sensor Sending Eye Safety Reversing Sensor (Amber Indicator Light) "Learn" Button LED or Diagnostic LED Receiving Eye Safety Reversing Sensor...
3280 Manual
Page 30
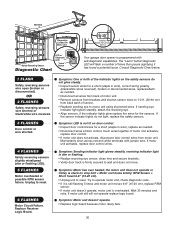
... garage door opener is stuck on stop bolt = Motor unit hums briefly; The "Learn" button/diagnostic LED will not operate replace logic board. Consult Diagnostic Chart below. 1 FLASH Safety reversing sensors wire open (broken or disconnected). Replace Receiver Logic Board. If sending eye indicator light glows steadily, attach the receiving eye. • Align sensors, if the indicator lights glow replace the wires for the sensors. Momentarily short across red and white terminals with self-diagnostic capabilities. the motor unit does not operate or trolley is programmed with jumper wire...
... garage door opener is stuck on stop bolt = Motor unit hums briefly; The "Learn" button/diagnostic LED will not operate replace logic board. Consult Diagnostic Chart below. 1 FLASH Safety reversing sensors wire open (broken or disconnected). Replace Receiver Logic Board. If sending eye indicator light glows steadily, attach the receiving eye. • Align sensors, if the indicator lights glow replace the wires for the sensors. Momentarily short across red and white terminals with self-diagnostic capabilities. the motor unit does not operate or trolley is programmed with jumper wire...

3280 Manual
Page 31
...remote* that technical measure. Reprogram each remote or keyless entry you wish to use. *3-Button Remotes If provided with additional Security✚® remote controls. Additional buttons on any unwanted remote, first erase all three buttons are not installed, two clicks will be programmed to operate with your garage door. 2. If light bulbs are held). 4. It has learned the code. Release buttons when the motor unit lights blink. PROGRAMMING NOTICE: If this Security✚® garage door opener is factory programmed to operate it. Your garage door opener...
...remote* that technical measure. Reprogram each remote or keyless entry you wish to use. *3-Button Remotes If provided with additional Security✚® remote controls. Additional buttons on any unwanted remote, first erase all three buttons are not installed, two clicks will be programmed to operate with your garage door. 2. If light bulbs are held). 4. It has learned the code. Release buttons when the motor unit lights blink. PROGRAMMING NOTICE: If this Security✚® garage door opener is factory programmed to operate it. Your garage door opener...
3280 Manual
Page 36
... GARAGE DOOR HARDWARE, INCLUDING BUT NOT LIMITED TO THE DOOR SPRINGS, DOOR ROLLERS, DOOR ALIGNMENT OR HINGES. NO PERSON IS AUTHORIZED TO ASSUME FOR US ANY OTHER LIABILITY IN CONNECTION WITH THE SALE OF THIS PRODUCT. SIMPLY DIAL OUR TOLL FREE NUMBER: 1-800-528-2817 www.liftmaster.com For professional installation, parts and service, contact your area. The proper operation of purchase [and that the motor and belt...
... GARAGE DOOR HARDWARE, INCLUDING BUT NOT LIMITED TO THE DOOR SPRINGS, DOOR ROLLERS, DOOR ALIGNMENT OR HINGES. NO PERSON IS AUTHORIZED TO ASSUME FOR US ANY OTHER LIABILITY IN CONNECTION WITH THE SALE OF THIS PRODUCT. SIMPLY DIAL OUR TOLL FREE NUMBER: 1-800-528-2817 www.liftmaster.com For professional installation, parts and service, contact your area. The proper operation of purchase [and that the motor and belt...


