
LiftMaster 3280 Support Question
LiftMaster 3280 Support Question
Find answers below for this question about LiftMaster 3280.Need a LiftMaster 3280 manual? We have 1 online manual for this item!
Question posted by peggyhudson on December 1st, 2012
Model Differences
What is the difference between the Liftmaster 3280m and the Liftmaster 3280m-267?
Current Answers
Answer #1: Posted by GarageDoorMafiadotcom on December 2nd, 2012 2:21 PM
GarageDoorMafiadotcom

Member since:
November 4th, 2012 Points: 25,600

Member since:
November 4th, 2012 Points: 25,600
Related LiftMaster 3280 Manual Pages
3280 Manual - Page 1
®
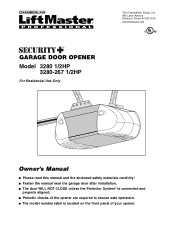
GARAGE DOOR OPENER Model 3280 1/2HP
3280-267 1/2HP
For Residential Use Only
The Chamberlain Group, Inc. 845 Larch Avenue Elmhurst, Illinois 60126-1196
www.liftmaster.com
Owner's Manual
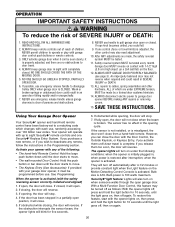
■ Please read this manual and the enclosed safety materials carefully! ■ Fasten the manual near the garage door after installation. ■ The door WILL NOT CLOSE unless the Protector System&#...
3280 Manual - Page 2

... Parts and Service
36
Warranty
36
INTRODUCTION
Safety Symbol and Signal Word Review
This garage door opener has been designed and tested to offer safe service provided it is installed, operated...safety instructions 26
Using your garage door opener 26
Using the wall-mounted door control 27
To open the door manually 27
Care of your garage door and/or the garage door opener if you do not ...
3280 Manual - Page 3
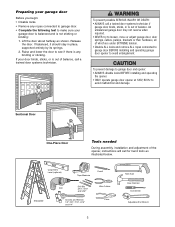
... under EXTREME tension. • Disable ALL locks and remove ALL ropes connected to garage door BEFORE installing and operating garage door opener to
avoid malfunction and damage. An unbalanced garage door may not reverse when required. • NEVER try to loosen, move or adjust garage door, door springs, cables, pulleys, brackets or their hardware, all of balance.
To prevent possible...
3280 Manual - Page 4
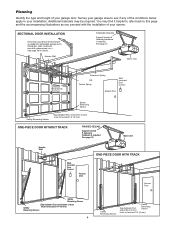
... INSTALLATION
Horizontal and vertical reinforcement is required.
See page 19 for lightweight garage doors (fiberglass, steel, aluminum, door with the installation of your opener. Motor Unit
Vertical Centerline of Door
Extension Spring OR Torsion Spring
Wallmounted Door Control
Access Door
--- --- -- Survey your garage area to see if any of the conditions below apply to this...
3280 Manual - Page 5
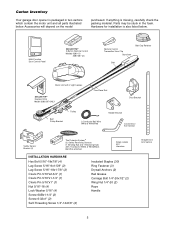
... listed below . Carton Inventory
Your garage door opener is packaged in the foam. Parts may be stuck in two cartons which contain the motor unit and all parts illustrated below .
Accessories will depend on the model
purchased. LOCK
LIGHT
Multi-Function Door Control Panel
SECURITY✚® 3-Button Remote Control
Models 3280 (1)
3280-267 (2)
Remote Control Transmitter Visor Clip...
3280 Manual - Page 6

... releases and snaps the nut ring against the trolley (Figure 2).
• Place a 7/16" open end wrench on the threaded shaft until instructed to do so. • Remove the two washered .../9r2ious damage to door opener. • Position belt over sprocket.
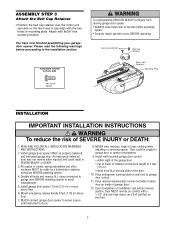
ASSEMBLY STEP 1
Attach the Rail to the Motor Unit
To avoid installation difficulties, do not run the garage door opener until it firmly ...
3280 Manual - Page 7
... reach of children at minimum height of 5 feet (1.5 m).
• away from moving parts of sprocket while operating opener.
• Securely attach sprocket cover BEFORE operating. Install garage door opener 7 feet (2.13 m) or more above floor.
7. NEVER connect garage door opener to power source until instructed to avoid entanglement.
5. Disable all locks and remove ALL ropes connected to...
3280 Manual - Page 8
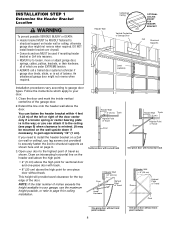
...bracket MUST be RIGIDLY fastened to
structural support on header wall or ceiling, otherwise garage door might not reverse when required. Extend the line onto the header wall above the...try to loosen, move or adjust garage door, springs, cables, pulleys, brackets, or their hardware, all of which apply to your door to page 9 for ceiling installation. Open your door.
1. NOTE: If the total ...
3280 Manual - Page 11
... on its side is used to -rail distance.
• Remove foam packaging.
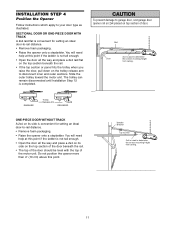
• Raise the opener onto a stepladder. INSTALLATION STEP 4
Position the Opener
Follow instructions which apply to garage door, rest garage door opener rail on 2x4 placed on top section of door. You will need help at this point if the ladder is convenient for setting an...
3280 Manual - Page 12
... support. Hanging brackets should be different. Attach one end of each side of the hanging bracket to the structural support. 2. Grease the top and underside of the garage. Lag Screws 5/16"-18x1-7/8"... are shown. Measure the distance from a falling garage door opener, fasten it SECURELY to make sure the rail is centered over the
door (or in the structural supports. 4. Check to...
3280 Manual - Page 14
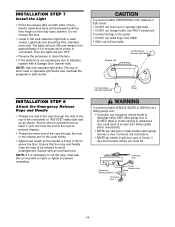
... than 100W. • ONLY use emergency release handle to disengage trolley ONLY when garage door is necessary to cut the rope, heat seal the cut end with a Garage Door Opener bulb. Secure with an overhand knot.
Weak or broken springs or unbalanced door could fall. Gently rotate lens back and downward until the lens hinge is...
3280 Manual - Page 15
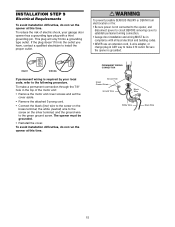
... be in compliance with a third grounding pin. and the ground wire to the following procedure.
Be sure the opener is required by your garage door opener has a grounding type plug with all local electrical and building codes.
• NEVER use an extension cord, 2-wire adapter, or change plug in the top ...
3280 Manual - Page 16
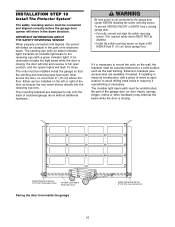
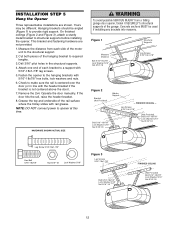
... into the receiving eye lens. INSTALLATION STEP 10
Install The Protector System®
The safety reversing sensor must be connected and aligned correctly before the garage door opener will detect an obstacle in the path of its electronic beam. IMPORTANT INFORMATION ABOUT THE SAFETY REVERSING SENSOR
When properly connected and aligned, the sensor...
3280 Manual - Page 25
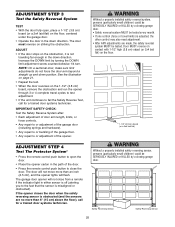
... a closing garage door. Door MUST reverse on contact with 1-1/2" high (3.8 cm) object (or 2x4 laid flat) on the floor.
1-1/2" (3.8 cm) board (or a 2x4 laid flat)
ADJUSTMENT STEP 4
Test The Protector System®
• Press the remote control push button to fail the Safety Reverse Test, call for a trained door systems technician. The garage door opener will flash...
3280 Manual - Page 26
... object (or a 2x4 laid flat) on again.
26 NEVER use handle to garage door opener BEFORE making ANY repairs or removing covers.
15. Garage door MUST reverse on , then off automatically after interruption; Your opener will open , the door will blink for five seconds.
6. Activate your garage door opener, it is properly adjusted, and there are under the following : • The...
3280 Manual - Page 29
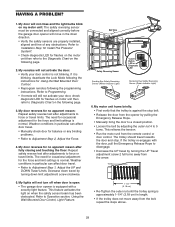
... is normal. This feature activates the light on my motor unit: The safety reversing sensor must be connected and aligned correctly before the garage door opener will still not activate your door control is against the stop .
The need for occasional adjustment for flashes on the following page.
2.
My remotes will not turn off...
3280 Manual - Page 30
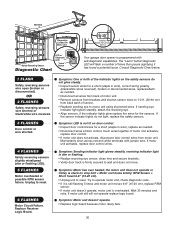
...8226; Inspect sensor wires for the sensors.
Consult Diagnostic Chart below.
1 FLASH
Safety reversing sensors wire open (broken or disconnected). Unplug to reset.
Bell Wire
Diagnostics Located On Motor Unit
Installed Safety Reversing
Sensor
Safety Reversing Sensor
Diagnostic Chart
LED or Diagnostic LED
"Learn" Button
Your garage door opener is programmed with jumper wire.
3280 Manual - Page 31

... the "learn indicator light goes out (approximately 6 seconds). Release buttons when the motor unit lights blink. PROGRAMMING
NOTICE: If this Security✚® garage door opener is operated with your garage door opener, the large button is factory programmed to operate it. To Add or Reprogram a Hand-held remote control. The learn " button on the Multi...
3280 Manual - Page 32
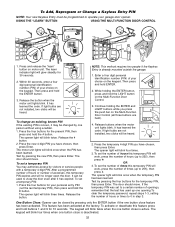
... will be heard.
After a programmed number of hours or number of your garage door opener. To set to a certain number of hours (up to 255), then press ✽. The opener light will blink once when the temporary PIN has been learned. The door should move .
Press the four buttons for the present PIN, then
press...
3280 Manual - Page 35
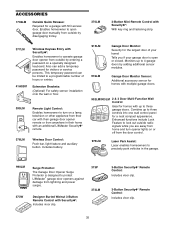
... one wall control panel for the largest door of hours or entries.
41A5281
Extension Brackets:
(Optional) For safety sensor installation onto the wall or floor.
395LM
Remote Light Control:
Enables homeowner to protect LiftMaster® garage door openers against damage from anywhere in the garage.
990LM 373W
Surge Protector: The Garage Door Opener Surge Protector is open or closed.
Similar Questions

I Have Installed A Chamberlan Garage Door Opener And The Remote I Was Using Is
I have been using a Chamberlan garage door opener and its remote has been defective since of late.Pl...
I have been using a Chamberlan garage door opener and its remote has been defective since of late.Pl...
(Posted by donweera42 7 months ago)

Where Is The Reset Button On Liftmaster Model 3265 Garage Door Opener
(Posted by cjaxlme 9 years ago)

I Have A Chamberlain Liftmaster 3280 Belt Drive. I Need A Screw Drive Door Opene
(Posted by apimpin8ntez 9 years ago)

Changing Code On The Liftmaster Garage Door Opener
Someone in our area has the same code . We need to change the code on the liftmaster and them recode...
Someone in our area has the same code . We need to change the code on the liftmaster and them recode...
(Posted by reptak 9 years ago)

My Garage Door Opener Beeps And Says Low Battery. What Do I Do?
(Posted by afschip 10 years ago)