LiftMaster 1345 Support Question
LiftMaster 1345 Support Question
Find answers below for this question about LiftMaster 1345.Need a LiftMaster 1345 manual? We have 1 online manual for this item!
Question posted by rembcarr on February 18th, 2012
Door Does Not Go Down. Lick Blinks On And Off
The person who posted this question about this LiftMaster product did not include a detailed explanation. Please use the "Request More Information" button to the right if more details would help you to answer this question.
Current Answers
Related LiftMaster 1345 Manual Pages
1355 Manual - Page 1
The Chamberlain Group, Inc. 845 Larch Avenue Elmhurst, Illinois 60126-1196 www.liftmaster.com
®
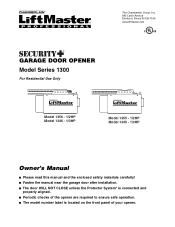
GARAGE DOOR OPENER Model Series 1300
For Residential Use Only
Model 1356 - 1/2HP Model 1346 - 1/3HP
Model 1355 - 1/2HP Model 1345 - 1/3HP
Owner's Manual
■ Please read this manual and the enclosed safety materials carefully! ■ Fasten the manual near...
1355 Manual - Page 2

... these Safety Symbols and Signal
Words on the following pages, they will alert you to the possibility of damage to the possibility of your garage door and/or the garage door opener if
you do not comply with the cautionary statements that accompany them carefully.
2 TABLE OF CONTENTS
Introduction
2-7
Safety symbol and signal word review...
1355 Manual - Page 3

... locks and remove ALL ropes connected to
WARNING garage door BEFORE installing and operating garage
door opener to
avoid malfunction and damage. Lift the door about halfway as illustrated below. CAUTION
To prevent damage to garage door and opener: • ALWAYS disable locks BEFORE installing and operating
the opener. • ONLY operate garage door opener at 120V, 60 Hz to avoid entanglement...
1355 Manual - Page 6
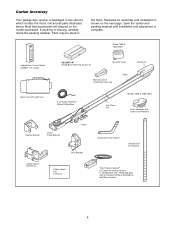
Hardware for assembly and installation is shown on the model purchased. Model 1355 & 1345 ONLY
Lighted Door Control Button w/6ABx1-1/2" screws
SECURITY✚® Single-Button Remote Control (1)
Sprocket Cover
Remote Control... material until installation and adjustment is missing, carefully check the packing material. Carton Inventory
Your garage door opener is packaged in
the foam.
1355 Manual - Page 8
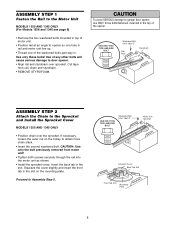
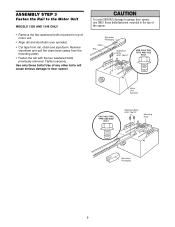
...1345 ONLY (For Models 1356 and 1346 see page 9)
• Remove the two washered bolts mounted in top of motor unit.
• Position rail at an angle to opener so one hole in rail and motor unit line up.
• Thread one of the opener. WARNING
CAUTION
To avoid SERIOUS damage to garage door opener...Styrofoam
ASSEMBLY STEP 2
Attach the Chain to door opener. • Align rail and styrofoam over ...
1355 Manual - Page 9
... 5/16"-18x1/2"
Mounting Plate
Styrofoam Packaging
9
Use of any other bolts will cause serious damage to garage door opener, use ONLY those bolts/fasteners mounted in top of the opener. Tighten securely. WARNING
CAUTION
To avoid SERIOUS damage to door opener. Use only these bolts! Remove styrofoam and pull the chain back (away from rail, chain...
1355 Manual - Page 10
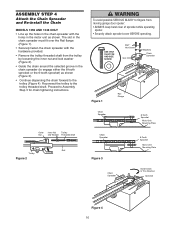
... AND 1346 ONLY
• Line up the holes in the chain spreader with the hardware provided.
• Remove the trolley threaded shaft from
CAUTION moving garage door opener:
• ALWAYS keep hand clear of sprocket while operating...
1355 Manual - Page 11

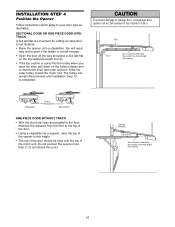
.../safety reverse test label in the direction shown.
READ AND FOLLOW ALL INSTALLATION WARNINGS AND INSTRUCTIONS.
2. Install garage door opener ONLY on inside of garage door.
12. Disable all locks and remove all ropes connected to garage door BEFORE installing opener to do not re-adjust the chain. If the chain returns to the installation section.
WARNING
You...
1355 Manual - Page 16
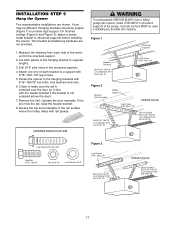
... setting an ideal doorto-rail distance.
• Raise the opener onto a stepladder.
Header Bracket
Top of door. WARNING
CAUTION
To prevent damage to garage door, rest garage door opener rail on 2x4 placed on the trolley release arm to your door type as a support, raise the top of the opener to determine the correct mounting height from ceiling.
16...
1355 Manual - Page 17
...garage door opener, fasten it SECURELY to the hanging brackets with
5/16"-18x1-7/8" lag screws. 5. Fasten the opener to structural
supports of the garage. Check to the structural support.
2. Operate the door manually. If the door... brackets should be angled (Figure 1) to structural supports before installing the opener. Grease the top and underside of each side of the hanging bracket to...
1355 Manual - Page 19
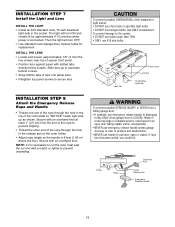
... slipping.
• Thread the other end of the rope through the hole in the socket. Then the light will turn OFF. • Use standard neck Garage Door Opener bulbs for approximately 4-1/2 minutes when power is clear of persons and obstructions.
• NEVER use A19 size bulbs. The light will turn ON and remain...
1355 Manual - Page 20
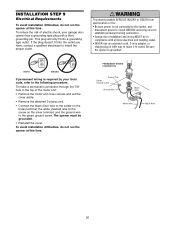
... disconnect power to circuit BEFORE removing cover to the screw on the silver terminal;
RIGHT
WRONG
If permanent wiring is required by your garage door opener has a grounding type plug with all local electrical and building codes.
• NEVER use an extension cord, 2-wire adapter, or change plug in ANY way ...
1355 Manual - Page 21

... are available if needed. The invisible light beam path must be installed on the wall, the brackets must be connected and aligned correctly before the garage door opener will detect an obstacle in masonry construction, add a piece of wood at each other hardware) may interrupt the beam while the...
1355 Manual - Page 28
...)
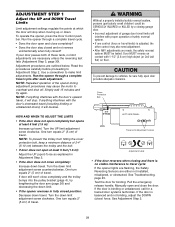
LEFT SIDE PANEL
Travel Limit Adjustment Screws
Adjustment Label
• If the door reverses when closing garage door. • Incorrect adjustment of 2-4" (5-10 cm) between the trolley and the bolt.
• If door does not open at least 5 feet (1.5 m):
Adjust the UP (open door provides adequate clearance. Read the procedures carefully before proceeding to make limit adjustments...
1355 Manual - Page 29
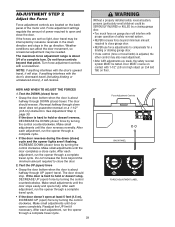
...; After ANY adjustments are made, the safety reversal system MUST be interrupted by a closing garage door.
• Too much force on garage door will interfere with the door's upward travel cycle.
• If the door doesn't open at least 5 feet (1.5 m), INCREASE UP (open) force by turning the control counterclockwise. Readjust the UP limit if necessary. Reversal halfway through...
1355 Manual - Page 30

... not move more than an inch, and the opener lights will not close the door. The garage door opener will flash.
ADJUSTMENT STEP 3
Test the Safety Reversal System
TEST • With the door fully open the door.
• Place the opener carton in the path of the door.
• Press the remote control push button to close from a remote if...
1355 Manual - Page 31

....
2. ALWAYS KEEP GARAGE DOOR PROPERLY BALANCED (see page 3). Activate your opener with your garage door opener, it will turn on the floor.
12.
If closed . when power is CLOSED. when the opener is A19. ONLY activate garage door when it can close from a hand-held remote. If obstructed while closing , the door will blink for five seconds.
6. If fully open . 2. If you...
1355 Manual - Page 34
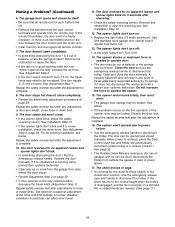
... is normal for 5 seconds after any ice or snow from the garage floor area where the door closes.
• Review Adjustment Step 2 on garages with no apparent reason and opener lights don't blink:
• Is something obstructing the door? The door reverses for occasional adjustment of door arm length, close completely:
• Review the travel limits (Adjustment Step...
1355 Manual - Page 35
...
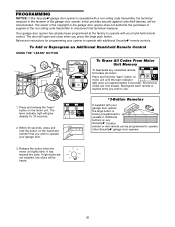
35 It has learned the code. Release the button when the motor unit lights blink. All previous
codes are instructions for 30 seconds.
1
2
KG
2. If light...Additional Hand-held remote control. The door will be programmed to operate with your opener to operate other Security✚® garage door openers.
3. Your garage door opener has already been programmed at the ...
1355 Manual - Page 36
... 1 and 9 for
30 seconds. Release the button when the motor unit lights blink. The opener light will blink three times.
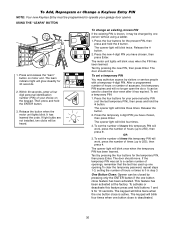
To set a temporary PIN
You may be closed by pressing the four buttons for your garage door opener. The opener light will blink four times.
3. The door should move . Press the new 4-digit PIN you have chosen, then press...
Similar Questions

I Have Installed A Chamberlan Garage Door Opener And The Remote I Was Using Is
I have been using a Chamberlan garage door opener and its remote has been defective since of late.Pl...
I have been using a Chamberlan garage door opener and its remote has been defective since of late.Pl...
(Posted by donweera42 8 months ago)
Garage Door Opens After Shutting.
My Lift master 8550 inside keypad is Inside wall pad is model #880LM. outside keypad Model # is 877M...
My Lift master 8550 inside keypad is Inside wall pad is model #880LM. outside keypad Model # is 877M...
(Posted by BONNIECA92 2 years ago)

All Remote Controls Of My Lm 1345 Stop Working Suddenly. Door Control Still Ok.
All remote controls of my LM 1345 stop working all the sudden. When I press the transmit button on a...
All remote controls of my LM 1345 stop working all the sudden. When I press the transmit button on a...
(Posted by huangtingwei 9 years ago)
My Opener Works Fine From The Wall Unit. None Of The Remotes Work.
The wall unit works fine but the remotes just stopped working. I reset the codes and can not reset t...
The wall unit works fine but the remotes just stopped working. I reset the codes and can not reset t...
(Posted by Nelsoneric84 11 years ago)

Liftmaster Cptk-3, How Do I Program My New Key Remote To Existing Garage Door
(Posted by alisonwood 11 years ago)