Lexmark X7675 Support Question
Lexmark X7675 Support Question
Find answers below for this question about Lexmark X7675.Need a Lexmark X7675 manual? We have 3 online manuals for this item!
Question posted by moresoccer1214 on January 1st, 2013
How Do You Fix A Printer Carrier Stall. Nothing Is Stuck In The Printer.
The person who posted this question about this Lexmark product did not include a detailed explanation. Please use the "Request More Information" button to the right if more details would help you to answer this question.
Current Answers
Related Lexmark X7675 Manual Pages
Network Guide - Page 3
...13 Wireless configuration does not continue after the USB cable is attached 13 Why isn't my printer in this list?...14 Removing and reinstalling the software 14 Cannot print over wireless network...15 Cannot... 28 Finding the signal strength...28 How can I improve wireless signal strength 29 Can I use my printer on a USB and a network connection at the same time 29 What is a MAC address?...29 ...
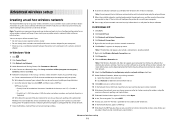
Network Guide - Page 5
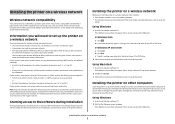
...the wireless utility of the network that your wireless access point is set up the printer.
Installing the printer on the network. You do one of the following :
In Windows Vista a...you will need to run the setup software on a wireless network
Wireless network compatibility
Your printer contains an IEEE 802.11g wireless print server. ASCII characters in a WPA passphrase are ...
Network Guide - Page 6
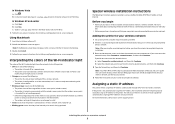
...box, or from the list of the wireless access point (wireless router). - Either the configured printer or the wireless access point has been turned off . • Orange means one of the ...Double-click Install. 4 Follow the on-screen instructions for a wireless network. - The printer is powering up your printer using a LiveBox, AliceBox, N9UF Box, FreeBox, or Club Internet.
b Select the ...
Network Guide - Page 7

...In Windows XP and earlier, click Start. 2 Click All Programs or Programs, and then select the printer program folder from the list. 3 Click Tools ΠLexmark Wireless Setup Utility. 4 Follow the ... configuration.
Note: If the cable is not already connected, you access your printer depending on your printer:
If the printer is currently set up for one of the following : • In Windows...
Network Guide - Page 8
... ΠSystem Preferences.
Attach the other end to the USB port on the back of the printer. Attach the other end to a USB
port on the computer. 2 Close any "New Hardware ... In Windows XP and earlier, click Start. 4 Click All Programs or Programs, and then select the printer program folder from the list. 5 Click Tools ΠLexmark Wireless Setup Utility. 6 Follow the instructions...
Network Guide - Page 9
...switch
or wall jack. 2 Wait for a minute for the Ethernet network interface to configure the printer for wireless access.
Note: You will need a USB cable to the computer during configuration.
See ...have configured your USB cable to use both . 3 From the Finder desktop, double-click the printer folder. 4 Double-click Lexmark Wireless Setup Assistant. 5 Follow the on a switch
or wall ...
Network Guide - Page 10
... end of a USB cable to the USB port on page 10). 3 A second print queue will be created. The Printer List dialog appears. 2 Choose the printer you want to use . 3 Click Add.
Installing the printer on an Ethernet network. Attach the other end into an available port on a switch
or wall jack. 2 Insert the...
Network Guide - Page 11
... wireless network at a time.
If you have an infrastructure network, you should configure the printer for use the exact spelling and capitalization. 15 If Network Authentication appears in the list, ..., and follow the directions for your wireless settings. A network set up menu. Configuring the printer for your computer) • Want to set up a standalone network between the computer and...
User's Guide - Page 17
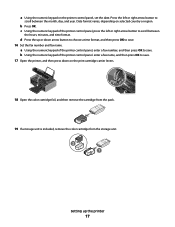
...format, and then press OK to save . 16 Set the fax number and fax name.
a Using the numeric keypad of the printer control panel. Press the left or right arrow button to
scroll between
the hours, minutes, and time format. Date format varies, depending ...storage unit is included, remove the color cartridge from the storage unit. 2 1
Setting up or down on the print cartridge carrier levers.
User's Guide - Page 18
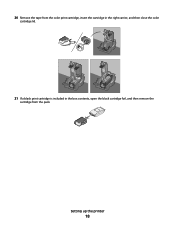
20 Remove the tape from the color print cartridge, insert the cartridge in the right carrier, and then close the color
cartridge lid.
21 If a black print cartridge is included in the box contents, open the black cartridge foil, and then remove the
cartridge from the pack. Setting up the printer
18
User's Guide - Page 19
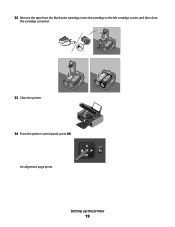
An alignment page prints.
22 Remove the tape from the black print cartridge, insert the cartridge in the left cartridge carrier, and then close
the cartridge carrier lid.
23 Close the printer.
24 From the printer control panel, press OK. WI F I PRINTING
Back
Setting up the printer
19
User's Guide - Page 22
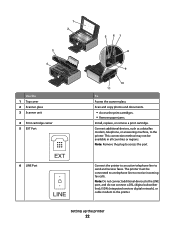
... subscriber line), ISDN (integrated services digital network), or cable modem to the printer. Connect additional devices, such as a data/fax modem, telephone, or answering machine, to the printer.
1 2
3
W I
F I PRINTING
5 67 8
4
W I
F I PRINTING
Use the 1 Top cover 2 Scanner glass 3 Scanner unit
4 Print cartridge carrier 5 EXT Port
6 LINE Port
EXT
LINE
9
10 11
To Access the...
User's Guide - Page 121
... or the metal nozzles on the cartridge carrier levers. W I
F I PRINTING
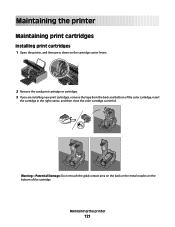
2 Remove the used print cartridge or cartridges. 3 If you are installing new print cartridges, remove the tape from the back and bottom of the cartridge. Maintaining the printer
Maintaining print cartridges
Installing print cartridges
1 Open the printer, and then press down on the...
User's Guide - Page 122
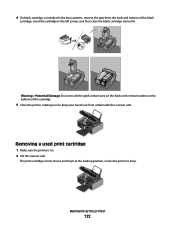
... the tape from the back and bottom of the cartridge.
5 Close the printer, making sure to keep your hands out from underneath the scanner unit.
4 If a black cartridge is included in the left carrier, and then close the black cartridge carrier lid.
Warning-Potential Damage: Do not touch the gold contact area on...
User's Guide - Page 123
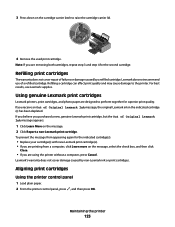
... 3 and step 4 for the second cartridge. Maintaining the printer
123 Lexmark does not recommend use Lexmark supplies.
Refilling print cartridges...carrier lid. Refilling a cartridge can affect print quality and may cause damage to perform together for the indicated cartridge(s):
• Replace your cartridge(s) with new Lexmark print cartridge(s). • If you are using the printer...
User's Guide - Page 165

...233;e de manière à n'émettre aucun champ HF dépassant les limites fixées pour l'ensemble de la population par Santé Canada. European Community (EC) ... doit faire l'objet d'une licence. The Alert sign indicates that there are applicable if your printer has a wireless network card installed This product is in conformity with the requirements of electrical equipment...
User's Guide - Page 179
... slots 21 paper exit tray 21 paper feed guard 20 paper guides 20 paper support 20 PictBridge port 21 power supply port 23 print cartridge carrier 22 printer control panel 21 scanner glass 22 scanner unit 22 top cover 22 USB port 23 Wi-Fi indicator 21 password 61 phone line busy...
Fax Guide - Page 10

... an active telephone line to access the port.
capability and may not have this print server.
9 USB port
Connect the printer to a wireless network. Use the 3 Scanner unit
4 Print cartridge carrier 5 EXT Port
To
• Access the print cartridges. • Remove paper jams.
Install, replace, or remove a print cartridge. Note: Remove the...
Fax Guide - Page 15

...then press OK to save . 17 Open the printer, and then press down on the print cartridge carrier levers. c Using the numeric keypad of the printer control panel, enter a fax number, and then...selected country or region. Date format varies, depending on the printer control panel, set the date.
b Using the numeric keypad of the printer control panel. Press the left or right arrow button to ...
Fax Guide - Page 17

22 Remove the tape from the black print cartridge, insert the cartridge in the left cartridge carrier, and then close
the cartridge carrier lid.
23 Close the printer.
24 From the printer control panel, press OK. An alignment page prints. WI F I PRINTING
Back
Fax Setup
17
Similar Questions

On My Lexmark X7675 Printer I Am Getting Printer Carrier Stall, How Can I Get
rid of it
rid of it
(Posted by jetkga 9 years ago)

Where Is The Printer Carrier Stall Located On A Lexmark 7600 Series Printer
(Posted by joDavene 9 years ago)

I Have Replaced All Four Ink Cartridges And Am Told To Fix Printer Heads!
I have replaced all four ink cartridges on a model 4444-101 printer and am told on the screen that I...
I have replaced all four ink cartridges on a model 4444-101 printer and am told on the screen that I...
(Posted by dmews 10 years ago)

Printer Carrier Stall
Error message of printer carrier stall appears on the printer and wont go away. The printer carrier ...
Error message of printer carrier stall appears on the printer and wont go away. The printer carrier ...
(Posted by tmarshud 11 years ago)