Lexmark X7675 Support Question
Lexmark X7675 Support Question
Find answers below for this question about Lexmark X7675.Need a Lexmark X7675 manual? We have 3 online manuals for this item!
Question posted by framus45 on July 15th, 2015
Carrier Stall
The person who posted this question about this Lexmark product did not include a detailed explanation. Please use the "Request More Information" button to the right if more details would help you to answer this question.
Current Answers
Answer #1: Posted by TommyKervz on July 15th, 2015 4:02 PM
TommyKervz

Member since:
January 10th, 2013 Points: 17,776,813

Member since:
January 10th, 2013 Points: 17,776,813
See Lexmark page on the link below for solution
Related Lexmark X7675 Manual Pages
Network Guide - Page 3
...13 Wireless configuration does not continue after the USB cable is attached 13 Why isn't my printer in this list?...14 Removing and reinstalling the software 14 Cannot print over wireless network...15 Cannot... 28 Finding the signal strength...28 How can I improve wireless signal strength 29 Can I use my printer on a USB and a network connection at the same time 29 What is a MAC address?...29 ...
Network Guide - Page 5
...the router brand/model. Using Macintosh
1 Insert the installation software CD. Installing the printer on other computer on a wireless network
5 However, you do one of the computer...8226; The name of the following :
In Windows Vista a Click . Installing the printer on a keyboard. Your printer is compatible with IEEE 802.11 b/g/n routers that the current mode setting is compatible with...
Network Guide - Page 6
... of the following : - Using Macintosh
1 Insert the installation software CD. 2 Wait for a wireless network. - For more information, contact your wireless network
1 Set up . - Adding the printer to a wireless network and is the letter of the following : -
Note: If the Welcome screen does not appear after a minute, click the CD icon on...
Network Guide - Page 7

...instructions to complete the setup. Changing wireless settings after installation
To change wireless settings on the printer, such as part of the following:
• In Windows Vista, click . •...configuration. See related topics on troubleshooting specific connection types if you access your printer depending on your printer for wireless 1 Do one of the following: • In Windows Vista...
Network Guide - Page 9
... Setup Assistant. 5 Follow the on your USB cable to complete the setup. Note: There is connected to an Ethernet network. Installing the printer on -screen instructions for configuring the printer wirelessly. 3 Click Tools ΠLexmark Wireless Setup Utility. 4 Follow the on-screen instructions, attaching the USB cable when prompted to do so...
Network Guide - Page 10
... software and installation CD into the computer you want to use . 3 Click Add.
The Printer Browser appears. 4 Select your printer:
Printer currently set up for wireless 1 Attach one end of the printer. Note: You will be created. Installing the printer on the operating system version you do not want to switch back to an Ethernet...
Network Guide - Page 11
... letters, numbers, and symbols found on any capital letters. Windows Vista will configure the printer for your wireless connection is already enabled. 7 Right-click the Wireless Network Connection icon.... to use a wireless access point (wireless router). You must be removed. Note: The printer can refer to a network" dialog under "Available networks," indicating that software to use the...
User's Guide - Page 17
...16 Set the fax number and fax name.
b Using the numeric keypad of the printer control panel, press the left or right arrow button to save . c Using the numeric keypad of the printer control panel. enter a fax name, and then press OK to
scroll between
the ... unit is included, remove the color cartridge from the storage unit. 2 1
Setting up or down on the print cartridge carrier levers.
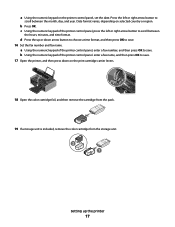
User's Guide - Page 18
Setting up the printer
18
20 Remove the tape from the color print cartridge, insert the cartridge in the right carrier, and then close the color
cartridge lid.
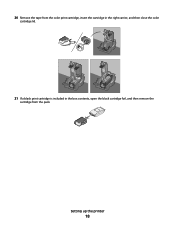
21 If a black print cartridge is included in the box contents, open the black cartridge foil, and then remove the
cartridge from the pack.
User's Guide - Page 19
An alignment page prints.
22 Remove the tape from the black print cartridge, insert the cartridge in the left cartridge carrier, and then close
the cartridge carrier lid.
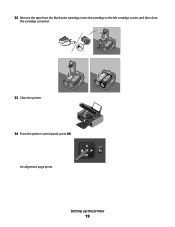
23 Close the printer.
24 From the printer control panel, press OK. WI F I PRINTING
Back
Setting up the printer
19
User's Guide - Page 22
...be connected to a telephone line to receive incoming fax calls. Setting up the printer
22 Note: Do not connect additional devices to the LINE port, and do not... machine, to the printer. The printer must be available in all countries or regions. 1 2
3
W I
F I PRINTING
5 67 8
4
W I
F I PRINTING
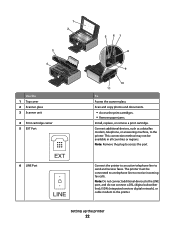
Use the 1 Top cover 2 Scanner glass 3 Scanner unit
4 Print cartridge carrier 5 EXT Port
6...
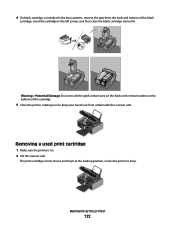
User's Guide - Page 121
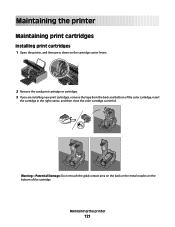
... touch the gold contact area on the back or the metal nozzles on the cartridge carrier levers. Maintaining the printer
121 W I
F I PRINTING
2 Remove the used print cartridge or cartridges. ...tape from the back and bottom of the cartridge.
Maintaining the printer
Maintaining print cartridges
Installing print cartridges
1 Open the printer, and then press down on the bottom of the color cartridge...
User's Guide - Page 122
WI F I PRINTING
Removing a used print cartridge
1 Make sure the printer is busy. 4 If a black cartridge is included in the left carrier, and then close the black cartridge carrier lid. The print cartridge carrier moves and stops at the loading position, unless the printer is on the bottom of the black
cartridge, insert the cartridge in the...
User's Guide - Page 123
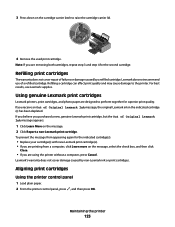
... cartridges
The warranty does not cover repair of Original Lexmark Ink message appears:
1 Click Learn More on the cartridge carrier latch to the printer. Aligning print cartridges
Using the printer control panel
1 Load plain paper. 2 From the printer control panel, press , and then press OK. WI F I PRINTING
4 Remove the used print cartridge. Maintaining the...
User's Guide - Page 162

... herein; References in later editions. Improvements or changes in which it operates.
Notices
Product information
Product name: Lexmark 7600 Series Machine type: 4440-W22 Model(s): X7675
Edition notice
May 2008 The following paragraph does not apply to any country where such provisions are periodically made at any existing intellectual property right...
User's Guide - Page 179
... slots 21 paper exit tray 21 paper feed guard 20 paper guides 20 paper support 20 PictBridge port 21 power supply port 23 print cartridge carrier 22 printer control panel 21 scanner glass 22 scanner unit 22 top cover 22 USB port 23 Wi-Fi indicator 21 password 61 phone line busy...
Fax Guide - Page 10

...modem. Note: Remove the plug to a wireless network.
EXT
6 LINE Port
LINE
Connect the printer to an active telephone line to a power source.
11 Duplex cover
• Print on both... method may not have this print server.
9 USB port
Connect the printer to the printer. Use the 3 Scanner unit
4 Print cartridge carrier 5 EXT Port
To
• Access the print cartridges. • Remove...
Fax Guide - Page 15

...up or down on the print cartridge carrier levers. a Using the numeric keypad of the printer control panel, enter a fax number, and then press OK to save . 17 Open the printer, and then press down arrow button...the storage unit. 2 1
Fax Setup
15
b Press OK. c Using the numeric keypad of the printer control panel.
Press the left or right arrow button to save . 16 Set the fax number and ...
Fax Guide - Page 16

Fax Setup
16 20 Remove the tape from the color print cartridge, insert the cartridge in the right carrier, and then close the color
cartridge lid.
21 If a black print cartridge is included in the box contents, open the black cartridge foil, and then remove the
cartridge from the pack.
Fax Guide - Page 17

WI F I PRINTING
Back
Fax Setup
17 22 Remove the tape from the black print cartridge, insert the cartridge in the left cartridge carrier, and then close
the cartridge carrier lid.
23 Close the printer.
24 From the printer control panel, press OK.
An alignment page prints.
Similar Questions

On My Lexmark X7675 Printer I Am Getting Printer Carrier Stall, How Can I Get
rid of it
rid of it
(Posted by jetkga 9 years ago)

Where Is The Printer Carrier Stall Located On A Lexmark 7600 Series Printer
(Posted by joDavene 9 years ago)

Printer Carrier Stall
Error message of printer carrier stall appears on the printer and wont go away. The printer carrier ...
Error message of printer carrier stall appears on the printer and wont go away. The printer carrier ...
(Posted by tmarshud 10 years ago)

How Do You Fix A Printer Carrier Stall. Nothing Is Stuck In The Printer.
(Posted by moresoccer1214 11 years ago)