Lexmark X364dn Support Question
Lexmark X364dn Support Question
Find answers below for this question about Lexmark X364dn.Need a Lexmark X364dn manual? We have 8 online manuals for this item!
Question posted by pbradlo on June 11th, 2014
How To Remove The Replace Pc Kit Message On Lexmark X364dn
The person who posted this question about this Lexmark product did not include a detailed explanation. Please use the "Request More Information" button to the right if more details would help you to answer this question.
Current Answers
Related Lexmark X364dn Manual Pages
User's Guide - Page 153
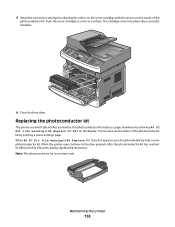
... one item only. 5 Install the new toner cartridge by printing a menu settings page. When 84 PC Kit life warning or 84 Replace PC Kit first appears, you before the photoconductor kit reaches a page maximum by showing 84 PC Kit life warning or 84 Replace PC Kit on the tracks of -life, print quality significantly decreases.
Push the toner cartridge in as...
User's Guide - Page 182
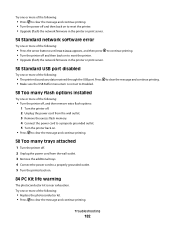
... the wall outlet. 3 Remove the excess flash memory. 4 Connect the power cord to a properly grounded outlet. 5 Turn the printer back on.
• Press to clear the message and continue printing.
58 Too many trays attached
1 Turn the printer off and then back on .
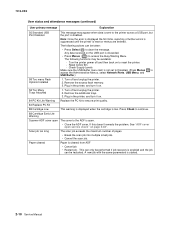
84 PC Kit life warning
The photoconductor kit is not set to...
User's Guide - Page 183
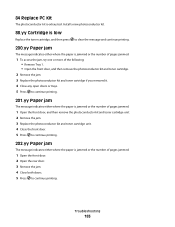
... 84 Replace PC Kit
The photoconductor kit is jammed or the number of pages jammed.
1 Open the front door. 2 Open the rear door. 3 Remove the jam. 4 Close both doors. 5 Press to continue printing.
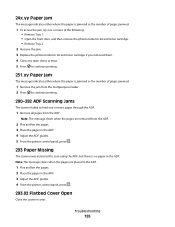
202.yy Paper jam
The message indicates either where the paper is exhausted.
Install a new photoconductor kit.
88.yy Cartridge is low
Replace the toner...
User's Guide - Page 185
... 1. • Open the front door, and then remove the photoconductor kit and toner cartridge. • Remove Tray 2.
2 Remove the jam. 3 Replace the photoconductor kit and toner cartridge if you removed them. 4 Close any open doors or trays. 5 Press to continue printing.
251.yy Paper jam
The message indicates either where the paper is jammed or the number of...
User's Guide - Page 228
... installed 182 58 Too many trays attached 182 84 PC Kit life warning 182 84 Replace PC Kit 183 840.01 Scanner Disabled 186 840.02 Scanner... an unresponsive printer 176 checking an unresponsive scanner 192 checking device status on Embedded Web Server 158
cleaning ADF separator rollers ...make
copies 192 copying
adding an overlay message 76 adjusting quality 74 canceling a copy job 77 collating copies...
User's Guide - Page 232
... trays attached 182 84 PC Kit life warning 182 84 Replace PC Kit 183 840.01 Scanner ... 179 Unsupported USB device, please
remove 179 Unsupported USB hub, please
remove 180 USB/USB ...Lexmark packaging 38 Lexmark products 38 toner cartridges 38 WEEE statement 212 reducing a copy 73
Index
232
Remove packaging material, check 179 Remove paper from standard output bin 179 replacing
photoconductor kit...
Technical Reference - Page 57
... Kit
Intervention Required - 40038
Replace PC Kit To X
X
Replace PC Kit To
Continue
Continue
Intervention Required - 40038
Replace Toner
X
X
Replace Toner Cartridge
Cartridge
Intervention Required - 40038
Replace Toner To X
X
Replace Toner Cartridge
Continue
To Continue
Intervention Required - 40038
84 All Photo Devs X
X
84 All Photo Devs
Exhausted
Exhausted
* This message...
Technical Reference - Page 60
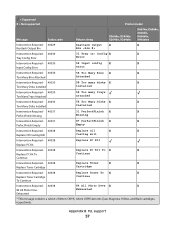
Appendix B: PJL support
60 = Supported X = Not supported
Printer model
Message
Status code
Return string
X264dn, X363dn, X364dn, X364dw
X463de, X464de, X466de, X466dte, X466dwe
Intervention Required - 40050
Replace Transfer X
X
Replace Transfer Kit
Kit
Intervention Required - 40087
59 Incompatible X
X
Incompatible Bin
Bin
Intervention Required - 40087
59 Incompatible X
X
...
Technical Reference - Page 62

...
88.2x Replace
X
X
Replace Cartridge
yellow cartridge
Black PC Unit Life
40204
84 Black pc unit X
X
Warning
life warning
Intervention Required - 40204
84 unsupported
X
X
Unsupported PC Unit
[color] pc unit
Intervention Required - 40204
84.yy Color PC
X
X
Color PC Units Life
Unit Life warning
Warning
Intervention Required - 40204 PC Kit Life Warning
84 PC kit life warning...
Technical Reference - Page 63

... PC Kit
84 Replace PC Kit
Intervention Required - 40304
84 Replace
X
X
Replace Photoconductor
photoconductor
Intervention Required - 40305
84 Replace black X
X
84 Replace Black PC Unit
PC Unit
Intervention Required - 40309
32.yy black
X
X
Cartridge Part Number Unsupported
cartridge part number unsupported by device
Intervention Required - 40309
32.yy Replace
X
X
Replace...
Maintenance Guide - Page 10

... cartridge clicks into place when correctly installed.
6 Close the front door. You can also see the status of the photoconductor kit by showing 84 PC Kit life warning or 84 Replace PC Kit on the tracks of -life, print quality significantly decreases. Push the toner cartridge in as far as it will go. While the printer...
Service Manual - Page 33
...mm MMR MPF MR MROM MS NAND NVM NVRAM OCF OCR OEM OHP OPC OPT PC PDF PICS PIN
Gigabyte Ground Fault Interrupter Gigahertz Host Based Printing High-capacity feeder ...diode Long edge feed Lexmark Embedded Solution (applications) Laser Scanning Unit Low Voltage Low voltage power supply Magenta Megabyte Motor Driver Control Multifunction Device Multifunction Printer Message handling Motor interface ...
Service Manual - Page 44
... cover. This can only be performed if job recovery is discarded.
• Press Menus ( ) to clear the message. Remove the excess flash memory. 3. Plug in the printer, and turn it on .
84 PC Kit Life Warning Replace the PC kit to the printer across a USB port, but the port is open The cover to access the Administrative...
Service Manual - Page 45

... Imaged page not expected page (bouncy passthru sensor)
Remove the toner cartridge/PC kit. Replace the sensor if necessary. Finally, check the paper ...Remove the PC kit and paper or debris at the input sensor. Replace the wear strips if necessary.
200.09 Transfer servo never started to media prestaged in the paper path. • Media not of the tray. 7013-XXX
Cartridge error messages...
Service Manual - Page 46

... OR NO GAP JAM RECOVERY. Possible causes include user insert of the PC kit for debris in machine during warmup.
2-12 Service Manual If so, then inspect the tray wear strips and replace if necessary. Remove the toner cartridge/PC kit. At the front, remove the upper front guide, and inspect the flag on page 2-30.
200...
Service Manual - Page 47

... during warm-up.
Verify that the narrow media flag rotates freely and securely. Remove the toner cartridge/PC kit and check for the printhead.
Check the main motor. Page did not reach the... designed to identify either motor after media at the entrance or in the fuser, then replace the fuser.
Inspect the wear strips in the source tray.
201.00 Paper jam between...
Service Manual - Page 48

...
Action
201.02 Exit sensor never made by leading edge of page.
Open the rear cover, and look for obstructions in the fuser, then replace the fuser. Also Remove the PC kit and paper or debris at the entrance or in the path way.
The flag is likely that was detected during warm-up .
Service Manual - Page 70
... d. The message CONFIG MENU ...PC kit.
• If those fail, then replace... the LVPS/HVPS, controller board, or the printhead in that order. Turn off .
b. Press to evenly distribute the toner.
Blank page
FRU Toner cartridge (not a FRU)
Printhead LVPS/HVPS Controller board
Action
Remove the toner cartridge, and gently shake it to print the pages. None should be caused by the PC...
Service Manual - Page 72

... oils or hand lotion. Try a new PC Kit. Place a sheet of wear, damage or contamination. Replace as necessary. Try changing the setting to the PC drum. The bearing assemblies should support the ... (no repeating pattern)
FRU Toner cartridge (not a FRU)
Paper (not a FRU)
Action
Remove the toner cartridge assembly, and gently shake the assembly to evenly distribute the toner.
Check the...
Service Manual - Page 73

...
Action
Banding appears as it feeds through the printer, especially in the speed of overly dry or moist environments.
Replace the fuser as necessary. None of graphics. Diagnostics information 2-39 Recheck condition before replacing PC Kit, if necessary. With the printer off, check to the back of toner buildup and contamination. Toner on a page...
Similar Questions

What Does It Mean When Code Replace Pc Kit Lexmark X364dn
(Posted by jeblu 10 years ago)


What Does It Mean When The Printer Says, ' Replace Pc Kit'
(Posted by vickiegrant 12 years ago)

Replace Pc Kit
Our printeer is reading replace pc kit. What doea this mean?
Our printeer is reading replace pc kit. What doea this mean?
(Posted by ajackson4780 12 years ago)