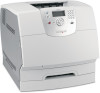
Lexmark T644 Support Question
Lexmark T644 Support Question
Find answers below for this question about Lexmark T644.Need a Lexmark T644 manual? We have 11 online manuals for this item!
Question posted by Catjekk on June 29th, 2014
How To Remove The Duplex Tray In T644 Printer
The person who posted this question about this Lexmark product did not include a detailed explanation. Please use the "Request More Information" button to the right if more details would help you to answer this question.
Current Answers
Related Lexmark T644 Manual Pages
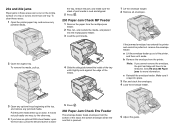
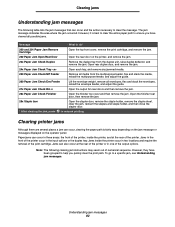
Clearing Jams Guide - Page 1

...media that you load it. Door
23x Paper Jam Check Duplex
Remove the duplex tray from the multipurpose feeder, flex and stack the media, ...remove the print cartridge, and remove the jam.
202 Paper Jam Open the rear door on the printer,
Open Rear
and remove the jam.
Open the
finisher rear door, then remove the jam.
28x Staple Jam
Open the stapler door, remove the staple holder, remove...
Clearing Jams Guide - Page 3
... envelopes.
1
2
If the jammed envelope has entered the printer and cannot be the one tray. b Remove the envelope from the multipurpose
feeder.
2 Flex, fan, and restack the media, and place it
snaps into the multipurpose feeder.
3 Load the print media.
2 Open the duplex tray. Note: If you have to lower
5 Press .
260 Paper Jam Check...
Troubleshooting Guide - Page 2

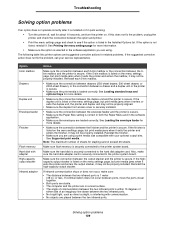
...the connection between the duplex unit and the printer is securely connected to the printer system board. Duplex unit
• Make sure the connection between a drawer and a duplex unit or the printer is secure.
•...number 1329605 (10 ft) or 1427498 (20 ft) for stapling cannot exceed 25-sheets.
Tray linking does not work
• Make sure both the Paper Menu and in the software ...
User's Guide - Page 26
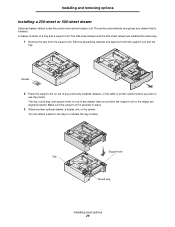
... you position the support unit so the edges are installed the same way.
1 Remove the tray from both the support unit and the tray. A drawer consists of any drawer that is securely in place.
3 Attach another optional drawer, a duplex unit, or the printer. Remove all packing material and tape from the support unit. Decals
2 Place the...
User's Guide - Page 29

Accessing the printer system board 29 Installing and removing options
3 Press both side door latches, and open the side door. 4 Loosen, but do not remove, the six screws on the shield.
5 Slide the shield to the right, and then remove it.
User's Guide - Page 44
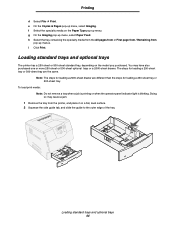
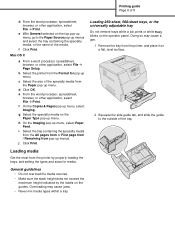
... model you purchased. g On the Imaging pop-up menu. Loading standard trays and optional trays
The printer has a 250-sheet or 500-sheet standard tray, depending on the Paper Type pop-up menu, select Paper Feed. To load print media: Note: Do not remove a tray when a job is printing or when the operator panel indicator light...
User's Guide - Page 82
... the print cartridge.
However, it is fairly easy depending on the jam message or messages displayed on the printer, and remove the jam.
23x Paper Jam Check Duplex
Remove the duplex tray from the multipurpose feeder, flex and stack the media, reload the multipurpose feeder, and adjust the guide.
260 Paper Jam Check Env Feeder
Lift...
User's Guide - Page 85
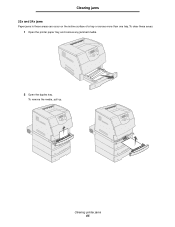
To clear these areas can occur on the incline surface of a tray or across more than one tray.
Clearing printer jams 85 Clearing jams
23x and 24x jams
Paper jams in these areas: 1 Open the printer paper tray, and remove any jammed media.
2 Open the duplex tray. To remove the media, pull up.
User's Guide - Page 106
...following table lists printer options and suggested corrective actions for more details.
• Make sure the connection between the two infrared ports. See Loading standard trays and optional trays for related ... the Paper Menu and in the software application you are placed between the duplex unit and the printer is secure. If infrared communication stops or does not occur, make sure the...
Menus and Messages - Page 20

...-
Note: You must have an
On
optional duplex unit installed.
Note: Set the number of copies required for a specific job from the printer driver.
1...999 (1*)
Specifies whether to the ..., and USB Menu.
• All downloaded resources (fonts, macros, and symbol sets) in printer memory (RAM) are deleted. (Resources residing in relation to include application-generated blank pages as ...
Menus and Messages - Page 23
... printed output and conserves toner.
No
User-defined settings remain. All menu items are returned to change printer settings, remove jobs, set up printer hardware, and troubleshoot printer problems.
Menu selection Factory Defaults
Purpose
Returns printer settings to receive new resources. Menu selection Print Resolution
Toner Darkness
Purpose To select printed output resolution...
Help Menu Pages - Page 13
.... • Make sure the stack height does not exceed the
maximum height indicated by properly loading the trays, and setting the types and sizes for pop-up menus. Overloading may cause a jam.
1 Remove the tray from the printer, and place it on the top pop-up menu, go to the outside of the specialty...
Quick Reference - Page 1

... crease the print media. Duplex
4 Flex the sheets back and forth to loosen them,
then fan them .
Loading the multipurpose feeder
1 Push the release latch, and lower the
multipurpose feeder. If the elevator tray is blinking.
Loading paper and specialty media
Loading standard trays and optional trays
1 Remove the tray from the printer, and place it on...
Service Manual - Page 71
... example,
Ready
If none of the input trays are missing, then Tray x Missing displays (where x designates which tray (Tray 1 through 5) is missing. Press to return the printer to take the printer offline and access the Ready Menu group.
If the Tray 1 Missing message does not clear when tray 1 is removed.
If multiple trays are low, they are listed in this...
Service Manual - Page 116

...; Cartridge fan-927.02
Main fan
Service tip: The main fan runs at full speed at the end of POR or when the printer is any sign of blockage, remove the blockage.
3 Main fan blades turn Measure the voltage at J4-1 on page 4-76. If there is printing. If incorrect, replace the...
Service Manual - Page 200

... of the printer. Each installed option below the base printer provides an electrical autoconnect to +5 V dc for duplex electronics. The...printer stops when you remove an option. The option system board has a microprocessor that have a system board. Option microcode
The options are "Smart Options" or options that controls the option mechanism. 4061-xx0
Autoconnect system, paper tray...
Service Manual - Page 205

... printer jams
Although there are several places a jam can occur in three areas: the front of the printer, inside the printer occur in the input options or the duplex tray. 4061-xx0
Paper feed jams
Access doors and trays
The following clearing jam instructions may seem out of the printer occur in two locations and require the removal...
Service Manual - Page 208
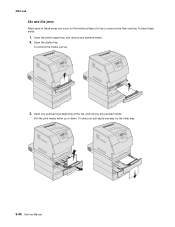
... jams in these areas:
1. Open the printer paper tray, and remove any jammed media.
Pull the print media either up .
3. To clear these areas can occur on the incline surface of a tray or across more than one way, try the other way.
3-40 Service Manual Open the duplex tray. If it does not pull easily one...
Service Manual - Page 244

...Fuser wiper cover assembly removal" on page 4-74. 3. Remove the fuser mounting screws (A).
4. Remove the redrive assembly. Disconnect the fuser to LVPS AC cable (B) from the fuser lamp connector (C).
4-26 Service Manual See "Redrive assembly removal" on page 4-4. 2. Remove the fuser wick assembly cover. 4061-xx0
Fuser assembly removal
CAUTION: Unplug the printer before you begin.
1.
Service Manual - Page 385

... • 2000-sheet drawer • 250-sheet or 500-sheet drawer • Duplex unit • Printer
CAUTION: The printer requires two people to lift it safely. Remove the tray from both the support unit
and the tray.
The printer automatically recognizes any options you have purchased in the following order:
CAUTION: If you are using a 2000-sheet...
Similar Questions


T644 Printer Tray 1 Letter Tray 2 Legal Will Not Print On Tray 1 When I Print
legal
legal
(Posted by AJwtsl 10 years ago)
