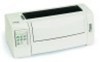
Lexmark Forms Printer 2400 Support Question
Lexmark Forms Printer 2400 Support Question
Find answers below for this question about Lexmark Forms Printer 2400.Need a Lexmark Forms Printer 2400 manual? We have 3 online manuals for this item!
Question posted by mdhughe32 on July 12th, 2012
Reset Margin On A Lexmark 2400 Series
I have a Lexmark 2400 printer and it all of the sudden started printing too far on the right side of the paper. I need to know how to reset the margin.
Current Answers
Related Lexmark Forms Printer 2400 Manual Pages
User's Guide - Page 3

...printer 1 Features and functions 2 Printer description 7 Printing the demonstration sample 10 Connecting the printer to your computer 14 Setting up your Windows and DOS application software 17
Chapter 2: Using the operator panel 21 Operator panel layers 22 Setting the printer online or offline 28 Advancing the paper...Loading paper 43 Setting the forms thickness lever 44 Loading continuous...
User's Guide - Page 8

... formats which include character option settings (font, pitch, and so on) and paper handling options (page length, margins and so on).
This printer has the capability of paper used, reducing costs.
4
For more information, see "Forms Macro menu options" on page 96. Enables printing on page 31. For information on setting up macros see "Selecting or...
User's Guide - Page 15
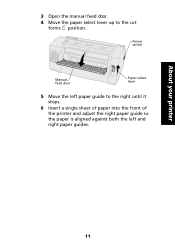
Power switch
Manual feed door
Paper select lever
5 Move the left and right paper guides.
11 About your printer
3 Open the manual feed door. 4 Move the paper select lever up to the right until it stops.
6 Insert a single sheet of paper into the front of the printer and adjust the right paper guide so the paper is aligned against both the left paper guide to the cut
forms position.
User's Guide - Page 33

... tractor unit is not printing.
• Press LineFeed to advance the paper to the next line.
• Press FormFeed to advance the paper to the Top-Of-Form. Operator panel
29
For more information, see "Setting the Tear Off position" on the next page or to advance the paper when the printer is in the Setup...
User's Guide - Page 34
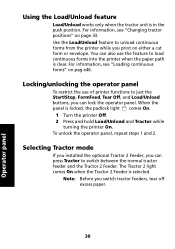
... the printer while you print on either a cut form or envelope. Selecting Tractor mode
If you installed the optional Tractor 2 Feeder, you can press Tractor to just the Start/Stop, FormFeed, Tear Off, and Load/Unload buttons, you switch tractor feeders, tear off excess paper.
30
Operator panel Note: Before you can also use of printer...
User's Guide - Page 52

... to the push tractor position" on pag e40.
1 Turn the printer On.
2 Make sure the paper path is the push tractor position. If a cut form or envelope is loaded in this position, see "Converting the pull tractor to remove it.
48 Loading paper
Loading continuous forms using the push tractor
The factory setting for your...
User's Guide - Page 60

Loading paper
Front loading continuous forms using the pull tractor
Make sure the tractor is loaded in the printer, remove it by pressing FormFeed.
56 If a cut form or envelope is in this position, see "Converting the push tractor to pull tractor position" on pag e36.
1 Turn the printer On.
2 Make sure the paper path is clear. If the tractor unit is not in the pull position.
User's Guide - Page 70

If the tractor is not in the printer, press FormFeed to pull tractor position" on pag e36.
1 Turn the printer On.
2 Make sure the paper path is in the pull position. If a cut form or envelope is loaded in this position, see "Converting the push tractor to remove it.
66 Loading paper
Bottom loading continuous forms using the pull tractor
Make sure the tractor is clear.
User's Guide - Page 77

Loading paper
Loading a cut form or envelope manually
1 Turn the printer On.
2 Make sure the paper path is blinking. 4 Set the forms thickness lever to a suitable setting for more information.
73 See "Setting the forms thickness lever" on page 44 for the type of the continuous form and then press Load/Unload to park the continuous forms. The Paper Out...
User's Guide - Page 91

... sent to the printer after advancing to the Top-Of-Form
on the Tear Off bar. 5 Close the operator panel cover. If you send another job to the Top-Of-Form and begins printing.
87 Loading paper
Using the Tear Off bar
Setting the Tear Off position
When Auto Tear Off is On. 7 Press Start/Stop.
User's Guide - Page 106

... your menus to print in NLQ mode, the printer prints
unidirectionally by putting it begins printing continuous forms.
For help see, "Setting Top-Of-Form" on page 92.
The printer prints slower in Quiet mode. Using Setup mode
Control menu options
Control options Use these menu options Uni-Dir Printing
Auto Ready Cut Sheet
Paper Out Alarm Demo Print Menu Language...
User's Guide - Page 111
... information on the World Wide Web at www.lexmark.com. A printer cable, ribbon cartridge, and paper are the only supplies you need more information about Lexmark Authorized Supplies Dealers in your area. Ordering supplies
If you need for the Lexmark Forms Printer 2400 Series printers. 6 Supplies
This section describes how to you from Lexmark Direct or to request information about the...
User's Guide - Page 122

... whether you are printing continuous forms, make sure the paper select lever is a power supply problem. No action required. Note: If the printer is not beeping, there is pushed down in the buffer to take action. Note: If you installed the optional Tractor 2 Feeder and you need to be printed. For instructions, see "Removing the ribbon...
User's Guide - Page 129

NLQ alignment bars
Current 01 value
The current value is the number printed below the bars.
125
Troubleshooting c The printer automatically starts printing the alignment bars for NLQ (Near-LetterQuality).
User's Guide - Page 131

... the printer Off. 2 Detach any torn perforation strips or bits of paper you are using the optional Tractor 2 Feeder.) 6 Open the left and right tractor doors. 7 Lift the paper away from tractor pins. 8 Carefully pull out the paper. 9 Remove the ribbon access cover to clear any torn paper. 10 Remove any continuous forms already printed. 3 Set the forms thickness...
User's Guide - Page 132
..." on page 116.
3 Have printer repaired.
Dust or paper particles are wrong or Application program
missing; control codes do not work.
Forms thickness lever is incorrect for each condition to One Second and software application or network is poor.
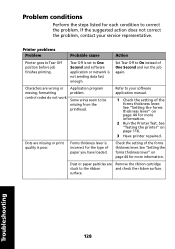
Some wires seem to Tear Off position before job finishes printing. Printer problems Problem
Probable cause...
User's Guide - Page 137
... the ribbon cartridge" on page 17.
Troubleshooting
133 paper you are using a
• Make sure the printer cable
characters print; printing
printer cable, it is Forms thickness lever is unstable; See "Setting up your Windows and DOS application software" on page 142.
Printing is set See "Setting the forms
printing but doesn't print; ends.
• Wrong driver in software...
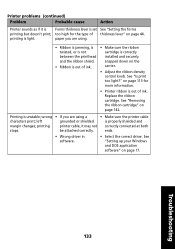
User's Guide - Page 138

... past rubber tractor stop in the printer.
• The right tractor position may be incorrectly adjusted.
• Before you are trying to loosen the sheets. See "Setting the forms thickness lever" on page 97 for the type of paper you load new forms, fan the forms to print continuous forms, make sure the paper select lever is not set...
User's Guide - Page 142
... set incorrectly. See the optional Auto Sheet Feeder manual for recommended paper weights.
Printer problems (continued)
Problem
Probable cause
Action
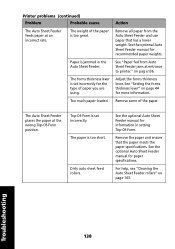
The Auto Sheet Feeder feeds paper at the wrong Top-Of-Form position. Remove all paper from Auto Sheet Feeder jams at entrance to printer." See the optional Auto Sheet Feeder manual for information in the...
Quick Reference - Page 11

..., see "Setting the forms thickness lever" on the margin guide.
7 Place a cut forms . 5 Open the manual feed door. 6 Set the left paper guide. 8 Move the right paper guide against the right edge of the paper. 9 Insert paper into the printer until the Ready light is blinking.
3 Set the forms thickness lever. Move the left paper guide so that the print start position you want...
Similar Questions

Lexmark S400 Series Printer Will Not Print Color
(Posted by lamp1tmcca 9 years ago)

Lexmark 900 Series Printer Won't Print In Color
(Posted by miBasil 9 years ago)

Printer Lexmark Forms 2400 Series
i need lexmark forms 2400 series printer driver for windows 8
i need lexmark forms 2400 series printer driver for windows 8
(Posted by kwaqasi1 11 years ago)

I Need To Print Code 38 Or Code 39 From A Lexmark 2400 Series And Or 2500 Series
need to know if code 38 or code 39 barcodes will be natively for lexmark 2400 series and or 2500 ser...
need to know if code 38 or code 39 barcodes will be natively for lexmark 2400 series and or 2500 ser...
(Posted by theothomas 12 years ago)
Page Size
I am trying to print on 8 1/2" continuous forms, but the it's trying to print as if the pages are 11...
I am trying to print on 8 1/2" continuous forms, but the it's trying to print as if the pages are 11...
(Posted by Anonymous-50674 12 years ago)