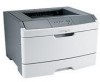
Lexmark 260d Support Question
Lexmark 260d Support Question
Find answers below for this question about Lexmark 260d - E B/W Laser Printer.Need a Lexmark 260d manual? We have 2 online manuals for this item!
Question posted by dlounberg on August 5th, 2010
What Does The Light Mean
On my Lexmark 260d laser printer, there is a light on and it's not printing. It's the fourth light from the left, an orange light, with some kind of design on it that I can't imagine the meaning of. What do I do now?
Current Answers
Answer #1: Posted by LexmarkListens on September 13th, 2011 11:31 AM
LexmarkListens

Member since:
July 1st, 2011 Points: 1,410,540

Member since:
July 1st, 2011 Points: 1,410,540
The fourth light from the left is the toner light. The printer is ready to receive and process data. In addition, the toner in the toner cartridge is getting low.
Please try to do the following steps.
• Press and release Continue to clear the light sequence and continue processing the print job.
• Turn the printer off.
• Remove the toner cartridge, and shake it to redistribute the remaining toner.
• Replace the toner cartridge.
Lexmark Listens
Phone:
USA: 1-800-539-6275
Canada: (877) 856-5540
UK: 0800 121 4726
South Africa: 0800 981 435
Related Lexmark 260d Manual Pages
Quick Reference - Page 1

.... The factory default paper type setting is networked:
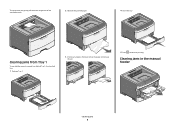
1 Type the printer IP address in the address field of the printer, then print a network setup page and locate the IP address in the trays.... Loading paper and specialty media
1
Do not remove trays while a job prints or when the Busy light sequence appears on your printer is plain paper, so the paper type setting must be saved until you ...
Quick Reference - Page 2

...sheet toward the center of the tray to the A6 size position. Load the letterhead with the recommended print side facedown. Note: Notice the maximum fill line.
Straighten the edges on the right guide, and slide... the width guides to the maximum fill line; Do not load A6-size paper to lightly touch the side of the tray.
Do not fold or crease the paper. the position for the ...
Quick Reference - Page 3
... optional 250- You can use
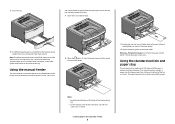
2 When the light is located inside the manual feeder door of paper at a time.
the manual feeder to the center of the paper. It collects print jobs facedown. Loading paper and specialty media
3 ...point where its leading edge can feed only one sheet of the printer and can contact the paper guides.
4 Adjust the paper guides to 150 sheets of 20 lb paper.
Quick Reference - Page 4
... cause creases in the transparencies.
• When moving the printer to
Notes
Tray 2 250 or 550 sheets of the trays and the manual feeder are printing on 75 g/m 2 (20 lb) paper. Load up ...based on transparencies. Loading paper and specialty media
4
Doing so may be loaded depends on the printer at a time.
Manual feeder
Note: Feed paper into the feeder.
1 sheet of A6-size ...
Quick Reference - Page 5

The light sequence for
the light to come on the virtual display of the following illustration shows possible jam areas:
12 3
4
5
7
6
Access point Description
1
Push the button to access jam areas. On
• Do not load the manual feeder while the printer is printing.
The following : • Remove Tray 1. • Open the front door, and...
Quick Reference - Page 7
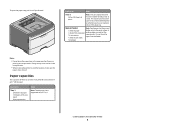
... the photoconductor kit and the toner cartridge out of the printer. Try one of the printer might be hot. Set the unit aside on the underside of injury from a hot component, allow the surface to the printer using a paper size not supported for duplex printing. To reduce the risk of the photoconductor kit.
On...
Quick Reference - Page 8
... in or behind Tray 1, the standard tray:
1 Remove Tray 1.
3 If necessary, depress the lever to free the paper and remove the jam.
5 Press to continue printing. Clearing jams from Tray 1
To see whether paper is jammed in the manual feeder
Clearing jams
8 To remove the jam, gently pull the sheet straight...
Quick Reference - Page 9
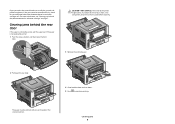
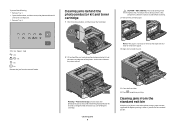
... 2 Pull open the rear door.
4 Close both the front and rear doors. 5 Press to continue printing. Clearing jams behind the photoconductor kit and toner cartridge" on page 7. The paper may be jammed with one... feeder can usually be grasped and pulled straight out.
To reduce the risk of the printer might be removed this way, check for jammed paper behind the photoconductor kit and toner ...
Setup Sheet - Page 1
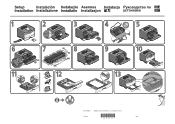
P/N 34S0254
© 2008 Lexmark International, Inc. All rights reserved.
*34S0254*
Rev 001
4/08
Similar Questions

My Printer Won't Print. Can You Help With The Message Its Giving?
(Posted by bestleggs57 9 years ago)

Yellow Light On The Tront, Second From The Right, Is On And Printer Won't Print.
(Posted by drmould1 12 years ago)

What Does The Light Beside The Ready Light Mean If It Is Yellow?
(Posted by dstokes2 12 years ago)

My Printer Is Not Printing After I've Installed The Software..why?
(Posted by Anonymous-29047 12 years ago)