
LG L1953TR-SF Support Question
LG L1953TR-SF Support Question
Find answers below for this question about LG L1953TR-SF.Need a LG L1953TR-SF manual? We have 1 online manual for this item!
Question posted by didierbzh on June 24th, 2011
How To Open To Change Fuse ?
I removed the 4 screws at the back but that seems not enought to open it in order to access the power supply ?
Can you help ?
Thanks
Current Answers
Related LG L1953TR-SF Manual Pages
Owner's Manual (English) - Page 1
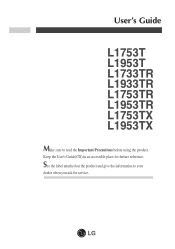
User's Guide
L1753T L1953T L1733TR L1933TR L1753TR L1953TR L1753TX L1953TX
Make sure to your
dealer when you ask for furture reference.
See the label attached on the product and give the information to read the Important Precautions before using the product. Keep the User's Guide(CD) in an accessible place for service.
Owner's Manual (English) - Page 2
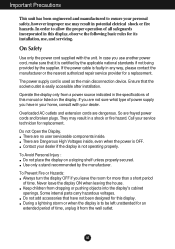
...place the display on the display. A1 In order to allow the proper operation of time, unplug it is easily accessible after installation. The power supply cord is not operating properly.
Call your ...as the main disconnection device. On Safety
Use only the power cord supplied with your home, consult with the unit.
Do not Open the Display. Do not add accessories that have in a...
Owner's Manual (English) - Page 3
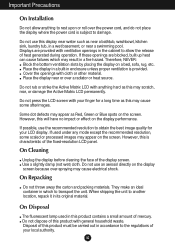
... small amount of mercury. Cover the openings with anything to rest upon or roll over the power cord, and do not place the display where the power cord is characteristic of the fixed-resolution ...processed images may result in its original material. Disposal of this product with ventilation openings in enclosure unless proper ventilation is provided. Displays are blocked, built-up heat ...
Owner's Manual (English) - Page 4
... on a soft cloth. 2. Make sure you push it until you hear it "click". Your monitor may fall and get damaged or injure your foot.
Stand Body
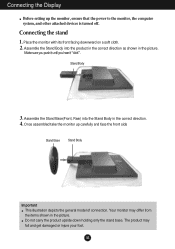
3. Once assembled take the monitor up the monitor, ensure that the power to the monitor, the computer system, and other attached devices is turned off. Assemble the Stand Body...
Owner's Manual (English) - Page 5
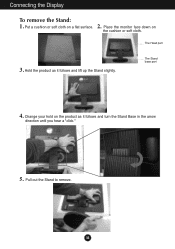
... Stand:
1. 2.
Pull out the Stand to remove. Place the monitor face down on a flat surface. Hold the product as it follows and lift up the Stand slightly. The Stand base part
4.
Change your hold on the product as it follows and turn the Stand Base in the arrow
direction until you hear a "click...
Owner's Manual (English) - Page 6
Connecting the Display
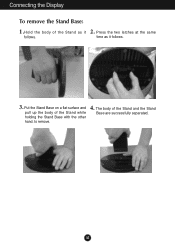
To remove the Stand Base:
1.Hold the body of the Stand and the Stand
Base are successfully separated. Press the two latches at the same
follows.
time as it follows.
3. The body of the Stand as it 2. A5
Put the Stand Base on a flat surface and
pull up the body of the Stand while holding the Stand Base with the other hand. to remove.
4.
Owner's Manual (English) - Page 7

... Connecting the Display
Before setting up the monitor, ensure that in order to the monitor, the computer system, and other attached devices is turned off. Positioning your finger(s). You can hurt your display
1.
Tilt Range: -5˚~20˚
Swivel : 355˚(The feature is recommended that the power to maintain an ergonomic and comfortable...
Owner's Manual (English) - Page 8

... type PC
DVI-D(This feature is needed to change the 15 pin high density (3 row) D-sub VGA connector on the supplied cable to model. However, be aware that is a simplified representation
Wall-outlet type
of the monitor.
This is easily accessible and close to
the display. 2
Power Cord Signal Cable
Analog signal Digital signal
D-sub...
Owner's Manual (English) - Page 9
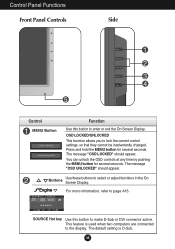
... time by pushing the MENU button for several seconds. Buttons
Use these buttons to lock the current control settings, so that they cannot be inadvertently changed. For more information, refer to page A15. SOURCE Hot key Use this button to enter or exit the On Screen Display.
A8 Press and hold...
Owner's Manual (English) - Page 10
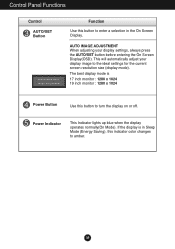
... automatically adjust your display settings, always press the AUTO/SET button before entering the On Screen Display(OSD). Power Indicator
This Indicator lights up blue when the display operates normally(On Mode). If the display is 17 inch monitor : 1280 x 1024 19 inch monitor : 1280 x 1024
Power Button
Use this indicator color changes to amber.
Owner's Manual (English) - Page 13
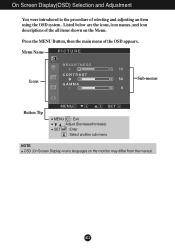
... and adjusting an item using the OSD system. Listed below are the icons, icon names, and icon descriptions of the all items shown on the monitor may differ from the manual.
Owner's Manual (English) - Page 14
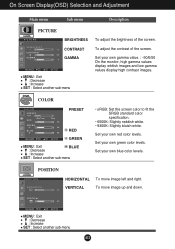
... brightness of the screen. To move image left and right. Set your own blue color levels. Set your own gamma value. : -50/0/50 On the monitor, high gamma values display whitish images and low gamma values display high contrast images. To adjust the contrast of the screen.
Owner's Manual (English) - Page 15
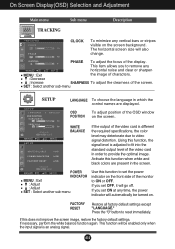
... again.
OSD
To adjust position of the display. If you set OFF, it will also change. Press the button to video signal distortion. This function will automatically be enabled only when the... language in which the control names are present in order to remove any time, the power indicator will be turned on the front side of the monitor to set ON at any
horizontal noise and clear ...
Owner's Manual (English) - Page 16
... the YES value using the buttons. Menu Name Icons
Sub-menu Name
button on the
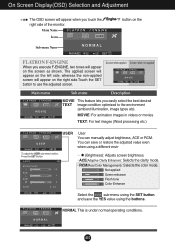
FLATRON F-ENGINE
When you touch the right side of the monitor.
The applied screen will appear on the left side, whereas the non-applied screen will appear on the right side.Touch the SET button to...
Owner's Manual (English) - Page 17
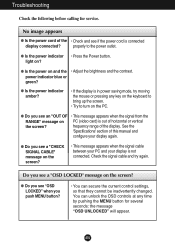
... amber?
• If the display is out of the • Check and see if the power cord is not connected. You can secure the current control settings, so that they cannot be inadvertently changed. power indicator blue or green?
light on the PC.
G Do you push MENU button?
• You can unlock the...
Owner's Manual (English) - Page 18
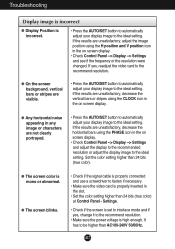
...; Check if the screen is set to interlace mode and if yes, change it to the recommend resolution.
• Make sure the power voltage is mono or abnormal. If the results are visible.
•....
• Check Control Panel --> Display --> Settings and see if the frequency or the resolution were changed. Set the color setting higher than 24 bits (true color) at Control Panel -
If the results ...
Owner's Manual (English) - Page 19
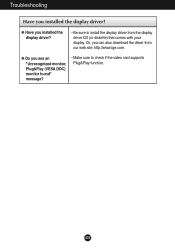
G Do you installed the display driver?
• Be sure to check if the video card supports Plug&Play function.
G Have you see an "Unrecognized monitor, Plug&Play (VESA DDC) monitor found" message?
• Make sure to install the display driver from our web site: http://www.lge.com. A18 Or, you installed the...
Owner's Manual (English) - Page 20
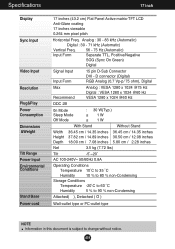
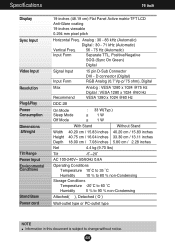
Specifications
17 inch
Display
Sync Input
Video Input
Resolution Plug&Play Power Consumption Dimensions &Weight
Tilt Range Power Input Environmental Conditions
Stand Base Power cord
17 inches (43.2 cm) Flat Panel Active matrix-TFT LCD Anti-Glare coating 17 ...Attached( ), Detached ( O )
Wall-outlet type or PC-outlet type
NOTE Information in this document is subject to change without notice.
Owner's Manual (English) - Page 21
... type or PC-outlet type
NOTE Information in this document is subject to change without notice. A20 Specifications
19 inch
Display
Sync Input
Video Input
Resolution Plug&Play Power Consumption Dimensions &Weight
Tilt Range Power Input Environmental Conditions
Stand Base Power cord
19 inches (48.19 cm) Flat Panel Active matrix-TFT LCD Anti...
Owner's Manual (English) - Page 24
The Stand base part
4. Pull out the Stand to remove.
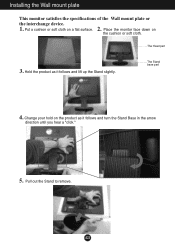
Place the monitor face down on a flat surface. Installing the Wall mount plate
This monitor satisfies the specifications of the Wall mount plate or
the interchange device.
1. 2. The Head part
3. A23 Change your hold on the product as it follows and turn the Stand Base...
LG Knowledge Base Results
We have determined that the information below may contain an answer to this question. If you find an answer, please remember to return to this page and add it here using the "I KNOW THE ANSWER!" button above. It's that easy to earn points!-
Dryer: Changing the Exhaust - LG Consumer Knowledge Base
...160; side opening and connect the elbow ... / Dryers Dryer: Changing the Exhaust Remove a screw and exhaust duct. 2-1. Reconnect...remove a knockout at the botton, available on the dryer? Dryer Exhaust Change 1. Why does the estimated time stop advancing on Gas dryer) 1, 2, 3 the order... -
Dryer Door Reversal - LG Consumer Knowledge Base
...right side and tighten the screws. 4. / Dryers Dryer Door Reversal To remove the door: 1. CAUTION: While removing the four hinge screws, hold the door firmly...screws on the dryer? Make sure the door swings and closes properly. Open the door to fall . 6. Dryer Not Drying/Long Dry Times Article ID: 6457 Last updated: 22 Apr, 2010 Views: 1123 Dryer: Changing the Exhaust Dryer: Power... -
LG Room / Window AC General FAQ - LG Consumer Knowledge Base
...be removed. For additional information please see if the unit needs to be considered when attempting to make hissing and gurgling sounds? 10. Ensure the power supply is clean. Check the fuse or... can be opened to allow water to drain more power in order to be some packing material that reduces the humidity in good working order. Does the packing foam need to remove the drain ...
Similar Questions

Lcd Blank
My monitor is connected properly to PC and power supply.But monitor not comming on
My monitor is connected properly to PC and power supply.But monitor not comming on
(Posted by vinaykarkarey 2 years ago)


Buy Power Adapter
From where to get power adapter for lg w1943c monitor??
From where to get power adapter for lg w1943c monitor??
(Posted by ankursaini60 10 years ago)

How To Remove The Back Cover Of Lg D2342p?
I WANT DETAILED INFORMATION ON REPAIRING OF LG D2342P MONITOR.I THINK THE PROBLEM IS WITH THE POWER ...
I WANT DETAILED INFORMATION ON REPAIRING OF LG D2342P MONITOR.I THINK THE PROBLEM IS WITH THE POWER ...
(Posted by subratakarmakar501 12 years ago)

Cannot Change Input Signal
I have a flatron 2662D. It is connected via TV coaxial cable. Accidentially i changed the input sign...
I have a flatron 2662D. It is connected via TV coaxial cable. Accidentially i changed the input sign...
(Posted by michaelcarell 12 years ago)