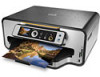
Kodak ESP 7250 Support Question
Kodak ESP 7250 Support Question
Find answers below for this question about Kodak ESP 7250 - All-in-one Printer.Need a Kodak ESP 7250 manual? We have 4 online manuals for this item!
Question posted by meraskopf on November 2nd, 2013
Paper Tray Won't Open
The paper tray jams in the closed position. I can force it open, but not all the time. It is very frustrating. Is there a fix, or a replacement tray?
Current Answers
Related Kodak ESP 7250 Manual Pages
User guide - Page 5
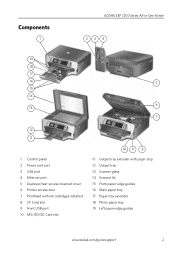
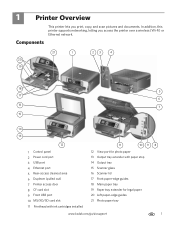
... cleanout cover 6 Printer access door 7 Printhead with ink cartridges installed 8 CF Card slot 9 Front USB port 10 MS/XD/SD Card slot
10 9 8
11 Output tray extender with paper stop 12 Output tray 13 Scanner glass 14 Scanner lid 15 Front paper-edge guides 16 Main paper tray 17 Paper tray extender 18 Photo paper tray 19 Left paper-edge guides
www...
User guide - Page 6
...), you can use KODAK Document Papers or a paper with your desktop.
or A4 sheets
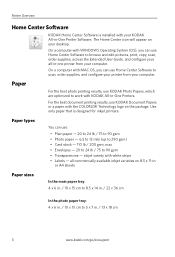
Paper sizes
In the main paper tray: 4 x 6 in. / 10 x 15 cm to 8.5 x 14 in. / 22 x 36 cm
In the photo paper tray: 4 x 6 in . Paper types
You can use KODAK Photo Papers, which are optimized to scan, order supplies, and configure your printer from your computer. The...
User guide - Page 7
... Paper tray extender Front paper-edge guide NOTE: For paper longer than 11 in -One Printer
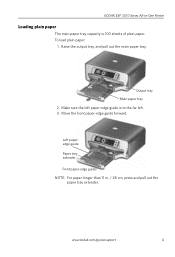
Loading plain paper
The main paper tray capacity is to the far left paper-edge guide is 100 sheets of plain paper.
Move the front paper-edge guide forward.
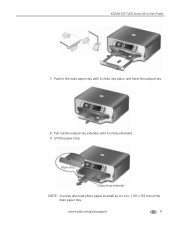
Make sure the left . 3. Raise the output tray, and pull out the main paper tray. To load plain paper:
1. KODAK ESP...
User guide - Page 8
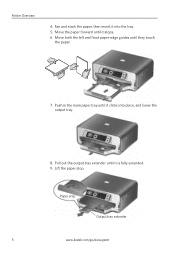
... clicks into the tray. 5. Pull out the output tray extender until they touch
the paper.
7. Lift the paper stop
Output tray extender
5
www.kodak.com/go/aiosupport Fan and stack the paper, then insert it is fully extended. 9.
Move both the left and front paper-edge guides until it into place, and lower the output tray.
8. Paper stop . Printer Overview
4.
User guide - Page 9
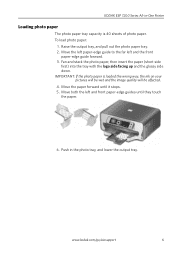
... the logo side facing up and the glossy side down. Move the paper forward until they touch
the paper.
6. To load photo paper:
1. Move both the left and the front
paper-edge guide forward. 3. Push in -One Printer
Loading photo paper
The photo paper tray capacity is loaded the wrong way, the ink on your
pictures will be...
User guide - Page 15
....
Kodak Service Number (located inside the printer when you do not overload the paper tray. Do not use non-Kodak brand or refilled ink cartridges.
• Remove, then install the cartridges again. Use our Step-by-Step Solutions and Repair tool to www.kodak.com/go /itg. Paper jam
• Remove the duplexer and gently...
Extended user guide - Page 3
... Paper types...14 Paper sizes...14 Envelope sizes...15 Loading paper ...16 Loading paper in the main paper tray...16 Loading legal-size paper in the main paper tray 18 Loading the photo paper tray ...21 Loading envelopes...23
4 Printing Switching paper trays ...25 Printing documents ...26 Printing two-sided documents...26 Printing pictures ...28 Printing from a memory card or USB-connected device...
Extended user guide - Page 4
...
7 Maintaining Your Printer General care and cleaning...53 Cleaning the scanner glass and document backing 54 Replacing ink cartridges...56 Replacing the printhead ...59 Updating the software and printer firmware...63 Updating if your printer is connected to ... Copy photo features ...71 Scanning features ...71 Bottom input paper tray ...72 Top input paper tray ...72
ii
www.kodak.com/go/aiosupport
Extended user guide - Page 5
Table of contents
Output paper tray...72 Ink cartridges ...72 Connectivity ...72 Software support ...73 Physical specifications ...73 Warranty...73 System requirements...74 Safety information ...77 Regulatory compliance...78 FCC statement ......
Extended user guide - Page 7
... cartridges installed
12 View port for photo paper 13 Output tray extender with paper stop 14 Output tray 15 Scanner glass 16 Scanner lid 17 Front paper-edge guides 18 Main paper tray 19 Paper tray extender for legal paper 20 Left paper-edge guides 21 Photo paper tray
www.kodak.com/go/aiosupport
1
In addition, this printer supports networking, letting you print, copy...
Extended user guide - Page 16
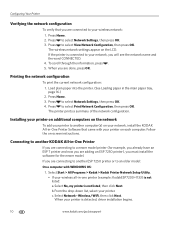
... connecting to another ESP 7250 printer or to your wireless network: 1. From the drop-down list, select your printer is connected to select...paper tray, page 16.) 2. Press to a newer model printer (for the newer model. Press to select Network Settings, then press OK. 4. To scroll through the information, press . 5. Load plain paper into the printer. (See Loading paper in -one printer...
Extended user guide - Page 21
www.kodak.com/go/aiosupport
15 KODAK ESP 7200 Series All-in-One Printer
The main paper tray accepts the following paper sizes: • 4 x 6 in. / 101 x 152 mm • 4 x 7 ...• US #10 (4.13 x 9.5 in. / 105 x 241 mm) • A2 (4.37 x 5.75 in either paper tray.
Envelope sizes
The printer accepts the following paper sizes: • 4 x 6 in. / 101 x 152 mm • 4 x 7 in. / 101 x 178 mm...
Extended user guide - Page 22

... output tray, and pull out the main paper tray. Move the front paper-edge guide forward. Make sure the left paper-edge guide is 100 sheets of plain paper. Left paperedge guide
Front paper-edge guide 4. Move both the left and front paper-edge guides until it into the tray. 5. Handling Paper
Loading paper
Loading paper in the main paper tray
The main paper tray capacity...
Extended user guide - Page 23
Paper stop . KODAK ESP 7200 Series All-in the main paper tray. Push in the main paper tray until it clicks into place, and lower the output tray.
8. Lift the paper stop
Output tray extender
NOTE: You may also load photo paper as small as 4 x 6 in. / 101 x 152 mm in -One Printer
7.
Pull out the output tray extender until it is fully extended. 9.
www.kodak.com/go/aiosupport
17
Extended user guide - Page 24
... paperedge guide
Front paper-edge guide
18
www.kodak.com/go/aiosupport
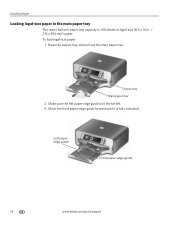
Raise the output tray, and pull out the main paper tray. Handling Paper
Loading legal-size paper in the main paper tray
The main (bottom) paper tray capacity is fully extended. To load legal-size paper:
1. Make sure the left paper-edge guide is to the far left. 3. Output tray Main paper tray
2.
Extended user guide - Page 31
...Company ESP 7200 Series AiO is selected. 3. Click Print. To switch paper trays when printing from the photo (top) paper tray. In the General tab under Paper tray, click then select Bottom Tray or Top Tray. 4.
Click OK to begin printing. Open the document you print documents, the printer automatically selects paper from a computer with WINDOWS OS:
1. Click OK to close the...
Extended user guide - Page 32
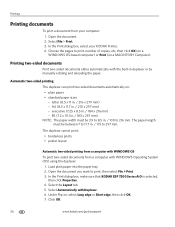
... plain paper into the paper tray. 2. Select Automatically with Duplexer. 6. Automatic two-sided printing The duplexer can print two-sided documents automatically on a MACINTOSH Computer). The duplexer cannot print: • borderless prints • poster layout
Automatic two-sided printing from a computer with WINDOWS OS To print two-sided documents from your KODAK Printer. 4. Open the...
Extended user guide - Page 33
... the printer accepts (See "Paper sizes" on the document. In the Two-Sided drop-down menu, select Layout. 5.
Manual two-sided printing can only be done on both sides, such as plain paper or two-sided photo paper. Open the document you rotate the paper manually. Select Manual (Instructions provided), then click OK. 6.
Load paper into the paper tray...
Extended user guide - Page 34
...paper tray. 2. Printing
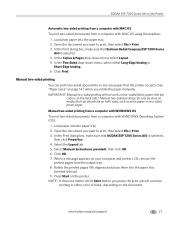
Manual two-sided printing from a computer with MAC OS
To print two-sided documents from a computer with all -in-one printer from:
• A memory card inserted into a memory card slot • A camera or storage device...Paper Handling. 12. In the Print dialog box, make sure that Eastman Kodak Company ESP... paper into the paper tray
(printed side up). 10. Open ...
Extended user guide - Page 70
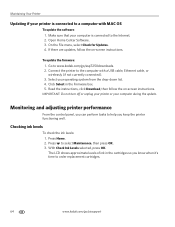
... tasks to select Maintenance, then press OK. 3. Monitoring and adjusting printer performance
From the control panel, you know when it's time to a computer with a USB cable, Ethernet cable, or wirelessly (if not currently connected). 3. Make sure that your computer is connected to order replacement cartridges.
64
www.kodak.com/go /esp7250downloads. 2. On the...
Similar Questions

Changed Printer Cartridge In Kodak 7250 Wont Print
(Posted by MAHhel 10 years ago)

How To Fix A Stuck Printer Cartridge Model Esp 7250
(Posted by gemindo 10 years ago)

Which Printer To Add Esp 5250 Do I Add To My Mac
(Posted by togcern 10 years ago)

The Paper Has Jammed In My 5250 Printer. I Have Removed All The Paper I Can But
I cannot reach the remaining paper
I cannot reach the remaining paper
(Posted by Anonymous-70513 11 years ago)

Paper Is Jammed And Cannot Reach The Paper
(Posted by swells6924 12 years ago)