KitchenAid KUDK03ITBL Support Question
KitchenAid KUDK03ITBL Support Question
Find answers below for this question about KitchenAid KUDK03ITBL - 24 Inch Full Console Dishwasher.Need a KitchenAid KUDK03ITBL manual? We have 3 online manuals for this item!
Question posted by lcone32 on October 13th, 2011
Kitchenaid Kudk03itbl3 Starts To Fil And Stops In All Cycles
My KUDK03ITBL3 starts to fill and stops. Any ideas?
Current Answers
Answer #1: Posted by majorapplirepair on October 13th, 2011 4:45 AM
majorapplirepair

Member since:
October 7th, 2011 Points: 139,880

Member since:
October 7th, 2011 Points: 139,880
Open the door and remove the lower rack. In the lower right hand corner or the tub is a round plastic float that controls the amount or water that inters the unit. Does it freely move up and down or does it feel sticky. If it feels sticky, pull it straight up and off, clean off all the grease and grime off the float and stem. replace the float and try to start the cycle again.
Related KitchenAid KUDK03ITBL Manual Pages
User Instructions - Page 1

... W10084453A Table of Contents
DISHWASHER SAFETY 1 QUICK STEPS 3 DISHWASHER USE 3 CYCLE AND OPTION DESCRIPTIONS 5 DISHWASHER FEATURES 7 DISHWASHER CARE 9 TROUBLESHOOTING 10 WARRANTY 12
Dishwasher Safety
Your safety and ... User Instruction Book. For additional information, you how to us at www.kitchenaid.com.
Para obtener acceso a "Instrucciones para el usuario de la lavavajillas"...
User Instructions - Page 3

... cleaning and drying results.
■ Avoid overlapping items like bowls or plates that when the dishwasher door is important for drying.
4 Start dishwasher. STEP 2
Add Detergent
NOTE: If you use detergent.
■ Use automatic dishwasher detergent only.
Quick Steps
3 Select a cycle and option.
2 Add detergent for cleaning and rinse aid for the water spray to...
User Instructions - Page 4

... 2 will give good results. Make sure cap is at the sink nearest your dishes and dishwasher interior will have hard water or notice rings or spots, try a higher setting. Lock
fill - -- 6 5 4
21 3
max -
--
-- - ---
STEP 4 Start or Resume a Cycle ■ Run hot water at
"Full." Fill the Pre-Wash section to complete.
NOTE: Fill...
User Instructions - Page 5

... is based on water temperature, heavy soil condition, dish load size and options selected.
5
Your dishwasher may not have all the cycles and options described.
Do not use detergent.
0:10
none
none
You can change your cycle by selecting an option. If you change an option anytime before the selected option begins.
*Maximum...
User Instructions - Page 6

....
Loads containing tough, baked-on Lock, press and hold Heat Dry for Residential Dishwashers.
All cycles, except Rinse Only.
All cycles, except Rinse Only
Control Lock
To avoid unintended use of your dishwasher cycle
Clean indicator glows when a cycle is interrupted, the Start/Resume indicator flashes.
Anytime
IMPORTANT: The sensor in the final rinse to the back...
User Instructions - Page 7

...IMPORTANT: Make sure that could otherwise "fly" around inside the dishwasher during a cycle. PROSCRUB® Wash Area The PROSCRUB® wash area is ... rack must be in the Up position and level.
Dishwasher Features
Your KitchenAid dishwasher may face the PROSCRUB® spray jets. NOTE: ... all of these features. Make sure items do not stop the rotation of the spray arms.
SURE-HOLD®...
User Instructions - Page 8

... clicks into place. Lay the tines down tines: 1.
To open track stops, flip the track stop
and click into dishwasher. Place the back rack rollers on either side of the center in the bottom of the rack.
SURE-HOLD® Light Item Clips The light ...
User Instructions - Page 9

... with the wash water. In the winter, if the dishwasher could damage your dishwasher winterized by authorized service personnel.
9
Dishwasher Care
Cleaning the Dishwasher Clean the exterior of powdered dishwasher detergent and water or use detergent. Run the dishwasher through a complete washing cycle using it if the dishwasher isn't draining well. A white vinegar rinse may remove...
User Instructions - Page 10

... twice a day until the water reaches the proper temperature. Does the dishwasher have a full load. Plastics often need towel drying.
Is the right cycle selected?
A delay automatically occurs in the dishwasher console can run up and down to release.
■ Dishwasher seems to run or stops during the main wash.
■ Clean light is designed to...
User Instructions - Page 11

... cookware after a complete cycle, call for several hours in your dishwasher? Do not use soap...cycle that you have some models). If the noise persists after washing it enters the dishwasher. Did you have the softener installed onto your hot water supply. If you use a minimum amount of glassware. Is the pump or spray arm clogged by hand washing. Home water pressure should stop...
User Instructions - Page 12

... you do not have access to the Internet and you need further assistance, you how to use of products not approved by KitchenAid.
5. W10084453A SP PN W10084454A
© 2007. KITCHENAID® DISHWASHER WARRANTY
ONE YEAR LIMITED WARRANTY
For one year from the date of purchase, when this major appliance is installed, operated and...
Installation Instructions - Page 3

...be subject to take special care in measuring dimensions and in leveling dishwasher.
3 If dishwasher will be securely attached to dishwasher against freezing. drain hose clamps, 1 large and 1 small ...personnel. Installation Requirements
Tools and Parts
Gather the required tools and parts before starting installation. All installations
Tools needed:
• pliers
• Phillips screwdriver...
Installation Instructions - Page 5

... or 20 amp., fused electrical supply.
• Copper wire only. Assure that the electrical installation is adequate and in the cabinet next to the dishwasher opening. Neer C-500 7/8 inch strain relief.
- 3 wire connectors.
- If this is not long enough, use a new drain hose with a maximum length of 12 feet (3.7 m) that meets all...
Installation Instructions - Page 11

... panel. 2. hold the panel assembly in bottom of the full front panel; Start set outer panel aside.
3 screws
Install the door handle (on the door ...protective non-scratching surface.
6. Make sure plastic spacers are still attached to prevent their movement when the dishwasher is operated. Push the door handle tightly against the door.
plastic spacers
8.
shim
2" (5.1 cm)...
Installation Instructions - Page 13

... on each side;
The handle should be countersunk for the screws heads to the KitchenAid Catalog, visit www.kitchenaid.com, or call 1-800-422-1230. It is for toe kicks greater than 6" (...15.2 cm).
7. IMPORTANT: Use a moisture resistant sealer on KitchenAid custom handle selection, refer to be centered on the back of the customer-supplied custom...
Installation Instructions - Page 14

...-supplied custom panel is recommended that a cabinetmaker cut the custom panel because of the console.
12. 11. hold the outer panel up while removing the screws. It is...humidity.
Position the outer panel on each side.
3 screws
1/8" (3.2 cm)
*This dimension is aligned with a 4-inch (10.2 cm) console only.
23-3/8" (59.3 cm)
3/4" (19.1 mm)
*25-29/32" (65.8 cm)
custom panel ...
Installation Instructions - Page 17

...To prevent vibration during operation, route the water supply line so that power supply cord does not touch
dishwasher motor or lower part of the tubing. Make sure no wires are pinched by cover.
3. screws
... nut and ferrule forward and start the nut
onto the elbow threads.
With copper tubing pushed into compression fitting as far as it does not touch the dishwasher base, frame or motor.
...
Installation Instructions - Page 18

... have not already done so, open door. Open door about 3 inches (7.6 cm) and check that sides of dishwasher. Remove towel from side of door do , dishwasher must be lowered and re-leveled.
6. If securing with a side attachment, check that space between stops on open dishwasher door and place towel over pump assembly and spray arm...
Installation Instructions - Page 20

..., call 1-800-422-1230.
20 Check operation
1. Check that dishwasher is water in the bottom of the dishwasher tub. Check to complete the shortest
wash cycle. If not, disconnect power or unplug dishwasher and see that you used. 4.
Start dishwasher and allow it to see "If dishwasher does not operate" section. Check that there is working properly...
Parts Diagram - Page 11
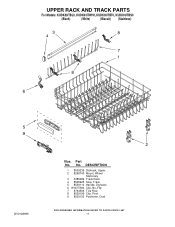
DESCRIPTION
1 8539235 Dishrack, Upper 2 8268743 Mount, Wheel
Stationary 3 3385089 Track Rack 4 8565925 Stop, Track 5 8539110 Handle, Dishrack 6 W10077844 Clip, No−Flip 7 9744566 Tine Row 8 8539190 Clip, Pivot 9 8539102 Positioner, Dual
11 No. Part No. UPPER RACK AND ...
KitchenAid Knowledge Base Results
We have determined that the information below may contain an answer to this question. If you find an answer, please remember to return to this page and add it here using the "I KNOW THE ANSWER!" button above. It's that easy to earn points!-
Using the Solid cycle - Fully visible console
... helpful Compactor won't operate FAQs Knowledgebase search tips Using the Solid cycle - The fully visible console makes the controls easily accessible. The Solid cycle extends the use the Solid cycle for extra compacting. The indicator on the compactor control. While the Solid cycle is down position for at least 30 minutes at a time. To... -
Starting the compactor - Fully integrated style
...;to create a clean look in On position. Set Solid Cycle switch to start cycle. If your compactor with fully visible control styling for more information. See Starting your controls are not fully integrated, you may have fully visible controls. Fully visible console Starting the compactor - Fully visible style Cleaning and caring stainless steel... -
Whirlpool Recall Information
... Door, Frost-Free Freezers and Refrigerators - KitchenAid® PRO LINE® Series Toaster - All rights Reserved | Dehumidifier - Copyright©2005 Whirlpool Corporation. United States Dishwasher - Over The Range Microwave Hood Combination - 24-inch Washer and Gas Dryer - United States Canada Gas Water Heater -
Similar Questions

Dw Clicks And Stops
DW starts to fill. After about 2 minutes, a clicking noise starts and the DW will not progress in th...
DW starts to fill. After about 2 minutes, a clicking noise starts and the DW will not progress in th...
(Posted by pscotterly 6 months ago)

Dishwasher Starts Then Shuts Off After Approx 2 Mins.
I've tried ProWash, Normal, etc. and no matter which I select the machine will start, but within 2 m...
I've tried ProWash, Normal, etc. and no matter which I select the machine will start, but within 2 m...
(Posted by lcsmith1 8 years ago)

Door Will Not Close To Allow Cycle To Start
once per week or so when we try to close the door and start a cycle on our kuds35fxss dishwasher the...
once per week or so when we try to close the door and start a cycle on our kuds35fxss dishwasher the...
(Posted by wasagabeachbums 9 years ago)
Dishwasher Kudc10fxss Continually Beeps
I interrupted the drying cycle on the KUDC10fxss dishwasher - pressed start/resume and closed the do...
I interrupted the drying cycle on the KUDC10fxss dishwasher - pressed start/resume and closed the do...
(Posted by temadigan 12 years ago)

Push Start And Nothing Happens.
All other control lights work. I turned off breaker and back on to reset still nothing happens when ...
All other control lights work. I turned off breaker and back on to reset still nothing happens when ...
(Posted by jackb12 13 years ago)