KitchenAid KUDE20FXSS Support Question
KitchenAid KUDE20FXSS Support Question
Find answers below for this question about KitchenAid KUDE20FXSS.Need a KitchenAid KUDE20FXSS manual? We have 4 online manuals for this item!
Question posted by shosmer8502 on October 18th, 2013
How Do I Remove The Adj Arm And Whellasm
The person who posted this question about this KitchenAid product did not include a detailed explanation. Please use the "Request More Information" button to the right if more details would help you to answer this question.
Current Answers
Related KitchenAid KUDE20FXSS Manual Pages
Use & Care Guide - Page 2
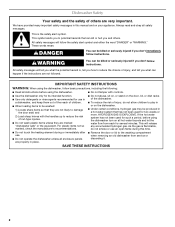
... all enclosure panels are properly in or on all instructions before using the dishwasher.
■ Do not tamper with the handles up to the washing compartment when removing an old dishwasher from each for use .
■ Do not operate the dishwasher unless all safety messages. All safety messages will release any accumulated hydrogen gas...
Use & Care Guide - Page 4
... and improves drying. Upper level wash
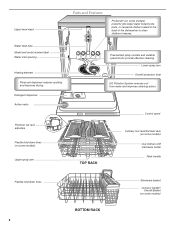
Parts and Features
ProScrub® (on some models)
Upper spray arm
Pressurized spray nozzles and variable speed motor provide effective cleaning. Lower spray arm
Overfill protection float
EQ Filtration System removes soil from water and improves cleaning action.
TOP RACK
Control panel
Culinary tool rack/3rd level...
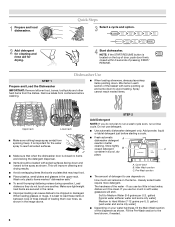
Use & Care Guide - Page 5
... 3 seconds, the start .
USE RINSE AID FOR Full
BETTER DRYING
Lock Add
Refill
or
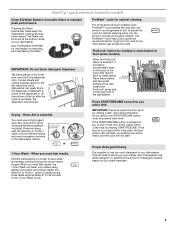
1 Hour Wash - Efficient dishwashers run longer to -clean dishes. Start-Up / quick reference (varies by model)
Clean EQ Wash System removable filters to etching of your dishes.
L
PUSH DOWN & TURN
O CK
UN
IMPORTANT: Do not block detergent dispenser...
Use & Care Guide - Page 6
...Spray cannot reach nested items.
Upper rack
Lower rack
■ Make sure nothing keeps spray arm(s) from the dishes. Pre-Wash section
■ The amount of the dispenser as shown... water and some down to Hard Water (7-12 grains per U.S. Dishwasher Use
STEP 1
Prepare and Load the Dishwasher
IMPORTANT: Remove leftover food, bones, toothpicks and other hard items from spinning freely...
Use & Care Guide - Page 11
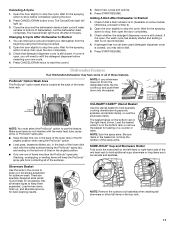
... (small round holes) for optimum wash. NOTE: Spin the spray arms. Be sure items in the top rack.
11 Changing A Cycle After Dishwasher Is Started
1. Check that detergent dispenser cover is still closed . ..., forks up, and alternate spoons, for the spraying action to stop the cycle. NOTE: Remove the culinary tool basket(s) when washing tall stemware or other tall items in the basket do...
Use & Care Guide - Page 12
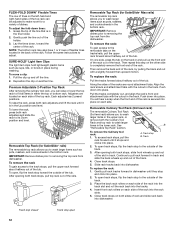
... out of the track. Then repeat this step on the other side to removing the top rack from the dishwasher. Push down , toward the outside of the tub. You will hear a... or 2 rows of flexible tines located in the bottom rack.
To remove the rack To gain access to removing the top rack from dishwasher. IMPORTANT: Remove dishes prior to the track stops, pull the upper rack forward about ...
Use & Care Guide - Page 13
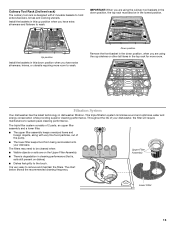
... dishware. Culinary Tool Rack (3rd level rack)
The culinary tool rack is very easy to remove and maintain the filters. Throughout the life of the pump.
■ The lower filter keeps food from being recirculated onto your dishwasher, the filter will require maintenance to wash. PUSH DOWN & TURN
L
O
CK
UN
Upper Filter...
Use & Care Guide - Page 14
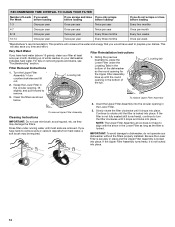
... may be required.
2. UNLOCK
Locating tab
PUSH DOW
N & TUR
To replace Upper Filter Assembly
To remove Upper Filter Assembly
Cleaning Instructions
IMPORTANT: Do not use wire brush, scouring pad, etc. If you would have to dishwasher, do not scrape or rinse before loading
1-3
Once per year
Once per year
Twice per year...
Use & Care Guide - Page 16

...knockout plug has been removed from opening properly.
Use of rinse aid along with large casserole dishes and the wash system at the back of the dishwasher.
If dishwasher is ready to run ...have a porous surface which tends to collect water droplets. HARD WATER (WHITE RESIDUE ON DISHWASHER INTERIOR OR GLASSWARE)
NOTE: Extremely hard water mineral deposits can cause damage to your detergent ...
Use & Care Guide - Page 17

...soaking the item in the lower rack. To remove spotting, run a vinegar rinse through the dishwasher. ■ Wash and rinse the affected dishware and load into dishwasher. This is an erosion of the surface of ...of soils. When this guide.)
Blinking LED's will blink 4 times in a row with the wash arms. Readjust the dishware and resume the cycle. Confirm that the cloudiness is set too low. Be ...
Use & Care Guide - Page 18

... in materials or workmanship that have been removed, altered or cannot be provided by calling KitchenAid. If you . KITCHENAID® DISHWASHER WARRANTY
LIMITED WARRANTY
For one year from ... unable to resolve the problem
after checking "Troubleshooting," additional help can cause the dishwasher to you on the duration of implied warranties of God, improper installation, installation ...
Dimension Guide - Page 2
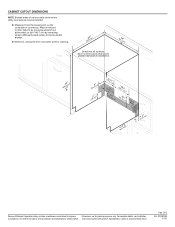
... subject to change materials and specifications without notice. D. Page 2 of opening.
(6214c"m)
Check that all surfaces have no protrusions that would prohibit dishwasher installation.
(61E2c4m" )
(86m.344icn"m)
D
(10.42"cm) (7.63"cm)
(17.2 cm) (4.4 cm)
(6.4 cm)
(26.7 ... may be reduced to 33 " (86 cm) by removing wheels from
E. Instructions packed with product. May be installed.
Installation Guide - Page 2

... Cabinet Opening 17 Connect to Water Supply 19 Connect to Drain 20 Make Direct Wire Electrical Connection 20 Secure Dishwasher in these instructions.
• Installation should be performed by a qualified service technician. Remove shipping materials, drain hose and lower rack.
You Need to:
• Slowly open door. Always read and obey all...
Installation Guide - Page 5

For panel ready models, dishwasher depth is 28" (70 cm).
30" (834.37Dc"m)
(1.9
cm) A
A. For Pro Line® handle, depth is 24" (60 cm) not including the
C. May be reduced to 33 " (86 cm) by removing wheels from narrowest point..."cm)
(621 4c"m)
Check that all surfaces have no protrusions that would prohibit dishwasher installation.
(61E2c4m" )
NOTE: Shaded areas of countertop. D.
Installation Guide - Page 10
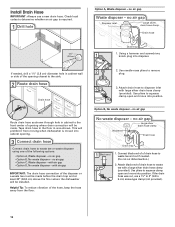
...into cabinet opening.
3 Connect drain hose
Connect drain hose to the front center of drain hose to remove plug.
3
3. Use needle-nose pliers to waste tee with large silver drain hose clamp
(provided). ...made before the drain trap and at least 20" (50.8 cm) above the floor where the dishwasher will be made. This will be installed. Helpful Tip: To reduce vibration of drain hose to waste...
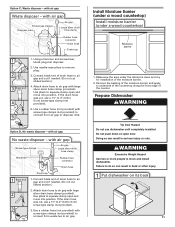
Installation Guide - Page 11
...
Drain trap
1 2 3 Black end 4 5
1.
Use needle-nose pliers to move and install dishwasher. Option D, No waste disposer - Attach drain hose to 5 cm) screw-type clamp (not provided... Hazard Use two or more people to remove plug.
3. with large silver drain hose clamp (provided). Attach drain hose to disposer inlet.
Remove the backing of the moisture barrier.
2....
Installation Guide - Page 12

... supply cord to continue with the power supply cord kit.
12
Take notice when installing or removing the dishwasher in order to the left when tightening conduit nut. Strain relief is provided with the installation of dishwasher tub. Make Power Supply Cord Connection
Option A, Power Supply Cord:
1 Power Cord-Route cord
into terminal...
Installation Guide - Page 17
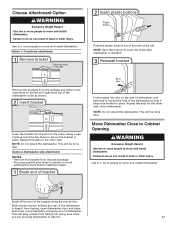
....
Repeat this step for the other injury. NOTE: Do not attach the dishwasher. Option 2, Dishwasher side attachment: NOTES: • Remove the brackets from the package and place in the open dishwasher door and place
towel over pump assembly and spray arm of dishwasher. This will keep it keeps the bracket in place. This will be done...
Installation Guide - Page 19

... panel with your cabinets.
8 Check for other side of the coupling.
Preferred method
Optional method
IMPORTANT: If wheels were removed, cover the floor when moving the dishwasher. Be sure rubber washer is level.
You may be easier to adjust the front leg using power cord, make sure that the drain hose stays...
Installation Guide - Page 22
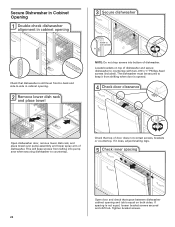
... spacing
Open door and check that space between dishwasher cabinet opening and tub is opened.
4 Check door clearance
Open dishwasher door, remove lower dish rack, and place towel over pump assembly and lower spray arm of dishwasher. Locate brackets on both sides. Tighten bracket screws.
22 The dishwasher must be secured to keep screws from shifting...
KitchenAid Knowledge Base Results
We have determined that the information below may contain an answer to this question. If you find an answer, please remember to return to this page and add it here using the "I KNOW THE ANSWER!" button above. It's that easy to earn points!-
Oversudsing/residue on dishes
Oversudsing/residue on dishes Why is there oversudsing or residue on tub or dishes in my dishwasher Why is securely attached. Do not use in the dispenser Stains on my dishes? Remove dishes from the dishwasher and add 2-3 tablespoons of vegetable cooking oil to the bottom of detergent to... -
Dish racks do not move freely
... What causes my dish racks to bind or not move freely? Email Your Feedback How old is removed from the dishwasher Upper rack features FAQs Knowledgebase search tips Culinary Tool Rack (Third Level Rack) Removing the lower level rack inserts << Share Delicious Digg Facebook Reddit StumbleUpon Twitter Print Email this... -
ProScrub® feature
...feature is the ProScrub ® feature? Your dishwasher may face the ProScrub spray jets. Load items so they do ...not interfere with the water feed tube or mid-spray arm. IMPORTANT: Only one or both rows of dishes, pots... keep the ProScrub spray jets from reaching all of items may have removable lower rack inserts or Flexi-Fold Down TM flexible tines. ...
Similar Questions

How To Remove Lower Spray Arm?
How do I remove the spray arm assembly at the bottom of the dishwasher?
How do I remove the spray arm assembly at the bottom of the dishwasher?
(Posted by bmoore6970 2 years ago)

Controls Frozen Kude20fxss
Controls do not reset even when powered off. Green (clean) light keeps flashing
Controls do not reset even when powered off. Green (clean) light keeps flashing
(Posted by spsbawa 3 years ago)

Kitchenaid Kdte254ess Does Not Drain Completely. What To Do?
Dishwasher will not drain completely. Removed the arm etc. BUT can't get at food chopper or circulat...
Dishwasher will not drain completely. Removed the arm etc. BUT can't get at food chopper or circulat...
(Posted by leoinhb 7 years ago)

How To Remove Lower Sprayer Arm On Dishwasher
(Posted by panfilconstruction 8 years ago)

How Do I Remove Rack Adjuster On Dishwasher?
Kitchenaid Dishwasher Model KUDS30FXSS. I have a new rack adjuster to install, but don't know how to...
Kitchenaid Dishwasher Model KUDS30FXSS. I have a new rack adjuster to install, but don't know how to...
(Posted by ekstrand33 10 years ago)