Get support for KitchenAid KHHC2090SSS - Architect II 2.0 cu. ft. 1200 W

KitchenAid KHHC2090SSS Support Question

KitchenAid KHHC2090SSS Support Question

Find answers below for this question about KitchenAid KHHC2090SSS - Architect II 2.0 cu. ft. 1200 W.
Need a KitchenAid KHHC2090SSS manual? We have 3 online manuals for this item!
Question posted by Rlwalker2 on November 17th, 2018

Where Is The Fuse Located

Where is the fuse located on a Kitchenaid model khhc2090sss microwave oven

Current Answers

Answer #1: Posted by Troubleshooter101 on November 23rd, 2018 9:46 AM
This answer was accepted by the poster of the original question.
Troubleshooter101

Member since:
September 30th, 2015

Points: 2,927,040
1,100
points
Inside the cabinet

Thanks


Please respond to my effort to provide you with the best possible solution by using the "Acceptable Solution" and/or the "Helpful" buttons when the answer has proven to be helpful. Please feel free to submit further info for your question, if a solution was not provided. I appreciate the opportunity to serve you!
Troublshooter101

Related KitchenAid KHHC2090SSS Manual Pages

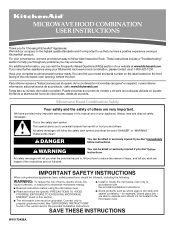
Use & Care Guide - Page 1

... hurt you what can find your model and serial number on the label located on your convenience, we have provided many important safety messages in the microwave oven. This is , tell you may encounter. Connect only to help you through any problems you how to us at www.kitchenaid.com. See "GROUNDING INSTRUCTIONS" found in...
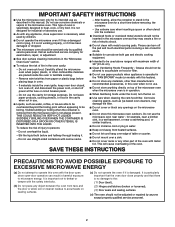
Use & Care Guide - Page 2

...BROWN" mode (on models with this manual. This will cause overheating of fire in the "Microwave Oven Care" section. ■ To reduce the risk of the oven. It is particularly important... the microwave oven when paper, plastic, or other part of 36" (91.44 cm). ■ Clean Ventilating Hoods Frequently - Do not use the microwave oven near a swimming pool, or similar locations. &#...
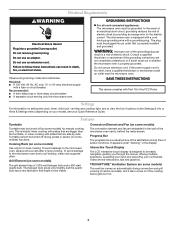
Use & Care Guide - Page 3

... the grounding instructions are side by providing an escape wire for the electric current. Settings For information on some models) functions. Recommended: ■ A time-delay fuse or time-delay circuit breaker. ■ A separate circuit serving only this microwave oven. The plug must be turned off (on some moodels), and it also comes on your...
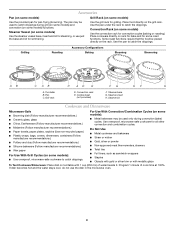
Use & Care Guide - Page 4

... the provided pan for grilling. Grill Rack (on some models) Use the grill rack for pan-frying (browning). Steamer Vessel (on some models) Use the steamer vessel base, insert and lid for steaming, or use the dish in the microwave oven. 4 Use the pan to catch the drippings. Pan C. Program 1 minute of water beside...
Use & Care Guide - Page 5

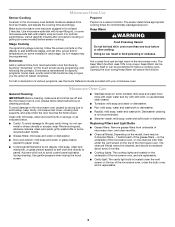
.... Activate child lock to panel). on the underside of the microwave oven, and are replaceable. ■ Cavity light: The cavity light bulb is located under the vent screen on the model, there may be kept warm in food poisoning or sickness. Make sure microwave oven has been plugged in for at least 30 minutes after convection...
Use & Care Guide - Page 6

.... Place 2 slices of a service call for the first few convection cycles. without the microwave oven being used. It may experience static or noise while microwave oven is normal for 5 minutes or more without microwaves - www.kitchenaid.com Microwave oven will dissipate with some models) ■ Grill rack (provided with repeated use . Fan running during convection cooking...
Use & Care Guide - Page 8

...microwave oven opening, behind the door. This major appliance is designed to be borne by a KitchenAid designated service company. Expenses for travel and transportation for product service if your major appliance, to instruct you can find your model number and serial number on the label located... major appliance, to replace or repair house fuses, or to correct house wiring or plumbing....
Dimension Guide - Page 1

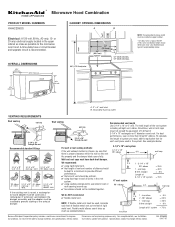
...Microwave Hood Combination PRODUCT MODEL...ft. 90° elbow = 25 ft. 90° elbow 6" = 10 ft. 3-1/4" x 10" 45° elbow wall cap = 6" = 5 ft. 40 ft. 3-1/4" x 10" 90° flat elbow= 10 ft. For complete details, see Installation our products, we reserve the right to change materials and specifications without notice. or 20-amp electrical supply located... the microwave oven hood... fuse ...
Installation Guide - Page 1

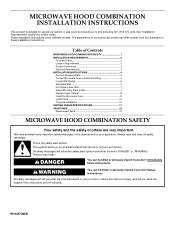
... HOOD COMBINATION SAFETY Your safety and the safety of Contents MICROWAVE HOOD COMBINATION SAFETY 1 INSTALLATION REQUIREMENTS 2 Tools and Parts 2 Location Requirements 2 Product Dimensions 3 Electrical Requirements 3 INSTALLATION INSTRUCTIONS 4 Remove Mounting Plate 4 Convert Microwave Oven to External Venting 4 Locate Wall Stud(s 6 Mark Rear Wall 7 Drill Holes in these installation...
Installation Guide - Page 2

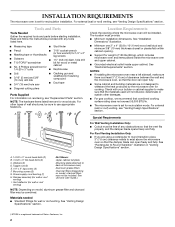
...), which includes microwave oven and items placed inside the microwave oven and upper cabinet. ■ Grounded electrical outlet inside upper cabinet. See Use and Care Guide.) NOTE: Depending on model, charcoal filters may be combined. For external (wall or roof) venting, see "Replacement Parts" section. Special Requirements H I . The location must be included...
Installation Guide - Page 3

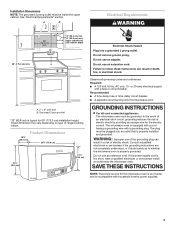
....4 cm) 15¹⁄₂" (39.4 cm) Electrical Shock Hazard Plug into an outlet that is incompatible with a fuse or circuit breaker. Do not remove ground prong. Recommended: ■ A time-delay fuse or time-delay circuit breaker. ■ A separate circuit serving only this microwave oven is an inverter, and is properly installed and grounded.
Installation Guide - Page 4

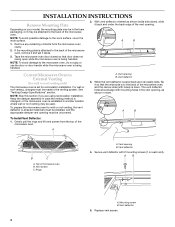
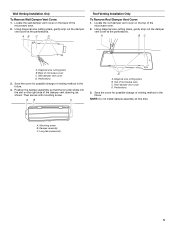
..., or the microwave oven is down ), slide it may be attached to the back of the microwave oven, and the narrow side (with 2 mounting screws (1 on your model, the mounting plate...in inset. With vent deflector oriented as shown in another location where wall or roof venting may be made to the back of the microwave oven. NOTE: Skip this section if you are using recirculation ...
Installation Guide - Page 5

... this time. AB C D Roof Venting Installation Only To Remove Roof Damper Vent Cover: 1. Save the cover for possible change of venting method in the future. 4. Locate the wall damper vent cover on the top of microwave oven C. Using diagonal wire cutting pliers, gently snip out the damper vent cover at the perforations.
Installation Guide - Page 6

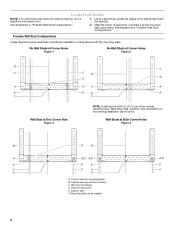
... is within the cabinet opening, do not install the microwave oven. 1. Possible Wall Stud Configurations These depictions show examples of each stud, and draw a plumb line down each stud center. Mounting plate center markers 6 Wall stud centerlines D. Corner holes (on mounting plate) B. Support tabs F. Locate Wall Stud(s) NOTE: If no wall studs exist...
Installation Guide - Page 7

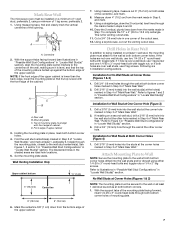
...of "Mark Rear Wall." Mounting plate C. See figures 1, 2 and/or 3 in "Possible Wall Stud Configurations" in "Locate Wall Stud(s)" section. 3. Wall Venting Installation Only Upper cabinet bottom ³⁄₈" (1 cm) 4" (10.2 cm)...plate must align with the front edge of the cabinet. Mark Rear Wall The microwave oven must be secured to the wall on at least 1 wall stud as well ...
Installation Guide - Page 8

...and to the upper cabinet. 8 Leave enough space for example, the thickness of the microwave oven. Position mounting plate on the template is level. 7. Check alignment of mounting plate,...front edge of "Installation for two 1/4-20 x 3" bolts and washers used to secure the microwave oven to open . Check alignment of mounting plate, making sure that the holes cut into the ...
Installation Guide - Page 9

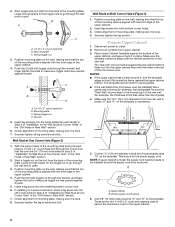
... tilted, thread power supply cord through the wall, make sure the damper assembly fits easily into microwave oven. Install the Microwave Oven WARNING Excessive Weight Hazard Use two or more people, lift microwave oven off of the microwave oven is being handled. 4. IMPORTANT: The right side of mounting plate, and set aside on each 1/4-20 x 3" bolt and place...
Installation Guide - Page 10

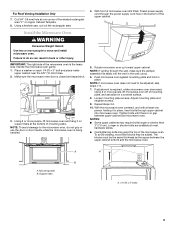
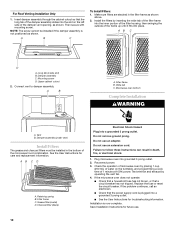
... vent) Install Filters The grease and charcoal filters must be installed if the damper assembly is not positioned as shown above. 2. Plug microwave oven into a grounded 3 prong outlet. Replace the fuse or reset the circuit breaker. Installation is plugged into a grounded 3 prong outlet. ■ See the User Instructions for troubleshooting information. A B C To Install...
Installation Guide - Page 11

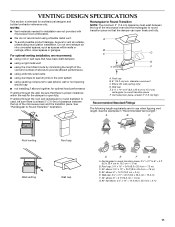
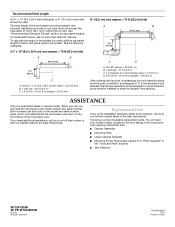
... 10 ft (15.2 cm = 3 m) E. For optimal venting installation, we recommend: ■ using roof or wall caps that have back draft dampers ■ using a rigid metal vent ■ using the most direct route by minimizing the length of the vent and number of the microwave oven and ... NOTE: The minimum 3" (7.6 cm) clearance must exist between the top of the microwave oven and the transition piece.
Installation Guide - Page 12

... type of the system you need the microwave oven model number and serial number. For best performance, use no more than three 90° elbows. Two 90° elbows = 20 ft (6.1 m) B. 1 wall cap = 40 ft (12.2 m) C. 1 rectangular to round transition piece = 5 ft (1.5 m) D. 2 ft (0.6 m) + 6 ft (1.8 m) straight = 8 ft (2.4 m) If the existing vent is located behind the door. ■ Damper Assembly...

KitchenAid Knowledge Base Results

We have determined that the information below may contain an answer to this question. If you find an answer, please remember to return to this page and add it here using the "I KNOW THE ANSWER!" button above. It's that easy to earn points!

  • Will the Microban® Refrigerator Air Filter fit my refrigerator?
    ...removal Hard Water Filming in 22, 25, and 27 cu. Model Number | Help me locate my model number Please enter at least 6 characters of your refrigerator ... The various compatible models have been built since 1997 and include current production models with serial numbers ... will fit only U.S. NOTE: If your model number in the space below. Will the Microban Refrigerator Air Filter ...
  • Connecting refrigerator to a power source
    or 20-amp fused, grounded electrical supply is recommended that cannot be provided. find it is important to make sure you are finished, reconnect the refrigerator to the electrical source and reset the control (Thermostat, Refrigerator or Freezer Control, depending on the model) to a power source? Model Number | Help me locate my model number Please enter...
  • Will the Microban® Refrigerator Air Filter fit my refrigerator?
    ... Air Filter Hard Water Filming in 22, 25, and 27 cu. capacities. Care Guides, Installation Instructions and Warranty Information. Less ...models with serial numbers that begin with either S or HR. Model Number | Help me locate my model number Please enter at least 6 characters of your appliance? Was this page Recipient Email * Required Your Email Your Name Will the Microban® ft...

Similar Questions

Fuse Location
where is the fuse for my kitchenaide KHMS2050SSS microwave
(Posted by mike2017 6 years ago)
Fuse Locations And Access
a tree limb fell on our electrical service entrance cable, disengaging it fron the splice location a...
(Posted by Bs4yall 11 years ago)
This Microwave Series Should Be Recalled Do To The Malfunction Of The Wave Guid
This microwave/convection oven should be recalled do to the malfunction of the wave guide? How long ...
(Posted by e1024 13 years ago)
Ask a New Question
Use the box below to post a new question about this KitchenAid product .
Points & Prizes
  • You can earn points for nearly everything you do on HelpOwl.com
  • You can trade in those points for gift cards at leading retailers such as Amazon.com and Walmart
  • It's that simple!
See How it Works
Create a Free Account

KitchenAid Manuals

Find free KitchenAid KHHC2090SSS - Architect II 2.0 cu. ft. 1200 W manuals and user guides available at ManualOwl.com. Try out our unique manual viewer allowing you to interact with manuals from directly within your browser!

KitchenAid Reviews

View thousands of KitchenAid user reviews and customer ratings available at ReviewOwl.com.

Contact Information

Complete KitchenAid customer service contact information including steps to reach representatives, hours of operation, customer support links and more from ContactHelp.com.

Scoreboard Ratings

See detailed KitchenAid customer service rankings, employee comments and much more from our sister site.

KitchenAid Recalls

Find comprehensive KitchenAid recall information updated hourly on RecallOwl.com.