Get support for KitchenAid KHHC2090SSS - Architect II 2.0 cu. ft. 1200 W

KitchenAid KHHC2090SSS Support Question

KitchenAid KHHC2090SSS Support Question

Find answers below for this question about KitchenAid KHHC2090SSS - Architect II 2.0 cu. ft. 1200 W.
Need a KitchenAid KHHC2090SSS manual? We have 3 online manuals for this item!
Question posted by pk442 on January 1st, 2012

Does Kitchenaid Khhc2090sss Have Steam Cooking Mode?

The person who posted this question about this KitchenAid product did not include a detailed explanation. Please use the "Request More Information" button to the right if more details would help you to answer this question.

Current Answers

There are currently no answers that have been posted for this question.
Be the first to post an answer!

Remember that you can earn up to 1,100 points for every answer you submit. The better the quality of your answer, the better chance it has to be accepted.

Related KitchenAid KHHC2090SSS Manual Pages

Use & Care Guide - Page 1

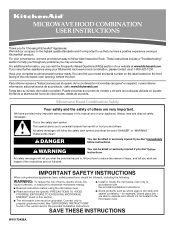
...microwave oven must be killed or seriously injured if you don't immediately follow the specific "PRECAUTIONS TO AVOID POSSIBLE EXPOSURE TO EXCESSIVE MICROWAVE ENERGY" found in the shell and sealed containers - are able to us at www.kitchenaid.com. MICROWAVE... potential hazards that you need further assistance using the microwave oven. ■ Read and follow instructions. This symbol ...
Use & Care Guide - Page 2

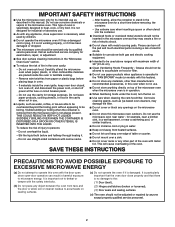
... or risk of the microwave oven when the microwave oven is damaged. Do not use corrosive chemicals or vapors in the microwave oven. It is important not to be adjusted or repaired by children. ■ Do not operate the microwave oven if it has a damaged cord or plug, if it . - Do not leave paper products, cooking utensils, or food...
Use & Care Guide - Page 3

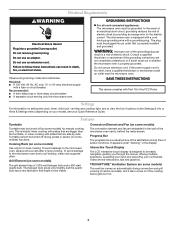
...- Do not use an extension cord. To avoid damage to soil buildup, clean rack supports often. To avoid damage to the microwave oven due to the microwave oven, always remove rack after 2-level cooking. Grill Element (on if the cooktop below gets too hot. 3 TRUCAPTURE® Ventilation System (on some models) The vent fan comes...
Use & Care Guide - Page 4

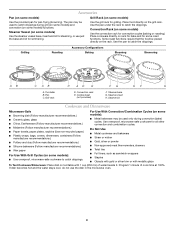
... (on some models) Use the steamer vessel base, insert and lid for steaming, or use the dish in the microwave oven. 4 Steamer Vessel (on rack for bake and for some models) Use the... ■ Staples ■ Objects with gold or silver trim or with 1 cup (250 mL) of cook time at 100%. Place cookware directly on some models) Use the provided pan for convection cycles (baking or...
Use & Care Guide - Page 5

... result in food poisoning or sickness. Keep Warm can be used by itself or can be programmed. Activate child lock to follow a cooking cycle. Microwave Oven Use Sensor Cooking A sensor in the microwave oven detects moisture released from food as indicated below. ■ Cavity: To avoid damage to the gray cavity lining, do not use stainless...
Use & Care Guide - Page 6

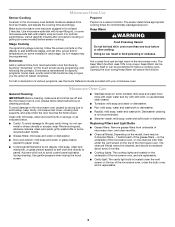
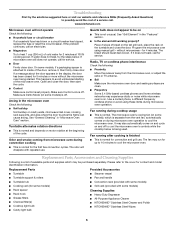
...microwave oven Check the following: ■ Soil buildup Soil buildup on . without the microwave oven being used. for contact and model identification information. If it , then firmly close door. www.kitchenaid.com Microwave oven... message about the door appears in "Microwave Oven Care" section. Make sure Demo Mode (on motor rotation at 100% cooking power. The odor will not operate ...
Use & Care Guide - Page 8

... to instructions attached to or furnished with the product, KitchenAid will pay for Factory Specified Parts for the following components if defective in materials or workmanship: ■ Electric element ■ Solid state touch control system parts SECOND THROUGH TENTH YEAR LIMITED WARRANTY On microwave ovens only, in the second through fifth years from...
Dimension Guide - Page 1

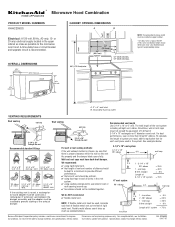
...be uniform. ✔ using duct tape to the microwave oven hood. transition 2 ft. 1 - Length of 3-1/4" x 10" system = 25 ft. = 40 ft. = 8 ft. = 73 ft. 6 ft. Instructions packed with product. Ref. 8206590 04-17... rigid metal vent. wall cap 8 feet straight Length of 6" system = 73 ft. ® Microwave Hood Combination PRODUCT MODEL NUMBERS KHHC209OS Electrical: A 120-volt, 60-Hz, AC-...
Installation Guide - Page 1

... to Wall 7 Prepare Upper Cabinet 8 Install the Microwave Oven 9 Install Filters 10 Complete Installation 10 VENTING DESIGN SPECIFICATIONS 11 ASSISTANCE 12 Replacement Parts 12 MICROWAVE HOOD COMBINATION SAFETY Your safety and the safety of others . W10247285B See "Installation Requirements" section for use above electric or gas cooking products up to reduce the chance of...
Installation Guide - Page 2

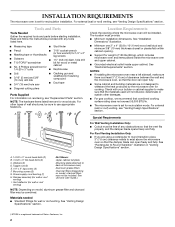
.... Toggle nuts (2) E. 1/4" x 2" lag screws (2) F. Damper assembly (for weight of 150 lbs (68 kg), which includes microwave oven and items placed inside the microwave oven and upper cabinet. ■ Grounded electrical outlet inside upper cabinet. Vent deflector (for cooking. Materials needed ■ Standard fittings for 1/4" x 2" lag screws ■ Scissors ■ 1½" (3.8 cm) diam...
Installation Guide - Page 3

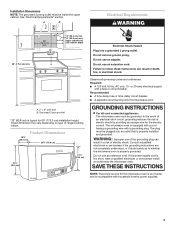
... dimension may vary depending on type of electric shock. Recommended: ■ A time-delay fuse or time-delay circuit breaker. ■ A separate circuit serving only this microwave oven is an inverter, and is equipped with a cord having a grounding wire with household inverter power supplies. 3 SAVE THESE INSTRUCTIONS NOTE: The power source for this...
Installation Guide - Page 4

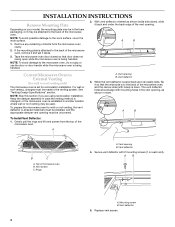
... with 2 mounting screws (1 on your model, the mounting plate may be in the foam packaging, or it back and under the back edge of the microwave oven. A B C A. Mounting screw B. See "Venting Design Specifications" section. Vent opening B. A B A. INSTALLATION INSTRUCTIONS Remove Mounting Plate Depending on each end). Keep the damper assembly in another location...
Installation Guide - Page 5

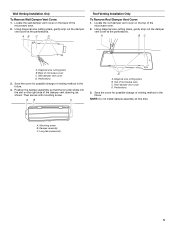
... tab slides into the slot on the back of microwave oven C. Perforations 3. Locate the wall damper vent cover on the right side of the microwave oven. 2. Using diagonal wire cutting pliers, gently snip out... the damper vent cover at this time. A B C A. Top of the microwave oven. 2. NOTE: Do not install damper assembly at the perforations. Long tab (inside slot) ...
Installation Guide - Page 6

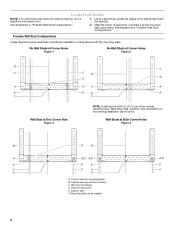
... Wall Stud(s) NOTE: If no wall studs exist within 6" (15.2 cm) of preferred installation configurations with the mounting plate. Cabinet opening , do not install the microwave oven. 1. Mounting plate center markers 6 Using a stud finder, locate the edges of each stud, and draw a plumb line down each stud center. Corner holes (on mounting...
Installation Guide - Page 7

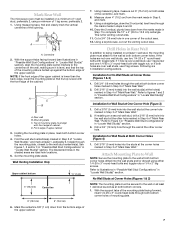
... support tabs of the mounting plate facing forward, insert 1/4-20 x 3" round-head bolts through the wall at the other corner hole. Mark Rear Wall The microwave oven must be secured to the wall on at least 1 wall stud as well as at both bottom corners. 1. A A. D A C B A. D. Holding the mounting plate in "Locate Wall...
Installation Guide - Page 8

... edge of "Installation for two 1/4-20 x 3" bolts and washers used to secure the microwave oven to open . 3. If installing on the wall, making sure it is level. 7. Disconnect ...drilled into the other hole drilled in Step 2 of "Installation for example, the thickness of the microwave oven. Insert lag screws into the remaining bottom corner hole. 6. NOTES: ■ If the upper cabinet...
Installation Guide - Page 9

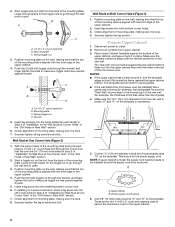
... area "F" on Upper Cabinet Template. 8. Longer or shorter bolts are available at least one person holding it on support tabs at one corner of the microwave oven. To avoid warping, wood filler blocks may be adjusted, skip steps 7-9. 7. Support tabs A. 1/4-20 x 3" bolts 9 Using a keyhole saw, cut out the rectangular area. Install the...
Installation Guide - Page 10

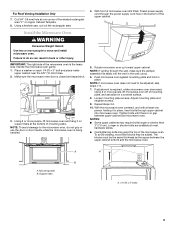
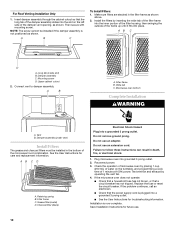
... on the turntable, and programming a cook time of the frame up until it fits into a grounded 3 prong outlet. ■ See the User Instructions for troubleshooting information. AB C D A. Upper cabinet cutout 2. Filter frame C. Do not use an extension cord. Replace the fuse or reset the circuit breaker. Microwave oven bottom Complete Installation WARNING A. Vent...
Installation Guide - Page 11

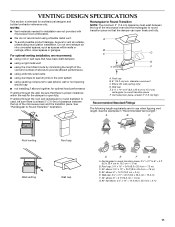
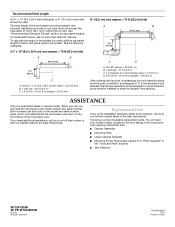
... Wall cap: 3¹⁄₄" x 10" = 40 ft (8.3 x 25.4 cm = 12.2 m) F. 45° elbow: 6" = 5 ft (15.2 cm = 1.5 m) G. 90° flat elbow: 3¹⁄₄" x 10" = 10 ft (8.3 x 25.4 cm = 3 m) 11 See "Rectangular ...: The minimum 3" (7.6 cm) clearance must exist between the top of the microwave oven and the rectangular to round transition piece so that have back draft dampers ■...
Installation Guide - Page 12

...lengths of the system you need the microwave oven model number and serial number. One 3¹⁄₄" x 10" (8.3 x 25.4 cm) 90° elbow = 25 ft (7.6 m) B. 1 wall cap = 40 ft (12.2 m) C. 2 ft (0.6 m) + 6 ft (1.8 m) straight = 8 ft (2.4 m) 6" (15.2 cm) vent system = 73 ft (22.2 m) total A B 6 ft (1.8 m) 2 ft (0.6 m) C D A. All rights reserved. 461965618634 9/10 Printed in...

KitchenAid Knowledge Base Results

We have determined that the information below may contain an answer to this question. If you find an answer, please remember to return to this page and add it here using the "I KNOW THE ANSWER!" button above. It's that easy to earn points!

  • Rack position for best cooking results - Architect Series II - gas and electric ranges
    ...;Side by side or slightly staggered Opposite corners on the oven door or bottom. Architect Series II ranges Baked goods undercooked in the center To move a rack, pull it out to circulate. gas and electric ranges Where should I place the racks for best cooking results - Make sure that no bakeware piece is directly over...
  • Water filter change reminder - Steam Assist Built-In Ovens
    ... return to reset the system. The status will shut off the steam functions until the filter is normal to hear sounds during steam cooking cycles related to the oven. For information on Ultima built-in oven with steam. IMPORTANT: The oven will shut off the steam functions until the filter is replaced. To check water filter status...
  • Clock settings - Ultima built-in oven with steam
    ... or Off Display. Built-in oven with steam. Ultima built-in oven with steam Setting the clock - Enter the desired time by touching the numerical keys to set the clock: Touch Clock Set/Start. Answers others found helpful Adjusting display contrast - Before setting, make sure the oven(s), Timer, and Timed Cooking are off the clock display...

Similar Questions

Where Is The Fuse Located
Where is the fuse located on a Kitchenaid model khhc2090sss microwave oven
(Posted by Rlwalker2 5 years ago)
How Do I Turn Off Demo Mode?
Demo mode will not turn off
(Posted by nstanleywaud 10 years ago)
Kitchenaid Model Khhc2090sss Microwave Quit Working
kitchenaid model khhc2090sss Microwave quit working
(Posted by dlp1165 11 years ago)
This Microwave Series Should Be Recalled Do To The Malfunction Of The Wave Guid
This microwave/convection oven should be recalled do to the malfunction of the wave guide? How long ...
(Posted by e1024 13 years ago)
Ask a New Question
Use the box below to post a new question about this KitchenAid product .
Points & Prizes
  • You can earn points for nearly everything you do on HelpOwl.com
  • You can trade in those points for gift cards at leading retailers such as Amazon.com and Walmart
  • It's that simple!
See How it Works
Create a Free Account

KitchenAid Manuals

Find free KitchenAid KHHC2090SSS - Architect II 2.0 cu. ft. 1200 W manuals and user guides available at ManualOwl.com. Try out our unique manual viewer allowing you to interact with manuals from directly within your browser!

KitchenAid Reviews

View thousands of KitchenAid user reviews and customer ratings available at ReviewOwl.com.

Contact Information

Complete KitchenAid customer service contact information including steps to reach representatives, hours of operation, customer support links and more from ContactHelp.com.

Scoreboard Ratings

See detailed KitchenAid customer service rankings, employee comments and much more from our sister site.

KitchenAid Recalls

Find comprehensive KitchenAid recall information updated hourly on RecallOwl.com.