KitchenAid KERS807SSS Support Question
KitchenAid KERS807SSS Support Question
Find answers below for this question about KitchenAid KERS807SSS - 30" Electric Range.Need a KitchenAid KERS807SSS manual? We have 3 online manuals for this item!
Question posted by winthropwalton on November 20th, 2010
Ceramic Cooktop
I have a 2008 Kitchenaid ceramic top oven/range. I left a plastic container of raspberries on the cool cooktop and 95# dog jumped to try to get them and turned the stove top on high. The container melted into a very hard mass. Is ther anyway to clean this off the ceramic top?
Current Answers
Related KitchenAid KERS807SSS Manual Pages
Dimension Guide - Page 1

... connected to back. q The range can be level. If countertop opening width is 30" (76.2 cm), no countertop preparation is required.
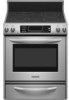
30" (76.2 cm) Freestanding and Slide-In Electric Range
PRODUCT MODEL NUMBERS
OVERALL DIMENSIONS
KERS807S KERS807X
KESK901S KESS907S
KESS908S KESS907X
Freestanding Range
Slide-in Range
ELECTRICAL REQUIREMENTS
B
q This range is manufactured with 25...
Installation Guide - Page 2

... Requirements -
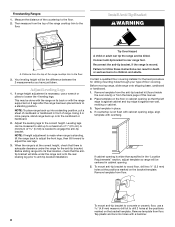
Always read and obey all safety messages.
Failure to rear range foot. TABLE OF CONTENTS
RANGE SAFETY 2
INSTALLATION REQUIREMENTS 3 Tools and Parts 3 Location Requirements 3 Electrical Requirements - Only 9 Verify Anti-Tip Bracket Location 14 Level Range 14 Complete Installation 14 Moving the Range 14
ANTI-TIP BRACKET TEMPLATE 24
TABLE DES MATIÈRES...
Installation Guide - Page 3

...cooktop..."Electrical Requirements" section. A
B
C
A.
Plastic ...oven has been designed in a freestanding cutout. INSTALLATION REQUIREMENTS
Tools and Parts
Gather the required tools and parts before starting installation. Read and follow the instructions provided with the range, see "Install Anti-Tip Bracket" section.
■ Grounded electrical supply is marked for concrete/ceramic...
Installation Guide - Page 4

...; See "Electrical Connection" section. Model/serial number plate (located on the right-hand side oven door trim)
*Range can be raised...cooktop
*Range can be raised approximately 1" (2.5 cm) by adjusting the leveling legs.
**When installed in a 24" (61.0 cm) base cabinet with 25" (63.5 cm) countertop; Model/serial number plate (located on the right-hand side oven door trim)
D. 30...
Installation Guide - Page 5

...) copper.
30" (76.2 cm) minimum clearance between the top of the cooking platform and the bottom of wood or metal cabinet is located inside the oven door on the model/serial number rating plate. The model/serial rating plate is covered by a qualified electrician.
■ Range must determine the type of electrical connection you...
Installation Guide - Page 6

... and wire size are in a clear plastic bag.
See the "Electrical Connection" section.
■ Allow 2 to 3 ft (61.0 cm to the fused disconnect (or circuit breaker box) through flexible or nonmetallic sheathed, copper or aluminum cable. See the "Electrical Connection" section. This cord contains 3 copper conductors with ring terminals or open -end spade terminals...
Installation Guide - Page 7

...underside of the countertop to move and install range. Measure from each front corner and/or rounded edge flattened. Cooktop
3. ■ This range is greater than 30" (76.2 cm), adjust the ³...) from inside oven.
2.
Keep cardboard bottom under range. Countertop Preparation
(for Proper Height
Slide-In Ranges:
1. Measure for Slide-in Ranges Only)
The cooktop sides of the...
Installation Guide - Page 8
... template from the anti-tip bracket kit (found inside
the oven cavity) or from the top of this manual. 2. Freestanding Ranges:
1. This may be the difference between the 2 measurements you have just taken.
Before moving range, slide range onto shipping base, cardboard or hardboard. 1. Tap plastic anchors into a standing position, put a sheet of cardboard or...
Installation Guide - Page 9

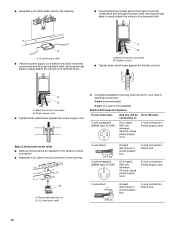
... the bracket to allow for the 40-amp supply cord.
9 U.S.A. 6. Continue installing your local hardware store.
10. Use 8 gauge copper or 6 gauge aluminum wire. Electrically ground range. Remove plastic tag holding three 10-32 hex nuts from under range.
8. Use a new 40 amp power supply cord. Align anti-tip bracket holes with screws provided.
7.
Installation Guide - Page 10
...: 4-wire (recommended)
3-wire (if 4-wire is not available)
Electrical Connection Options
If your home has:
And you will be Go to Section: connecting to:
4-wire receptacle (NEMA type 14-50R)
A UL listed, 250-volt minimum, 40-amp, range power supply cord
4-wire connection: Power supply cord
Style 2: Direct wire strain relief ■...
Installation Guide - Page 12

... nut B. Neutral (white) wire E. Line 1 (black)
3.
Tighten strain relief screws.
6. Replace terminal block access cover. Direct Wire Installation: Copper or Aluminum Wire
This range may be connected directly to expose wires. Depending on your type of electrical supply (4-wire or 3-wire connection).
4-wire Connection: Direct Wire
Use this method for use with...
Use & Care Guide - Page 1

ELECTRIC RANGE
ARCHITECT® SERIES II
Use & Care Guide
For questions about features, operation/performance, parts, accessories or service, call: 1-800-422-1230 or visit our website at www.kitchenaid.com
In Canada, call for assistance, installation and service, call: 1-800-807-6777 or visit our website at www.KitchenAid.ca
Table of Contents...2
Models...
Use & Care Guide - Page 2
... Display 16 Timer 16
OPTIONS 16 Options Selection Pad 16 Fahrenheit and Celsius - TABLE OF CONTENTS
RANGE SAFETY 3 The Anti-Tip Bracket 3
PARTS AND FEATURES 5
COOKTOP USE 9 Ceramic Glass 9 Cookware 9 Home Canning 10 Cooktop Controls - Option 5 17 Oven Temperature Calibration - Option 7 18
OVEN USE 19 Aluminum Foil 19 Bakeware 19 Meat Thermometer 19 Temperature Probe 19...
Use & Care Guide - Page 4

... cooktop.
■ Use Proper Pan Size - Let hot air or steam escape before removing or replacing food.
■ Do Not Heat Unopened Food Containers - Always place oven racks in or on . They should not be referred to accumulate on hood or filter.
■ When flambeing foods under the hood, turn the fan on the Range...
Use & Care Guide - Page 6
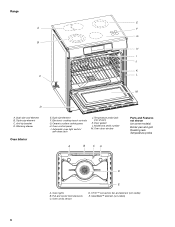
... and element (not visible) E. CleanBake™ element (not visible)
6 Warming drawer
Oven Interior
E. Ceramic surface cooking area H. Oven cavity sensor
D. Triple-size element C. Electronic cooktop touch controls G. Oven lights B. Oven control panel I J
K
C
L
M
D
A. Model and serial number M. Oven door window
A
B
CA
Parts and Features not shown (on some models)
Broiler...
Use & Care Guide - Page 10

...turn all elements off at the same time.
■ On ceramic...
■ Simmer (range of food. ■ Home canning. MELT & HOLD
■ Melt chocolate or butter. ...range is in death or fire. Single, Dual and Triple-Size Elements
A
A. Single size
A B
To Use: 1. Single size B. On electric cooktops...cool. ■ Center the canner on some models) during the Self-Cleaning cycle, the entire cooktop...
Use & Care Guide - Page 20
...oven will shut off in 30 seconds to 2 minutes. RACKS ■ Position racks before turning on the oven. ■ Do not position racks with bakeware on the oven...melt or burn near the oven vent. Press BAKE, CONVECT BAKE or CONVECT ROAST. Press OFF or open the oven...5
BAKEWARE
To cook food evenly, hot air must be set plastics, paper or other than the one displayed.
3. Press the number ...
Use & Care Guide - Page 26
...30 minutes and 4 hours 30 minutes.
2.
The oven light will not unlock until the oven cools. Prepare Cooktop and Storage Drawer: ■ Remove plastic items from the cooktop because they may result in discoloring, loss of the inside oven cavity frame, being certain not to remove soil. To set between 3 hours 30 minutes and 4 hours 30 minutes for a 2 hour 30...very high ...
Use & Care Guide - Page 30

... sales.
■ Specialized customer assistance (Spanish speaking, hearing impaired, limited vision, etc.).
30 Cooktop cooking results not what expected
■ Is the range level? Double-check the recipe in the pan? Move rack to build every new KITCHENAID® appliance.
Level the range. It may save you still need adjustment? Custom Knobs Custom Control Temperature...
Use & Care Guide - Page 31
...KitchenAid") will pay for the following components if defective in materials or workmanship:
■ Electric element
■ Solid state touch control system parts
■ Any cracking of the rubber seal between the ceramic glass cooktop...Replacement Parts & Accessories" and click on "Shopping Options." KITCHENAID® ELECTRIC RANGE WARRANTY
LIMITED WARRANTY
For one year from the date of ...
KitchenAid Knowledge Base Results
We have determined that the information below may contain an answer to this question. If you find an answer, please remember to return to this page and add it here using the "I KNOW THE ANSWER!" button above. It's that easy to earn points!-
Tips for using cookware - Gas and Electric Ranges and Cooktops
... heat is best for using cookware - Ceramic Follow manufacturer's instructions. Stainless steel Heats quickly, but unevenly. For more information about cookware and for ceramic cooktop care, please click on low to ... Use on stainless steel provides even heating. Gas and Electric Ranges and Cooktops Are there any tips for most cooking tasks. A core or base of cooking. Suitable... -
Using the ceramic glass cooktop
... baking results Gas and Electric Ranges and Cooktops Proposition 65 Warnings Different bakeware and the effects on the cooktop. Do not leave a hot lid on the cooktop. Ceramic glass (on some models) The surface cooking area will help keep it free of your glass cooking surface, see cleaning the glass top cooking surface . Cleaning off to its original... -
Cleaning ceramic glass cooktop - Electric Ranges and Cooktops
... and the oven and cooktop are preferred as streaks. Follow the instructions below to prevent streaking and staining. Rub the cleaner into the soil with Cooktop Protectant. Cast-iron pans - To keep your Cooktop Cleaner and Protectant or a Complete Care Kit Here Using the ceramic glass cooktop General cleaning tips for my electric or gas range Product...
Similar Questions

Oven Stopped Working
oven usually takes a long time to heat up & yesterday it just stopped working all together. Top ...
oven usually takes a long time to heat up & yesterday it just stopped working all together. Top ...
(Posted by dawnmariespencer 3 years ago)
Oven Stopped Heating
oven usually takes a very long time to heat up & yesterday it just stopped heating up at all. Wi...
oven usually takes a very long time to heat up & yesterday it just stopped heating up at all. Wi...
(Posted by dawnmariespencer 3 years ago)

Front Glass Top Knobs
We purchased a KitchenAid Kers807sss several years ago and so far we have not had any issues as far ...
We purchased a KitchenAid Kers807sss several years ago and so far we have not had any issues as far ...
(Posted by Mcgriff4U 8 years ago)

My Kitchenaid Kers205tss Electric Range Is Randomly Not Holding Tempurature.
My oven is not holding temps, but not all the time. It has happened twice in the last day. Would it ...
My oven is not holding temps, but not all the time. It has happened twice in the last day. Would it ...
(Posted by ritastrang 8 years ago)

Slid In Electrical Range
i have to install an electrical slidin range but it come with a metal below cooktop glass that separ...
i have to install an electrical slidin range but it come with a metal below cooktop glass that separ...
(Posted by arqfalves 12 years ago)