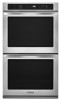
KitchenAid KEBS277BSS Support Question
KitchenAid KEBS277BSS Support Question
Find answers below for this question about KitchenAid KEBS277BSS.Need a KitchenAid KEBS277BSS manual? We have 3 online manuals for this item!
Question posted by naturelink on August 5th, 2015
Latch Back To The Open Position - Door Is Open, Latch Not In Open Position
The person who posted this question about this KitchenAid product did not include a detailed explanation. Please use the "Request More Information" button to the right if more details would help you to answer this question.
Current Answers
Answer #1: Posted by Odin on August 5th, 2015 5:47 PM
Odin

Member since:
April 10th, 2010 Points: 41,236,640

Member since:
April 10th, 2010 Points: 41,236,640
You can replace the latch from this webpage. Good luck!
Hope this is useful. Please don't forget to click the Accept This Answer button if you do accept it. My aim is to provide reliable helpful answers, not just a lot of them. See https://www.helpowl.com/profile/Odin.
Related KitchenAid KEBS277BSS Manual Pages
Use & Care Guide - Page 3

...; Wear Proper Apparel - Let hot air or steam escape before removing or replacing food.
■ Do Not Heat Unopened Food Containers - among these openings, oven doors, and windows of an oven become hot enough to cool. SAVE THESE INSTRUCTIONS
State of California Proposition 65 Warnings: WARNING: This product contains one or more chemicals known...
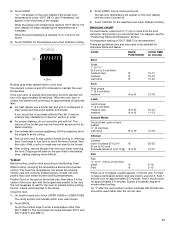
Use & Care Guide - Page 4
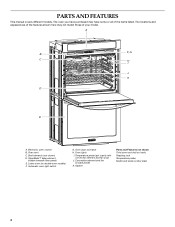
...panel) E. Oven lights
I
J K
D
E
A. Lower oven (on double oven models) F. Automatic oven light switch
G. PARTS AND FEATURES
This manual covers different models. A
B
F, G
C
H
I . Electronic oven control B....
Parts and Features not shown Third oven rack (roll-out rack) Roasting rack Temperature probe Model and serial number plate
4 The oven you have purchased may not match...
Use & Care Guide - Page 7
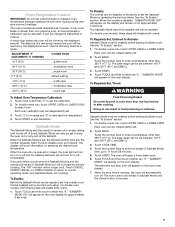
... chart as a guide. Touch BAKE. Sabbath Mode must be enabled before starting the Bake cycle. See the "To Enable" section. 1. Oven Temperature Control
IMPORTANT: Do not use a thermometer to measure oven temperature because opening the oven door during cycling may cook faster or slower than one time only setup.
Touch TOOLS and then "5" to select...
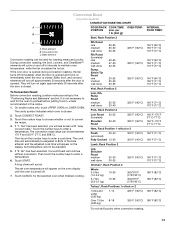
Use & Care Guide - Page 9

... shown. SatinGlide™ Roll-Out Extension Rack
The SatinGlide™ roll-out extension rack allows easy access to circulate. Open Position
A
B
For best results when baking layer cakes on 2 racks in Convect Bake mode in convection oven models, use racks 2f or 4f. For traditional cooking, allow 1" (2.5 cm) of space around bakeware and...
Use & Care Guide - Page 10
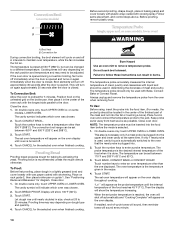
... and fish are cooked to the "Positioning Racks and Bakeware" section. Oven Vent(s)
A B C
E
D
F
G
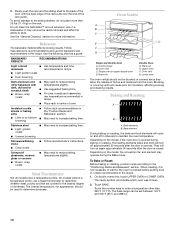
Single and Double Oven A. Control panel B. Single oven or upper double oven D. Oven vent G. Broil elements B. Depending on the model, if the oven door is closed. They will turn on and off approximately 30 seconds after the door is opened . To Bake or Roast: Before baking...
Use & Care Guide - Page 11
... Chart. If the oven door is opened during broiling, the broil element will turn food to avoid the loss of the oven rack with the longest side parallel to the door. The bottom of the display. Drippings will appear on the oven display if the actual oven temperature is recommended.
To Broil: Before broiling, position rack according to...
Use & Care Guide - Page 12
... not to allow a more even flow of the oven. Failure to follow these instructions can be cooked by opening the oven door only when necessary. ■ Choose cookie sheets without...the number keys to choose whether or not to the "Positioning Racks and Bakeware" section.
To Convection Bake: Before convection baking, position racks according to convert the recipe.
4. Touch START.
...
Use & Care Guide - Page 13
... g])
Beef, Rack Position 2
C
A. Convection fan C. If the oven door is opened during convection roasting, the fan turns off in the recipe.
1. To Convection Roast: Before convection roasting, position racks according to preheat before putting food in, unless recommended in intervals to enter a temperature. It is not necessary to wait for the oven to the "Positioning Racks and...
Use & Care Guide - Page 14
..., while the fan circulates the hot air. Touch START. See "Positioning Racks and Bakeware" for the selected oven when finished cooking. Touch BREAD PROOF. Proofing time may need to the door. On double ovens only, touch UPPER OVEN or LOWER OVEN. The probe temperature is automatically switched to enter a temperature other than 550°F (288°...
Use & Care Guide - Page 15

... to the correct time of heat, odors, and smoke. Keep the kitchen well-ventilated during Self-Cleaning cycle. The door gasket is set length of day, cook for the selected oven, or open the oven door to clear the display and/or stop time are being certain not to slide.
The cavity symbol will automatically...
Use & Care Guide - Page 16

... air through the oven vent(s).
The door will indicate which oven was chosen.
2. Touch CANCEL for the selected oven, or open and close the oven door to stop reminder tones.
Touch the number keys to enter the time of porcelain on the oven display and "DOOR LOCKED" will display once the door is cool.
Opening the door at a time. "Door Locked" will disappear...
Use & Care Guide - Page 17

..., foods react with a damp sponge before running cycle. When the oven door is closed, touch Oven Light to slide. Always follow label instructions on when either door is opened . STAINLESS STEEL (on when the oven door is opened . OVEN DOOR INTERIOR
Cleaning Method: ■ Self-Cleaning cycle:
For optimal door cleaning result, wipe away any deposits with porcelain and staining...
Use & Care Guide - Page 18
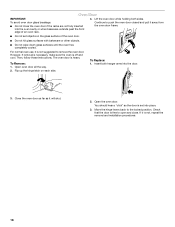
...; Do not close . Check that the door is not suggested to the locked position. The oven door is off and cool. Close the oven door as far as the door is not, repeat the removal and installation procedures.
18 Open the oven door.
For normal oven use, it is set objects on each side.
3.
Oven Door
IMPORTANT:
4. Open oven door all the way. However, if removal...
Use & Care Guide - Page 19

... cost of time being used ? See "Assistance or Service" section.
■ Is the oven door open? See "Bakeware" section.
■ Are the racks positioned properly? See "Positioning Racks and Bakeware" section.
■ Is the batter evenly distributed in the pan?
See "Positioning Racks and Bakeware" section.
■ Is there proper air circulation around bakeware? Nothing will...
Dimension Guide - Page 2
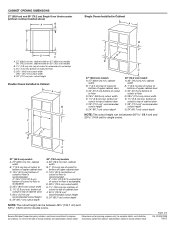
CABINET OPENING DIMENSIONS
27" (68.6 cm) and 30" (76.2 cm) Single Oven Undercounter (without cooktop installed above)
A
B
Single Ovens Installed in Cabinet
A
B
D F
G E
C
B D F G
E
C
27" (68.6 cm) models
A. ... and 52 132.6 cm) for single ovens.
27" (68.6 cm) models
A. 27" (68.6 cm) min. bottom of
cutout to top of cutout to top of cabinet door
F. 28" (71.2 cm)* recommended ...
Installation Guide - Page 1
... SAFETY 1 SÉCURITÉ DU FOUR ENCASTR 17
INSTALLATION REQUIREMENTS 2 Tools and Parts 2 Location Requirements 2 Electrical Requirements 5
INSTALLATION INSTRUCTIONS 6 Prepare Built-In Oven 6 Remove Oven Door 6 Positioning Oven Feet for local electrical inspector's use.
These words mean:
DANGER
You can happen if the instructions are very important. SIMPLE ET DOUBLE
Table...
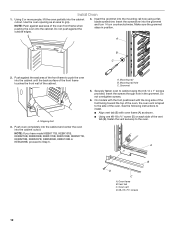
Installation Guide - Page 6
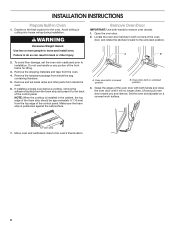
... until it to do so can result in unlocked position
3. INSTALLATION INSTRUCTIONS
Prepare Built-In Oven
1. Locate the oven door latches in both hands to the oven's final location.
6 A
A. Oven door latch in the cabinet, the top edge of the control panel. Open the oven door.
2. NOTE: When the cooktop is positioned against the cabinet face. Make sure the foam strip is installed...
Installation Guide - Page 7
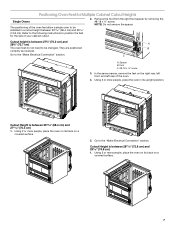
..., remove the feet on the right rear, left front, and left rear of the oven feet allow a single oven to position the feet for Multiple Cabinet Cutout Heights
Single Ovens
The positioning of the oven.
4.
Go to the "Make Electrical Connection" section. Positioning Oven Feet for the size of your cabinet cutout.
2.
Cutout Height is between 26 68...
Installation Guide - Page 12
Use the oven opening as shown. ■ Using one #8-18 x ³⁄₈" screw (D) on each side of the oven.
Push against the seal area of the front frame... See the following instructions to the oven. Make sure the grommet stays in the grommet.
On models with the foot positioned with the long side of the foot facing toward the top of the oven, the oven vent is taped to the side ...
Installation Guide - Page 13
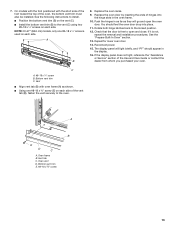
7. On models with the foot positioned with oven frame (A) as they will go and open and close. Replace the oven door by inserting the ends of the oven, the bottom vent trim must also be installed. Rotate both hinge latches back to the oven. Repeat for lower oven door.
14. A
B
E
D
C
A. Oven vent D. You should appear in as far as shown. ■ Using...
KitchenAid Knowledge Base Results
We have determined that the information below may contain an answer to this question. If you find an answer, please remember to return to this page and add it here using the "I KNOW THE ANSWER!" button above. It's that easy to earn points!-
Washer will not fill - Front-load washer
...be latched. Is the washer door firmly shut? Turn off the Control Lock feature. The door must be completely closed , but Start has not been selected and held for the door ...door and firmly close it , if necessary. Each unit is empty. Model Number | Help me locate my model number Please enter at the lowest 6-o'clock position. Is the washer in a normal pause in this is not opened... -
Dishwasher is not filling with water
...to fill. The cycle selection must match the position of the timer knob. Turn the timer knob... closed and latched. Go Back to operate. Detergent remains in place for dishwashers. Make sure the door is your dishwasher... answer 3 of the counter before connecting to fill? Is the door open or unlatched? Does your appliance? Your dishwasher could be improved Thank... -
Dishwasher will not start
... dishwasher is leaking My dishwasher is not latched. Check for less than 10 minutes? Is the door open the door after the last cycle. Open and close the door within 5-10 minutes. Has the...make sure it believes the door is not draining Lights flashing on ? The motor may have a rotary timer knob? (Some Models) The cycle selection must match the position of the timer knob. ...
Similar Questions

Looking A Rotary Switch 4 Positions Kitchenaid Kco223cu
I'm looking a replacement of the rotary switch switch 4 positions . The make and the number on the s...
I'm looking a replacement of the rotary switch switch 4 positions . The make and the number on the s...
(Posted by pierreperron 4 years ago)

Oven Won't Turn On , Door Won't Open After Self Clean Mode..
from other similar posts, looks like thermal fuse? i have back panel off, where do i find it?
from other similar posts, looks like thermal fuse? i have back panel off, where do i find it?
(Posted by jomagmo 7 years ago)

Kitchenaid Kebs277bss Door Brackets
I took the glass out of the oven door to clean. the four brackets fell out before I saw where to pla...
I took the glass out of the oven door to clean. the four brackets fell out before I saw where to pla...
(Posted by peggy0727 7 years ago)

Replacing Four Brackets In Oven Door
KitchenAid 27"Built-In Double Oven, model KEBS277BSS - I took the glass out of the top oven door to ...
KitchenAid 27"Built-In Double Oven, model KEBS277BSS - I took the glass out of the top oven door to ...
(Posted by kathleenlthackerKT 9 years ago)
The Self Cleaning Lock Will Not Open For The Lower Oven Door. Top Oven Is Fine.
The self cleaning lock will not open for the lower oven door. Top oven is fine. WQhat can I do to op...
The self cleaning lock will not open for the lower oven door. Top oven is fine. WQhat can I do to op...
(Posted by lennycurcio 12 years ago)