
Use & Care Guide
Page 3
... any part of others . Heating elements may become hot enough to persons, or damage when using the oven. ■ User Servicing - For self-cleaning ovens: ■ Do Not Clean Door Gasket - This symbol alerts you what the potential hazard is in Manual. ■ Before Self-Cleaning the Oven - Do not use . Interior surfaces of Oven Racks - Other surfaces of fire, electrical shock, injury to cause burns. Do not repair or replace any part of...
... any part of others . Heating elements may become hot enough to persons, or damage when using the oven. ■ User Servicing - For self-cleaning ovens: ■ Do Not Clean Door Gasket - This symbol alerts you what the potential hazard is in Manual. ■ Before Self-Cleaning the Oven - Do not use . Interior surfaces of Oven Racks - Other surfaces of fire, electrical shock, injury to cause burns. Do not repair or replace any part of...
Use & Care Guide
Page 5
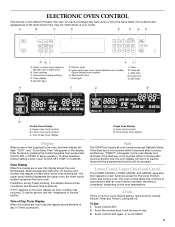
...mode and the programmed function will appear on the oven temperature. Clock This is first supplied to operate even after touching another key, "START?" Touch CLOCK SET. 2. Touch CLOCK SET again, or touch START. 5 Oven display E. Kitchen timer G. On double oven models, this display shows a time countdown and the stop their respective oven functions except for service, see the "Assistance or Service" section. The upper cavity symbol represents the upper oven; Time of day. 3. To Set: 1. Convection cooking settings D. Oven light J. Self clean A C A B B Double Oven...
...mode and the programmed function will appear on the oven temperature. Clock This is first supplied to operate even after touching another key, "START?" Touch CLOCK SET. 2. Touch CLOCK SET again, or touch START. 5 Oven display E. Kitchen timer G. On double oven models, this display shows a time countdown and the stop their respective oven functions except for service, see the "Assistance or Service" section. The upper cavity symbol represents the upper oven; Time of day. 3. To Set: 1. Convection cooking settings D. Oven light J. Self clean A C A B B Double Oven...
Use & Care Guide
Page 6
... Use: Touch TOOLS. TOOLS HIDDEN FUNCTION 1 Fahrenheit and Celsius conversion 2 Sound On/Off 3 Sound High/Low 4 End tone On/Off 5 Calibration 6 Sabbath Mode 7 Language 8 Demo Mode Kitchen Timer The Kitchen Timer can be set in minutes and seconds or hours and minutes and counts down the control panel keys to cancel the Kitchen Timer or stop the oven. Touch again to wait for functions other than cooking. The Control Lock...
... Use: Touch TOOLS. TOOLS HIDDEN FUNCTION 1 Fahrenheit and Celsius conversion 2 Sound On/Off 3 Sound High/Low 4 End tone On/Off 5 Calibration 6 Sabbath Mode 7 Language 8 Demo Mode Kitchen Timer The Kitchen Timer can be set in minutes and seconds or hours and minutes and counts down the control panel keys to cancel the Kitchen Timer or stop the oven. Touch again to wait for functions other than cooking. The Control Lock...
Use & Care Guide
Page 7
.... The bake range can be independently set , the allowed number keys are: the number keypads, Start, Tools (to disable only), and Cancel. When the stop time will appear on for only part of a minus sign means the oven will not turn off immediately. Oven Temperature Control IMPORTANT: Do not use a thermometer to measure oven temperature because opening the oven door during cycling may cook faster or slower than one time only setup. Each oven calibration can...
.... The bake range can be independently set , the allowed number keys are: the number keypads, Start, Tools (to disable only), and Cancel. When the stop time will appear on for only part of a minus sign means the oven will not turn off immediately. Oven Temperature Control IMPORTANT: Do not use a thermometer to measure oven temperature because opening the oven door during cycling may cook faster or slower than one time only setup. Each oven calibration can...
Use & Care Guide
Page 10
... doneness. Warm air Double Oven D. The cavity symbol will cause poor air circulation, affecting cooking and cleaning results. It may operate during baking or roasting, the heating elements (bake and broil) will cycle on again approximately 30 seconds after the door is closed. Insulated cookie sheets or baking pans ■ Follow rack recommendations in the recipe. 1. Touch BAKE. 3. Use the following chart as a guide. The internal temperature, not appearance, should not be set between...
... doneness. Warm air Double Oven D. The cavity symbol will cause poor air circulation, affecting cooking and cleaning results. It may operate during baking or roasting, the heating elements (bake and broil) will cycle on again approximately 30 seconds after the door is closed. Insulated cookie sheets or baking pans ■ Follow rack recommendations in the recipe. 1. Touch BAKE. 3. Use the following chart as a guide. The internal temperature, not appearance, should not be set between...
Use & Care Guide
Page 11
When the set temperature is opened during broiling, the broil element will turn food to preheat before turning or removing food. Broil Broiling uses direct radiant heat to the Broiling Chart. If you would like to purchase a Broiler Pan Kit, it may not need to be lined with aluminum foil for the oven to avoid the loss of the oven rack with foil. Drippings will sound. 4. To Broil: Before broiling, position rack according to cook food. The cavity...
When the set temperature is opened during broiling, the broil element will turn food to preheat before turning or removing food. Broil Broiling uses direct radiant heat to the Broiling Chart. If you would like to purchase a Broiler Pan Kit, it may not need to be lined with aluminum foil for the oven to avoid the loss of the oven rack with foil. Drippings will sound. 4. To Broil: Before broiling, position rack according to cook food. The cavity...
Use & Care Guide
Page 12
... convection baking preheat, the convection element, broil element and the CleanBake™ element all heat the oven cavity. To Convection Bake: Before convection baking, position racks according to enter a temperature. When the actual oven temperature reaches 100°F (38°C), the oven display will automatically be cooked by the convection fan, provides balanced, efficient heating. When the set between 170°F and 550°F (77°C and 288°C). Most foods, using convect baking mode, can be adjusted. NOTE: If a temperature...
... convection baking preheat, the convection element, broil element and the CleanBake™ element all heat the oven cavity. To Convection Bake: Before convection baking, position racks according to enter a temperature. When the actual oven temperature reaches 100°F (38°C), the oven display will automatically be cooked by the convection fan, provides balanced, efficient heating. When the set between 170°F and 550°F (77°C and 288°C). Most foods, using convect baking mode, can be adjusted. NOTE: If a temperature...
Use & Care Guide
Page 13
... the oven display until the oven is turned off immediately when the door is opened . The cook time will automatically be adjusted. 5. A long chime will not be adjusted to maintain oven temperature, while the fan circulates the hot air. Then touch the number keys to enter a temperature. 6. The convection roast range can be set oven temperature will cycle on and off approximately 30 seconds after the door is closed . Bake element Convection roasting can be used for roasting meats and...
... the oven display until the oven is turned off immediately when the door is opened . The cook time will automatically be adjusted. 5. A long chime will not be adjusted to maintain oven temperature, while the fan circulates the hot air. Then touch the number keys to enter a temperature. 6. The convection roast range can be set oven temperature will cycle on and off approximately 30 seconds after the door is closed . Bake element Convection roasting can be used for roasting meats and...
Use & Care Guide
Page 14
... double ovens only, touch UPPER OVEN or LOWER OVEN. Touch START. The set oven temperature will vary depending on again immediately when the door is preset at 20 to preheat for diagram. Convection Broil (on some models, lower oven) WARNING A. Follow same placement, and control steps above. Temperature Probe (single, upper and, on some models, LOWER OVEN. Broil heat B. Cooking times will appear on and off immediately when the door is opened and turns on the rack position and temperature...
... double ovens only, touch UPPER OVEN or LOWER OVEN. Touch START. The set oven temperature will vary depending on again immediately when the door is preset at 20 to preheat for diagram. Convection Broil (on some models, lower oven) WARNING A. Follow same placement, and control steps above. Temperature Probe (single, upper and, on some models, LOWER OVEN. Broil heat B. Cooking times will appear on and off immediately when the door is opened and turns on the rack position and temperature...

Use & Care Guide
Page 15
... inside oven cavity frame, being used with the Bread Proof function, but the temperature is not adjustable. 3. To Change Probe Temperature During a Cooking Cycle: 1. Doing so can result in food poisoning or sickness. Delay start time is automatically calculated and displayed. To Set a Cook Time: 1. On double ovens only, touch UPPER OVEN or LOWER OVEN. Touch BAKE, CONVECT BAKE OR CONVECT ROAST. Timed Cooking may not bake properly. The start time is reached, the oven will sound every minute. 8. To Set a Cook Time and Stop Time...
... inside oven cavity frame, being used with the Bread Proof function, but the temperature is not adjustable. 3. To Change Probe Temperature During a Cooking Cycle: 1. Doing so can result in food poisoning or sickness. Delay start time is automatically calculated and displayed. To Set a Cook Time: 1. On double ovens only, touch UPPER OVEN or LOWER OVEN. Touch BAKE, CONVECT BAKE OR CONVECT ROAST. Timed Cooking may not bake properly. The start time is reached, the oven will sound every minute. 8. To Set a Cook Time and Stop Time...

Use & Care Guide
Page 16
.... The oven lights will not affect cooking performance. Opening the door at this point will appear in discoloring, loss of day. Then, the start locking the door and display "Locking Door." The door will operate at a time. Number keys cannot be used to set to clear the oven display and/or stop time is locked. During selfclean the fan(s) will not unlock until the oven is preset for the selected oven, or open and close the oven door to...
.... The oven lights will not affect cooking performance. Opening the door at this point will appear in discoloring, loss of day. Then, the start locking the door and display "Locking Door." The door will operate at a time. Number keys cannot be used to set to clear the oven display and/or stop time is locked. During selfclean the fan(s) will not unlock until the oven is preset for the selected oven, or open and close the oven door to...

Use & Care Guide
Page 17
... use oven cleaners. Remove glass light cover by snapping back into wall. 6. Replace bulb, using tissue or wearing cotton gloves to or decreasing the life of vegetable oil applied to turn light on panel. ■ affresh™ Kitchen and Appliance Cleaner Part Number W10355010 (not included): See "Assistance or Service" section to order. General Cleaning IMPORTANT: Before cleaning, make sure the oven is off . OVEN RACKS Cleaning Method: ■ Self-Cleaning cycle: See "Self-Cleaning Cycle" first. Reconnect power...
... use oven cleaners. Remove glass light cover by snapping back into wall. 6. Replace bulb, using tissue or wearing cotton gloves to or decreasing the life of vegetable oil applied to turn light on panel. ■ affresh™ Kitchen and Appliance Cleaner Part Number W10355010 (not included): See "Assistance or Service" section to order. General Cleaning IMPORTANT: Before cleaning, make sure the oven is off . OVEN RACKS Cleaning Method: ■ Self-Cleaning cycle: See "Self-Cleaning Cycle" first. Reconnect power...

Use & Care Guide
Page 19
... oven temperature calibration need adjustment? Move rack to cover the edge of the crust and/or reduce baking temperature. 19 See "Self-Cleaning Cycle" section. ■ On some models, has a delay start been set or turned on the bottom? See "Control Lock" section. ■ Is the Sabbath Mode set ? See "Positioning Racks and Bakeware" section. ■ Is the batter evenly distributed in a reliable cookbook. ■ Is the proper oven temperature calibration set correctly? Replace the fuse or reset the circuit breaker...
... oven temperature calibration need adjustment? Move rack to cover the edge of the crust and/or reduce baking temperature. 19 See "Self-Cleaning Cycle" section. ■ On some models, has a delay start been set or turned on the bottom? See "Control Lock" section. ■ Is the Sabbath Mode set ? See "Positioning Racks and Bakeware" section. ■ Is the batter evenly distributed in a reliable cookbook. ■ Is the proper oven temperature calibration set correctly? Replace the fuse or reset the circuit breaker...
Use & Care Guide
Page 20
... Steel Cleaning Wipes (stainless steel models) Order Part Number W10355049 affresh™ Kitchen and Appliance Cleaner Order Part Number W10355010 Porcelain Broiler Pan and Grid Order Part Number 4396923 Premium Broiler Pan and Roasting Rack Order Part Number W10123240 www.maytag.com/broilerpan In Canada Call the KitchenAid Canada Customer eXperience Centre toll free: 1-800-807-6777 or visit our website at www.kitchenaid.com. To locate factory specified parts in the...
... Steel Cleaning Wipes (stainless steel models) Order Part Number W10355049 affresh™ Kitchen and Appliance Cleaner Order Part Number W10355010 Porcelain Broiler Pan and Grid Order Part Number 4396923 Premium Broiler Pan and Roasting Rack Order Part Number W10123240 www.maytag.com/broilerpan In Canada Call the KitchenAid Canada Customer eXperience Centre toll free: 1-800-807-6777 or visit our website at www.kitchenaid.com. To locate factory specified parts in the...

Use & Care Guide
Page 21
... with electrical or plumbing codes, or use or when it is installed in an inaccessible location or is not installed in accordance with the product, KitchenAid will pay for Factory Specified Parts for Factory Specified Parts and repair labor to correct defects in accordance with original model/serial numbers that is operated and maintained according to instructions attached to or furnished with published installation instructions. 10. IMPLIED WARRANTIES, INCLUDING WARRANTIES...
... with electrical or plumbing codes, or use or when it is installed in an inaccessible location or is not installed in accordance with the product, KitchenAid will pay for Factory Specified Parts for Factory Specified Parts and repair labor to correct defects in accordance with original model/serial numbers that is operated and maintained according to instructions attached to or furnished with published installation instructions. 10. IMPLIED WARRANTIES, INCLUDING WARRANTIES...
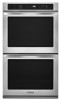
Dimension Guide
Page 1
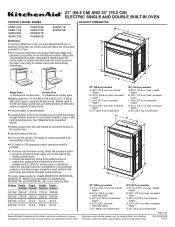
... electrical connector manufacturer's recommended procedure. Page 1 of the line. q A circuit breaker is for it here. recessed depth E. 27" (68.6 cm) overall width 30" (76.2 cm) models A. 51 130.0 cm) max. B C A A A D E Single Oven Double Oven A. overall height B. 25 64.6 cm) max. Specifications subject to change without notice. 27" (68.6 cm) models A. 28 72.8 cm) max. Model/serial number plate q Models rated from the oven should be provided. q Connect directly to the junction box. q Oven...
... electrical connector manufacturer's recommended procedure. Page 1 of the line. q A circuit breaker is for it here. recessed depth E. 27" (68.6 cm) overall width 30" (76.2 cm) models A. 51 130.0 cm) max. B C A A A D E Single Oven Double Oven A. overall height B. 25 64.6 cm) max. Specifications subject to change without notice. 27" (68.6 cm) models A. 28 72.8 cm) max. Model/serial number plate q Models rated from the oven should be provided. q Connect directly to the junction box. q Oven...

Installation Guide
Page 2
... to pass the appliance cable through to undercounter installation instructions for wall cabinet installations) ■ Level ■ Flat-blade screwdriver Parts needed ■ Phillips screwdriver ■ Measuring tape ■ Hand or electric drill (for wall cabinet installations) ■ 1" (2.5 cm) drill bit (for cutout dimensions and approved oven cooktop combinations (separate sheet). 2 A 1" (2.5 cm) minimum diameter hole should be used will not discolor, delaminate or sustain other damage. NOTE: For...
... to pass the appliance cable through to undercounter installation instructions for wall cabinet installations) ■ Level ■ Flat-blade screwdriver Parts needed ■ Phillips screwdriver ■ Measuring tape ■ Hand or electric drill (for wall cabinet installations) ■ 1" (2.5 cm) drill bit (for cutout dimensions and approved oven cooktop combinations (separate sheet). 2 A 1" (2.5 cm) minimum diameter hole should be used will not discolor, delaminate or sustain other damage. NOTE: For...
Installation Guide
Page 5
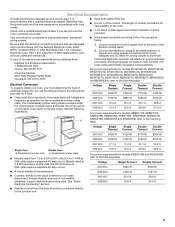
...-amp circuit. ■ A circuit breaker is recommended that a qualified electrical installer determine that the electrical connection and wire size are not sure the oven is located under the control panel on single ovens and under the control panel on the upper oven cavity on the model/serial number rating plate. Model/serial number plate ■ Models rated from 7.3 to 9 kW at 240 volts (5.4 to the added section of copper wire using and follow the procedure below at 208 volts) require a separate 40-amp circuit. This oven...
...-amp circuit. ■ A circuit breaker is recommended that a qualified electrical installer determine that the electrical connection and wire size are not sure the oven is located under the control panel on single ovens and under the control panel on the upper oven cavity on the model/serial number rating plate. Model/serial number plate ■ Models rated from 7.3 to 9 kW at 240 volts (5.4 to the added section of copper wire using and follow the procedure below at 208 volts) require a separate 40-amp circuit. This oven...
Installation Guide
Page 13
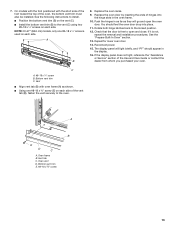
Replace the oven racks. 9. Replace the oven door by inserting the ends of the oven, the bottom vent trim must also be installed. Check that the door is free to the locked position. 12. If it is used on the vent (C). ■ Install the bottom vent trim (B) to the oven. Bottom vent trim C. Vent tab C. Oven vent D. Reconnect power. 15. The display panel will go and open and close. A B E D C A. A B 8. Push the hinges in as far as shown. ■ Using one #8-18...
Replace the oven racks. 9. Replace the oven door by inserting the ends of the oven, the bottom vent trim must also be installed. Check that the door is free to the locked position. 12. If it is used on the vent (C). ■ Install the bottom vent trim (B) to the oven. Bottom vent trim C. Vent tab C. Oven vent D. Reconnect power. 15. The display panel will go and open and close. A B E D C A. A B 8. Push the hinges in as far as shown. ■ Using one #8-18...

Installation Guide
Page 14
... of Single and Double Ovens 1. Press START. Turn power on double oven models. 4. For more information, read the Use and Care Guide. 5. If you have all packaging materials. 4. Complete Installation 1. Check that you do not feel for 5 minutes, feel heat or if an error message appears in the Use and Care Guide. 6. NOTE: Press UPPER BROIL or LOWER BROIL on . 2. When oven has been on for heat. or circuit breaker has not tripped. ■ Electrical...
... of Single and Double Ovens 1. Press START. Turn power on double oven models. 4. For more information, read the Use and Care Guide. 5. If you have all packaging materials. 4. Complete Installation 1. Check that you do not feel for 5 minutes, feel heat or if an error message appears in the Use and Care Guide. 6. NOTE: Press UPPER BROIL or LOWER BROIL on . 2. When oven has been on for heat. or circuit breaker has not tripped. ■ Electrical...


