KitchenAid KDSS907SSS Support Question
KitchenAid KDSS907SSS Support Question
Find answers below for this question about KitchenAid KDSS907SSS - 30" Slide-In Dual Fuel Range.Need a KitchenAid KDSS907SSS manual? We have 3 online manuals for this item!
Question posted by chuckb74 on December 14th, 2016
Warming Drawer Not Working - 2 Beeps When You Press On Button
The Warming Drawer is not working - I get 2 Beeps when i press on button?
Current Answers
Answer #1: Posted by Troubleshooter101 on December 20th, 2016 9:34 PM
Troubleshooter101

Member since:
September 30th, 2015 Points: 2,927,060

Member since:
September 30th, 2015 Points: 2,927,060
Cancel Key Line Open - Check the connection between the touch pad (keypad) and control board (clock) to make sure it is secure. Select the 'cancel' function and wait 60 seconds. If error code reappears then replace the touch pad, or touch pad and control board (clock) if all one assembly. All F3-E Codes - Oven Temperature Sensor (RTD) or Warming Drawer Defect - Replace oven temperature sensor (RTD).
http://www.partselect.com/JustForFun/Kitchen-Aid-Appliance-Fault-Codes.aspx
Thanks
Please respond to my effort to provide you with the best possible solution by using the "Acceptable Solution" and/or the "Helpful" buttons when the answer has proven to be helpful. Please feel free to submit further info for your question, if a solution was not provided. I appreciate the opportunity to serve you!
Troublshooter101
Related KitchenAid KDSS907SSS Manual Pages
Dimension Guide - Page 1
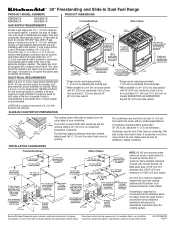
... area for satisfactory baking conditions. Place level on model KDSS907XSP) from both sides of the range to side; clearance from handle to the range. Cabinet door or hinge
should not extend into the cutout.
® 30" Freestanding and Slide-In Dual Fuel Range
PRODUCT MODEL NUMBERS
PRODUCT DIMENSIONS
KDRS807S KDRS807X
KDSS907S KDSS907X
GAS SUPPLY REQUIREMENTS
Provide a gas...
Installation Guide - Page 2
...Connection 16 Electronic Ignition System 17 Verify Anti-Tip Bracket Location 18 Level Range 18 Replace Oven Racks and Warming Drawer 19 Complete Installation 19
GAS CONVERSIONS 19 LP Gas Conversion 19 Natural ...du plan de travail 29
INSTRUCTIONS D'INSTALLATION 30 Déballage de la cuisinière 30 Mesures pour une hauteur appropriée 30 Réglage des pieds de nivellement 31 ...
Installation Guide - Page 7

... Type 10-50P plug on the underside of the storage drawer or below the warming drawer in the "Product Dimensions" section of the range (40 amps).
■ The wiring diagram is manufactured with... connected to the cabinet. or 50-amp power supply cord (pigtail) (see following Range Rating chart). Range Rating*
Specified Rating of the 4-wire power supply cord is less than the total connected...
Installation Guide - Page 11

... flush with cabinet opening so that specified in the "Location Requirements" section.
10. To Remove Warming Drawer: 1. Open drawer to its front, gently pull it conforms to the standards in the "Location Requirements" section, adjust template so range will slide under the range and onto the rear leveling leg prior to the lower section of the...
Installation Guide - Page 18

... control knob again and turn to "POWER BURNER HI" ("DUAL HI" on model KDSS907XSP) to the "LITE" position. ...properly positioned on rack and check levelness of the range, first side to floor. ■ Slide range back so rear range foot is level.
Low flame B. A
A.... the gas line. Hold the knob stem with a warming drawer, the rear range foot must be adjusted: 1. Insert a flat-blade...
Installation Guide - Page 19
... there is seated
properly on the slides. For more information, see which step was skipped.
2. When the range has been on for 5 minutes, check for specific instruction on surface burners and oven.
Examples of /recycle all of the Use and Care Guide.
6. Replace Oven Racks and Warming Drawer
Replace oven racks in death, explosion...
Installation Guide - Page 20

... position. 7. Burner caps B. Gas tube opening C. Unplug range or disconnect power. 3. Remove access cover from the cap ...burner cap.
7.
Internal gas orifice spud
A.
Reinstall the cap onto the regulator. Press nut driver down onto the gas orifice spud and remove by pushing against the
... of warming drawer compartment. 4. Set gas orifice spud aside. External gas...
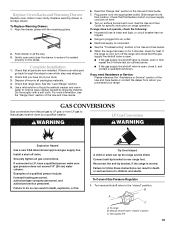
Installation Guide - Page 21

...C
A. See the "Remove Warming
Drawer" section for instructions.
10.
Turn over the spring retainer so the "NAT" is not as distinct as the inner cone. Press nut driver down onto the internal... pressure regulator 5. Reconnect the anti-tip bracket, if the range is very important.
External gas orifice spud C. Remove warming drawer. IMPORTANT: You may have a very distinct blue flame ¼...
Use & Care Guide - Page 5
...range. TO CHECK IF THE DEVICES ARE INSTALLED PROPERLY, SLIDE RANGE COMPLETELY FORWARD, LOOK FOR ANTI-TIP BRACKET SECURELY ATTACHED TO THE WALL BEHIND THE RANGE AND SLIDE RANGE...as a space heater to accumulate on the doors or drawers. s Glazed Cooking Utensils -
s Utensil Handles Should Be...surfaces of pressure may be allowed to
heat or warm the room. During and after use dry chemical or...
Use & Care Guide - Page 6

...not shown) E. Model and serial number plate O.
Warming drawer B. Oven vent F. Automatic oven light switch/
...gasket N. Surface burner locator B. Left front surface burner (dual valve TripleTier®
flame burner with InstaWok™ Grate ...
F. Control panel L. Oven lights B. Left rear control knob (6000 Btu/h)
Range
G F
E D
C B
E
D. Left rear surface burner H. Anti-...
Use & Care Guide - Page 11
...countdown and the stop working.
Press CLOCK SET/START
11 Hold down the control panel pads to press the desired function. Oven... preset unlocked, but can be used either when the range is in use of day. 3. Off
The OFF ... Clock/time of
cooking time) O. Number pads H. Warming drawer controls
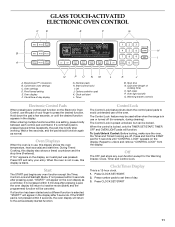
Electronic Control Pads
When pressing any oven function except the Timer, Control Lock and ...
Use & Care Guide - Page 12
... to set time ends, timer completion tones will sound, then reminder tones will sound approximately every 10 seconds.
4. Press the number pads to the following :
One beep s Function has been entered
Three beeps s Invalid pad press
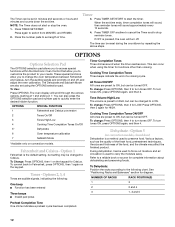
Dehydrate - If OFF is preset to Celsius. You can occur when using the OPTIONS selection pad. OPTIONS
SPECIAL...
Use & Care Guide - Page 13

..., the oven light will not turn on or off immediately. Open the oven door. 2. Press START to decrease the temperature.
3.
Press BAKE. The bake range can be set until the OFF button is the case, the oven will appear lit on the oven display.
Press the number pads to enter the length of the Sabbath...
Use & Care Guide - Page 14

... desired temperature level is displayed) before the oven is returned to its normal operating state (non-Sabbath Mode compliant state, not cooking) by pressing the WARMING DRAWER ON key (continue pressing until the oven is placed into its Sabbath Mode compliant state. Use the following chart as a guide. IMPORTANT: The health of oven. Exposure...
Use & Care Guide - Page 20

... steps above. Doing so can be used for more than 30 minutes. On some models, the start should not be used for warming breads and pastries. When the stop time and cook time...HI setting. Empty serving dishes and ovenproof dishes can result in oven-safe container. Press WARMING DRAWER ON button. See "Positioning Racks and Bakeware" for keeping hot cooked foods at a certain time of ...
Use & Care Guide - Page 21

... to remove soil. Air must be changed by pressing WARMING DRAWER ON additional times.
This area does not get ...warming drawer is preset for a "low" temperature, but can be able to move freely. Self-clean the oven before it may
melt. Do not clean, rub, damage or move birds to slide...HI
Roasted Chicken
MED HI
Soft Rolls
LOW
RANGE CARE
Self-Cleaning Cycle
WARNING
Burn Hazard Do...
Use & Care Guide - Page 22

...Press SELF CLEAN.
Also, make sure the clock is complete and the oven cools, "SELF CLEAN COMPLETE" will appear on the display until the oven cools. To set between 3 hours 30 minutes to clear the oven display. "DELAY" will not begin .
1.
It will not work...When the cycle is set between 2 hours 30 minutes and 4 hours 30 minutes.
2. Press STOP TIME.
3. The start time is ...
Use & Care Guide - Page 23
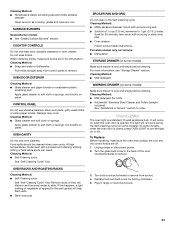
...more information, see "Storage Drawer" section. Oven Light(s)
The oven light is closed, press OVEN LIGHT to slide.
Replace bulb and bulb... Cleaning Method: s Mild detergent
WARMING DRAWER (on some models). It will not work during the Self-Cleaning cycle (.... Food spills should be cleaned when oven cools. Unplug range or disconnect power. 2. OVEN RACKS AND ROASTING RACKS
Cleaning...
Use & Care Guide - Page 24

... position. 2. Align the drawer glides with the receiving guides.
2. Oven Door
For normal range use, it is not suggested to push the oven door closed and pull it away from inside the warming drawer, and allow the warming drawer to cool completely before attempting to ensure it is seated properly on the slides.
24 Continue to remove...
Use & Care Guide - Page 28
...major appliance for other damage to the finish of your authorized KitchenAid dealer to KitchenAid within 30 days from the date of purchase.
6. This warranty is void if the factory applied...replace or repair house fuses, or to correct house wiring or plumbing.
2. KITCHENAID® DUAL FUEL RANGE WARRANTY
LIMITED WARRANTY
For one year from the date of purchase, when this major appliance is ...
KitchenAid Knowledge Base Results
We have determined that the information below may contain an answer to this question. If you find an answer, please remember to return to this page and add it here using the "I KNOW THE ANSWER!" button above. It's that easy to earn points!-
Ice Dispenser Not Working - Side by Side Refrigerator
...nbsp;Allow 24 hours for 3 seconds until you hear the beeps. Do not try to remove the melted ice with a clean, ... dispenser not working? Side by side refrigerator How does my ice maker work? Do not use the dispenser, press and hold the Reset button for the ice...ice build-up ice flakes over time due to the use a warm, wet cloth to refill. Check that ice is located ... -
Warming drawer does not slide properly
.... Press the tab down on the right side of the drawer and lift the tab on the slides? FAQs Knowledgebase search tips Has the drawer been mounted properly on the left side of the drawer at the same time. Is the drawer load uneven? If necessary, the drawer can be removed. Locate the black tabs on my warming drawer slide... -
Temperature and moisture control of warming drawer
...the warming drawer control to keep hot foods soft and moist. Moist-Dry slide control The Moist-Dry slide control allows you to Hi on the warming drawer. ...warming drawer is designed to cool. Different types of food hot, use : Push in the warming drawer longer than 30 minutes. To use the setting for keeping hot, cooked foods at the same time. The temperature setting ranges...
Similar Questions

Oven Door Will Not Open
(Posted by dimo1965 8 years ago)

Burner Lighters Don't Spark
The sparking function that lights the burners on my KitchnAid KDRP407HSS dual-fuel range has stopped...
The sparking function that lights the burners on my KitchnAid KDRP407HSS dual-fuel range has stopped...
(Posted by sprows 10 years ago)

Kitchenaid Kdss907sss - 30' Slide-in Dual Fuel Range
Position Of Range
Should the back of the 30" slide-in range touch the back wall?
Should the back of the 30" slide-in range touch the back wall?
(Posted by patriciainsf 11 years ago)

Warming Drawer Is Locked
I turned on the warming drawer. I left in on for over an hour. Now it is locked and I cannot open it.
I turned on the warming drawer. I left in on for over an hour. Now it is locked and I cannot open it.
(Posted by pmm98125 12 years ago)
