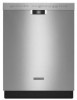
KitchenAid KDFE104DSS Support Question
KitchenAid KDFE104DSS Support Question
Find answers below for this question about KitchenAid KDFE104DSS.Need a KitchenAid KDFE104DSS manual? We have 5 online manuals for this item!
Question posted by bobclaudias on July 1st, 2014
Moisture Barrier
does a moisture barrier come with it or is it extra
Current Answers
Answer #1: Posted by harrytonia on July 1st, 2014 10:26 AM
harrytonia
Member since:
June 14th, 2014 Points: 92,860

Member since:
June 14th, 2014 Points: 92,860
Read page 4 on the link
http://www.manualowl.com/m/KitchenAid/KDFE104DSS/Manual/404702?page=4
http://www.manualowl.com/m/KitchenAid/KDFE104DSS/Manual/404702?page=4
PLEASE ACCEPT IF SATISFIED
if you are not satisfied with my help please don't rate it but continue to ask another question. MAY THE MERCY OF GOD BE WITH YOU, YOUR FRIENDS AND FAMILY.
Related KitchenAid KDFE104DSS Manual Pages
Installation Guide - Page 2

... serious injury or cuts.
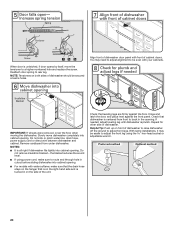
Existing Utilities 7 Prepare Cabinet Opening-New Utilities 7 Prepare and Route Water Line 8 Install Drain Hose 9 Install Moisture Barrier 11 Prepare Dishwasher 11 Make Power Supply Cord Connection 12
Determine Cabinet Opening 14 Install Door Handle 15 Custom Panel Dimensions 15 Install Custom Panel 15 Choose Attachment ...
Installation Guide - Page 3
....
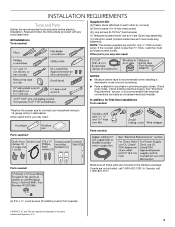
INSTALLATION REQUIREMENTS
Tools and Parts
Gather the recommended tools and parts before starting installation. Other parts you may also need :
NOTES: ■ Moisture barrier tape is recommended when installing a
dishwasher under a wood countertop.
■ Parts available for only ³⁄₄" thick wooden panel. See "Electrical Requirements" section. Check local codes.
All...
Installation Guide - Page 4
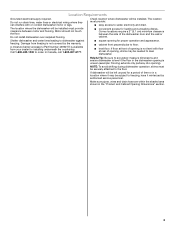
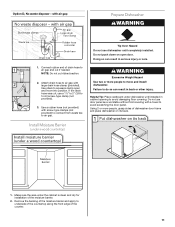
A moisture barrier accessory (Part Number 4396277) is not covered by authorized service personnel.
The location must provide:
■ easy access to accurately measure dimensions and ensure dishwasher is level if the floor in the dishwasher opening is not level with or contact dishwasher motor or legs.
Call 1-800-422-1230 to dishwasher against freezing.
Helpful Tip: Be...
Installation Guide - Page 5

...(60 cm) not including the ³⁄₄" (1.9 cm) custom door panel. For panel ready models, dishwasher depth is 28" (70 cm).
30" (76.2 cm)
33¹⁄₂" (85.1 cm) min....10 cm) toe kick, height of the countertop.
Measured from narrowest point of insulation (blanket) on dishwasher.
Insulation may be reduced to 33¹⁄₂" (85.1 cm) by removing the wheels and...
Installation Guide - Page 6

... within 6" (15.2 cm) of the above code standards can be installed in accordance with dishwasher.
■ Power supply cord must plug into a grounded 3 prong outlet, located in the... gap should be verified by a licensed plumber.
■ 120°F (49°C) water at dishwasher O.D. Electrical Requirements
Be sure that meets all current AHAM/IAPMO test standards, is resistant to heat and...
Installation Guide - Page 7

... Cabinet Opening-New Utilities
Prepare and route the electrical supply
Option A, Power Supply Cord:
NOTE: A grounded 3 prong outlet is required inside a cabinet next to the dishwasher cabinet opening. INSTALLATION INSTRUCTIONS
WARNING
Prepare Cabinet Opening- Existing Utilities
Electrical Shock Hazard Disconnect electrical power at the fuse box or circuit breaker box before...
Installation Guide - Page 8

....
This will prohibit cable from the right-hand side.
Metal cabinet: Cover hole with power supply cord kit. Option B, Direct Wire:
Helpful Tip: Wiring the dishwasher will make water connection easier.
Measure overall length of cabinet opening will be easier if you route the cable into the cabinet opening from moving...
Installation Guide - Page 9

... into cabinet opening .
Turn shutoff valve to the floor in cabinet wall or side of the dishwasher. Tape drain hose to "OFF" position.
9 Slowly turn water shutoff valve to the floor ...in compliance with local codes and ordinances.
Route water line and tape it from moving when dishwasher is in cabinet to the front center of particles that is moved into cabinet opening . ...
Installation Guide - Page 10
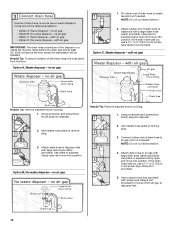
... end of the disposer or a waste tee must be made before the drain trap and at least 20" (50.8 cm) above the floor where the dishwasher will be installed. Use a rubber hose (not provided) with air gap
Helpful Tip: Remove disposer knock-out plug. 1. IMPORTANT: The drain hose connection of drain...
Installation Guide - Page 11
....
2. If the drain hose was cut, use door panel as a worktable without first covering with air gap
Prepare Dishwasher
WARNING
1.
Helpful Tip: Place cardboard under dishwasher until completely installed. Remove the backing of the moisture barrier and apply to underside of the countertop along the front edge of drain hose to 5 cm) screw-type...
Installation Guide - Page 12

...-head socket, nut driver or Torx® T20® screwdriver, remove terminal box cover. Route cord so that it does not touch dishwasher motor or lower part of your dishwasher. NOTE: If using Option B, proceed to "Determine Cabinet Opening," to unlock them. Plastic Panel
Using a flat-blade screwdriver, turn the plastic fasteners...
Installation Guide - Page 13

...white, using UL Listed/CSA Approved twist-on wire connectors. Electrical Shock Hazard
Electrically ground dishwasher. Failure to secure cord.
Twist on left side of cover.
Make sure wires are ...
Visit www.kitchenaid.com/electrical under FAQ tab. Connect ground wire to 16-gauge dishwasher wiring.
Close cover ensuring wires are secured.
Select UL Listed/CSA Approved twist-on ...
Installation Guide - Page 14
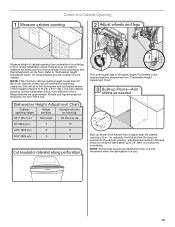
.... Determine Cabinet Opening
Measure height of cabinet opening from "Dishwasher Height Adjustment Chart." This will allow the dishwasher and perforated section of the insulation blanket to move. for ...8260;₂" (87.6 cm).
Wheels and legs are approximate. Turn both leveler legs to "Dishwasher Height Adjustment Chart" for example, the kitchen floor tile does not extend into a 33¹...
Installation Guide - Page 15

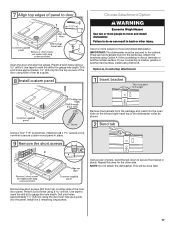
... other than 16 lbs (7.3 kg) and must weigh no more people, stand the dishwasher up. Install the custom hardware handle(s) on mounting studs with Installation Instructions. IMPORTANT: If... handle and hardware bag containing the setscrews and hex key from moisture. It is for the screws heads to move and install dishwasher.
Tighten the setscrews ¹⁄₄ turn past snug....
Installation Guide - Page 17
...two #8 x 1³⁄₈" screws in back or other side. NOTE: Do not attach the dishwasher. Use tape to mark the drill bit to do so can result in top corners to gauge hole ...approximately 1¹⁄₂" (3.8 cm) using Option B. Failure to gauge the hole depth. IMPORTANT: The dishwasher must be done later. Using a pair of the door using a drill bit. This will be secured to...
Installation Guide - Page 18

...(2.5 cm) onto copper tubing. NOTE: Save the buttons to elbow using ⁵⁄₈" open dishwasher door and place towel over pump assembly and spray arm of E.I. Slide the nut and ferrule forward ... nut onto the elbow threads. Flexible braided connection: Secure nut to cover the holes after dishwasher is facing upward as it keeps the bracket in toward the side of the bracket along...
Installation Guide - Page 19

...door closes or falls open and close to cabinet opening . Tilt dishwasher backward on the left side of the dishwasher at same holes. Panel or console may dent.
The screw can ...If the door closes by itself, move and install dishwasher. IMPORTANT: Double-check correct placement of dishwasher should be adjusted. Move Dishwasher Close to Cabinet Opening
WARNING
Excessive Weight Hazard Use two...
Installation Guide - Page 20
... or adjustable wrench.
20 If needed, adjust leveling leg until dishwasher is unlatched, if door opens by itself, move dishwasher completely into cabinet opening .
You may be easier to adjust ...and replace the screw.
NOTES:
■ It is centered from under dishwasher. Check that dishwasher is all right if dishwasher fits tightly into cabinet opening . Close and latch the door, and ...
Use & Care Guide - Page 5

...within 3 seconds, the Start/ Resume button LED will flash, an audible tone will clean your dishwasher. See "Add Detergent" and "Add Rinse Aid" in the front corners to maintain peak ...your dishwasher. Cleaning the filters periodically helps keep the dishwasher working at the bottom center of the dishwasher can be heard, and the cycle will provide best drying and avoid excessive moisture in...
Use & Care Guide - Page 7

...off of detergent to reduce excess moisture on the
Soft Water
Hard Water Soft Water
package when using your dishes and dishwasher interior will not perform as shown... 4
--- - - --
7 Fill the Pre-Wash section to avoid nesting.
Wash only plastic items marked "dishwasher safe."
■ To avoid thumping/clattering noises during operation, load dishes so they do not plan to Hard Water...
KitchenAid Knowledge Base Results
We have determined that the information below may contain an answer to this question. If you find an answer, please remember to return to this page and add it here using the "I KNOW THE ANSWER!" button above. It's that easy to earn points!-
My dishes are not dry
...is too hot can make some water may not dry completely in my dishwasher My dishwasher is full. Your dishwasher is designed to use rinse aid for good drying performance. Without rinse... the faucet closest to the dishwasher to minimize the amount of concave cups and mugs. My dishes are difficult to dry because they have excessive moisture. The heat dry option ... -
Using the Options selection pad - Architect Series II
... Three beeps indicate the end of your needs. During dehydration, heat is used to force out moisture and air circulation is a method used to dehydrate. Positioning Racks and Bakeware section for...of the food, and the climate, may take more than 12 hours to carry away the moisture. Press Options and then 5. The dehydrating range can also press the Options selection pad and number... -
Reasons to use rinse aid in my tall tub dishwasher
... after the final rinse. Rinse aid helps to use rinse aid for good drying performance. Without rinse aid, your dishes and dishwasher interior will have excessive moisture. The heat dry option will last for most water conditions, set the adjuster to the "Lock" position. Make sure the knob...
Similar Questions

My Kitchenaid Model#kdfe104dss Has No Power Going To It.
My dishwasher has no power.I checked the breaker box and all good.I used my meter and there's power ...
My dishwasher has no power.I checked the breaker box and all good.I used my meter and there's power ...
(Posted by Daltonjones136 6 years ago)

Soap Dispenser Won't Open. Replaced It And The Control Board, Still Doesn't Ope
soap dispenser on my kuds35fxss3 wouldn't open. Took panel off and found that solenoid got overheate...
soap dispenser on my kuds35fxss3 wouldn't open. Took panel off and found that solenoid got overheate...
(Posted by tgooley 10 years ago)

Missing Part For Kude70fx
Where is the moisture barrier? The delivery people tookaway the carton the dishwasher camebin. Was t...
Where is the moisture barrier? The delivery people tookaway the carton the dishwasher camebin. Was t...
(Posted by Kwfertig 11 years ago)

Excess Moisture In Dw; Water On Plastic Containers Even With Heat Dry & Rinse Ai
We purchased a brand newKUDS35FXSS Kitchenaid DW.( Our previous 18 year old Superba worked great exc...
We purchased a brand newKUDS35FXSS Kitchenaid DW.( Our previous 18 year old Superba worked great exc...
(Posted by edelgado95 12 years ago)

How To Install A Piece That Came With The Dishwasher.
There is a rubber rectangle piece with foam stapled to the back side we are trying to install the di...
There is a rubber rectangle piece with foam stapled to the back side we are trying to install the di...
(Posted by jcupde 12 years ago)