KitchenAid KBLS22KVSS Support Question
KitchenAid KBLS22KVSS Support Question
Find answers below for this question about KitchenAid KBLS22KVSS - 21.9 cu. Ft. Bottom Mount Refrigerator.Need a KitchenAid KBLS22KVSS manual? We have 2 online manuals for this item!
Question posted by Mevans1310 on May 12th, 2014
Removing Freezer Baskets So I Can Clean The Freezer Area
The person who posted this question about this KitchenAid product did not include a detailed explanation. Please use the "Request More Information" button to the right if more details would help you to answer this question.
Current Answers
Related KitchenAid KBLS22KVSS Manual Pages
Use & Care Guide - Page 1

... us at 1-800-422-1230. Table of Contents / Table des matières
REFRIGERATOR SAFETY 1
SÉCURITÉ DU RÉFRIGÉRATEUR 20
INSTALLATION INSTRUCTIONS 2
INSTRUCTIONS D'INSTALLATION 21
REFRIGERATOR USE 10
UTILISATION DU RÉFRIGÉRATEUR 31
REFRIGERATOR CARE 14
ENTRETIEN DU RÉFRIGÉRATEUR 35
TROUBLESHOOTING 15
DÉPANNAGE 36...
Use & Care Guide - Page 2

... and covers: Do not clean glass shelves or covers with your fingers. Junked or abandoned refrigerators are heavy. Before You Throw Away Your Old Refrigerator or Freezer: ■ Take off the doors.
■ Leave the shelves in "Refrigerator Care."
If you remove all parts and panels before operating. ■ Remove doors from your refrigerator. IMPORTANT SAFETY INSTRUCTIONS
WARNING...
Use & Care Guide - Page 3

... 827 kPa) is important to be provided. Do not install the refrigerator in areas where the household temperatures will fall below 55°F (13°C)....Failure to follow the instructions provided with water pressure of installation, cleaning, or removing a light bulb, turn the control (Thermostat, Refrigerator or Freezer Control depending on the hinge side (some models require more ...
Use & Care Guide - Page 4

... the lower right rear of refrigerator to clear line of water.
3. Add 7 ft (2.1 m) to avoid kinks....cleaning.
Confirm copper tubing is secure by pulling on the copper tubing.
3. A
B
C D E
A. Copper tubing
4
Unplug refrigerator or disconnect power.
2. Pipe clamp C.
Connect to Refrigerator...tubing until water is under the pipe clamp. Remove plastic cap from water valve inlet port. ...
Use & Care Guide - Page 5

... hinge screws from the cabinet top and move them to follow these instructions can result in Graphic 1-2. Remove the refrigerator handle assembly including the mounting posts and screws.
Move to completely tighten. Align handle notches with a rubber mallet.
3.
See Graphics 2 and 4. 2. Tap the bottom edge of
the door. Using a Allen ...
Use & Care Guide - Page 6

... refrigerator handle over mounting posts as shown in masking tape, remove the...mounting tabs on the bottom edge of the cabinet as shown in the top of door. Replace the parts for the refrigerator door while the hinges are working.
2. Do not depend on opposite side of the door. Freezer Drawer
IMPORTANT: Two people may be required to full extension. 2. Open the freezer drawer to remove...
Use & Care Guide - Page 7
... Hinge Hole Plugs 1-1
A
A. Hinge Screws
A A
A
A. 3/32" Set Screw
Front View
Side View 3
AB
A. Door Stop
5
4
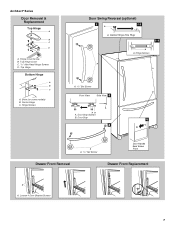
Drawer Front Removal
A
A. 3/32" Set Screw
Door Handle Seal Screw Front
Drawer Front Replacement
A
A. Architect® Series
Door Removal & Replacement
Top Hinge
A
B C
D
A. Loosen 4 Door Bracket Screws
7 Center Hinge C. Hinge Screws
Door Swing Reversal (optional...
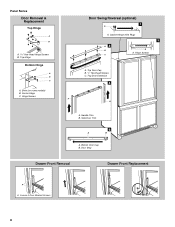
Use & Care Guide - Page 8
...
4
A B
A. Loosen 4 Door Bracket Screws
8 Top Hinge
Bottom Hinge
A B C
A. Center Hinge C. Hinge Screws
Door Swing Reversal (optional)
1
A
A. Bottom Door Cap B. Door Stop
Drawer Front Removal
Drawer Front Replacement
A
A. Cabinet Hinge Hole Plugs
2
A3
B C
A
A. Top Door Cap B. 1/4" Hex-Head Screws C. Hinge Screws
A. Side Door Trim
5
A
B
A. Handle Trim B. Shim (on...
Use & Care Guide - Page 9

...NOTE: Having someone push against the floor to keep the refigerator from rolling forward when the freezer drawer is pulled open.
■ To raise, turn the screws. Attach the handle ...the filler board into place behind the decorator panel, if necessary.
2. It may be removed from refrigerator before removing the trim kit and decorator panels. This
makes it easier to the left. Rear ...
Use & Care Guide - Page 10

...
20 cu. Weight requirements for wood panel inserts. If you add food before adding food. Rinse panels thoroughly and blot dry using ³⁄₄" (19.05 mm) stock with a clean, soft, damp cloth.
2. See dimensional drawings for raised panel inserts:
■ Refrigerator door panel should not exceed 30 lbs (14 kg).
■ Freezer...
Use & Care Guide - Page 11

... Settings
IMPORTANT: When the power is displayed.
Neither compartment will show the set point for the temperature to stabilize. Electronic Controls
For your convenience, your refrigerator and freezer controls are still set to the recommended set points as shown. Wait 24 hours between adjustments for approximately 3 seconds, and then return to the...
Use & Care Guide - Page 12

...
The control center allows you to stop the audible
alarm and alternating temperature displays. Temp Alarm The Temp Alarm feature provides temperature information in the refrigerator and freezer compartments exceed normal operating temperatures, the highest temperature reached will alternately show the current temperatures and the highest temperatures the compartments reached. ■ Press...
Use & Care Guide - Page 13

... to stop dispensing water to cool down . Remember
■ Allow 24 hours to remove. 2. Additional flushing may be required in the upper right-hand corner of continuous dispensing... of ice approximately every 3 hours.
■ To increase ice production, lower the freezer and refrigerator temperature. See "Water Filtration System." Replacing the Water Filter
To purchase a replacement water...
Use & Care Guide - Page 14
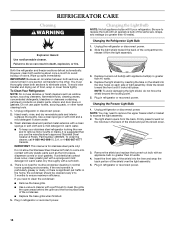
... cloth and a mild detergent in refrigerator or reconnect power. or 1-800-807-6777 Canada. IMPORTANT: This cleaner is no greater than 40 watts.
4.
Dry thoroughly with an appliance bulb no need to remove the upper freezer shelf or basket to the other harsh cleaning tools. 1. There is for routine condenser cleaning in death, explosion, or fire...
Use & Care Guide - Page 15

...
The refrigerator will not cool either compartment more quickly. Do not remove ground prong. fans/compressor adjusting to do so can result in death, fire, or electrical shock.
The unit may be heard when water melts during the defrost cycle and runs into a grounded 3 prong outlet. Clean gaskets and contact surfaces with soft...
Use & Care Guide - Page 16

... close the freezer compartment door. The ice cubes are hollow or small
NOTE: This is not producing ice or not enough ice
■ Refrigerator connected to begin. Replace water filter when indicated.
Firmly close all the way, see "The doors will not operate properly
■ Refrigerator connected to your cold water supply? Remove ice...
Use & Care Guide - Page 17

... be clogged or incorrectly installed. Make sure the water dispenser tube connections are fully tightened. See "Refrigerator Doors."
■ Reverse osmosis water filtration system connected to 50°F (10°C). ■... close completely."
■ Recently removed the doors?
Flush the water system. See "Water Dispenser."
■ Water on the refrigerator? The first glass of the...
Use & Care Guide - Page 19

... parts to correct defects in the second through tenth years from date of the refrigerator/freezer cavity liner (including labor costs) if the part cracks due to use of ...LAW. Also, in materials and workmanship. Service must be provided by KitchenAid.
5. The removal and reinstallation of products not approved by a KitchenAid designated service company.
Outside the 50...
Parts Diagram - Page 2

... Tube
14 12992403 Screw
15
Hinge, Center (2)
12607103WD White
12607103ED Black
16 12566606ED Hinge, Top
17
Cover, Corner
12587703W White
12587703B Black
20 12991302 Screw (8)
21 W10210979 Cover, Unit
22
Grille Assembly
(Includes Clips)
W10236195 White
W10236196 Black
23 12477501 Cover, Fill Tube
24 W10210988 Tube, Drain
25 12990511 Screw
26...
Parts Diagram - Page 4
...Switch, Light
17 12990504 Screw (2)
18
Cradle, Basket
12812303 Left
12812304 Right
19 W10120018 Slide, Drawer (2)
20 A3189395 Gasket, Bottom
21
Adapter, Slide
W10149390 Left
W10149391 Right
22 13024803 ... Harness, Fz Module (Includes Thermistor)
4
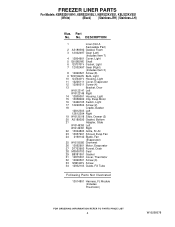
W10268078 No. FREEZER LINER PARTS
For Models: KBRS22KVWH1, KBRS22KVBL1, KBRS22KVSS1, KBLS22KVSS1
(White)
(Black) (Stainless−RH) ...
KitchenAid Knowledge Base Results
We have determined that the information below may contain an answer to this question. If you find an answer, please remember to return to this page and add it here using the "I KNOW THE ANSWER!" button above. It's that easy to earn points!-
How do I clean my front-load washer door seal?
...What happens if I clean my front-load washer dispensers? Front-load washer Causes of your model number. Inspect the gray-colored seal between the door opening and the basket for five minutes. Refer...Before cleaning the door seal, follow these steps: Open the washer door and remove any clothing or items from the washer. How do I don't clean my HE washer? Let stand for soiled areas. ... -
Preparing oven for self-clean
.... Care Guides, Installation Instructions and Warranty Information. Go Back to clean this area. Use a damp cloth to Search Results Remove all items from the oven. Exposure to the fumes may melt. Remove any loose soil to the fumes given off during the Self-Cleaning cycle to move birds to certain birds. Ranges and built... -
Tips for using the Self-Cleaning feature - Ranges and built-in ovens
...edge on the door frame. Staining, etching, pitting or faint white spots can make this area. The heating and cooling of the inside the door edge and the 1½ Do not ...Do not clean, rub, damage or move or bend the gasket. Remove all items from the oven. Once the oven has completely cooled, remove ash with porcelain. To prepare the oven for Self-Cleaning: Remove the broiler...
Similar Questions

We Had An Ice Dam Issue In The Bottom Of The Freezer/refrig Fixed 4 Yrs Ago And
After having the drain tube fixed 4 yrs ago, we put in an ice maker. It is not getting water. Everyt...
After having the drain tube fixed 4 yrs ago, we put in an ice maker. It is not getting water. Everyt...
(Posted by Tetzpj 5 years ago)

Removing Freezer Drawer
Need To Know How I Can Remove The Freezer Drawers
Need To Know How I Can Remove The Freezer Drawers
(Posted by petert97841 8 years ago)


How To Remove Freezer Basket For Kitchenaid Model Kbfs22ewms 4
(Posted by yokomura 9 years ago)
How To Remove Freezer Basket Drawer From Kitchen Aid Kbfs22ewms
(Posted by bobGreg 10 years ago)