Kenwood KDC-152 Support Question
Kenwood KDC-152 Support Question
Find answers below for this question about Kenwood KDC-152.Need a Kenwood KDC-152 manual? We have 2 online manuals for this item!
Question posted by Corum023 on July 3rd, 2015
Installed The Stereo Kdc-152
speakers do not work on 2000 Chevy 1500 Silverado pick-up truck
Current Answers
Answer #1: Posted by TechSupport101 on July 4th, 2015 9:39 AM
TechSupport101

Member since:
May 24th, 2013 Points: 12,171,305

Member since:
May 24th, 2013 Points: 12,171,305
Please see the installation manual/section here to be certain you did not miss a wire or two.
Related Kenwood KDC-152 Manual Pages
Instruction Manual - Page 1
...
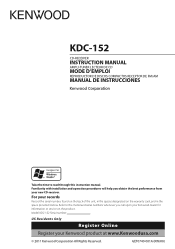
Familiarity with installation and operation procedures will help you call upon your Kenwood dealer for information or service on the warranty card, and in the space provided below. Model KDC-152 Serial number
..., found on the back of the unit, in the spaces designated on the product. KDC-152
CD-RECEIVER
INSTRUCTION MANUAL
AMPLI-TUNER LECTEUR DE CD
MODE D'EMPLOI
REPRODUCTOR DE DISCOS COMPACTOS ...
Instruction Manual - Page 2
...appears on the laser lens. Important to make sure that they work with :
The illustrations in an online manual on the following site... your area. Detailed information and notes about the playable audio files are stated in this case, remove the disc .... Caution: Adjust the volume so that you experience problems during installation, consult your unit How to prepare the remote controller
(RC-...
Instruction Manual - Page 4

... disc. Auxiliary input jack
Maintenance Cleaning the unit: Wipe off the dirt on it. Do not stick tape etc.
Do not use any solvents. ST: A stereo broadcast is in damage to observe this unit, pull them out horizontally. Remove the rims from this precaution may not function properly if the connectors...
Instruction Manual - Page 5
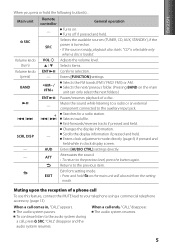
... from setting mode.
Scrolls the display information if pressed and held . AUD Enters [AUDIO CTRL] settings directly.
-
EXIT • Press and hold the following button(s)...
"... the sound. • To return to the previous item. "CALL" disappear and the audio system resumes. Selects track/file.
Returns to the previous level, press the button again. Confirms...
Instruction Manual - Page 7

... for [PRESET TYPE].) (page 6)
MONO SET ON: Improves the FM reception (but the stereo effect may be lost). ; NO*: Cancels (automatic memorizing is not activated). (Selectable only...band.
4 / ¢ (+) : Selects station.
1 - 6
: Selects preset station.
7 OFF*: Cancels (stereo effect resumes). AUTO2: Search in the order of the stations in the preset memory. ; Press briefly to recall ...
Instruction Manual - Page 9
...
Preparation : Make sure [ON1] or [ON2] is selected.
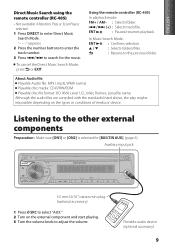
1 Press DIRECT to the previous folder. Portable audio device (optional accessory)
9 To cancel the Direct Music Search Mode, press or EXIT.
"- - -" appears....volume knob to search for [BUILTIN AUX]. (page 6) Auxiliary input jack
3.5 mm (3/16") stereo mini plug (optional accessory)
1 Press SRC to select "AUX." 2 Turn on the types...
Instruction Manual - Page 10

... [ON].
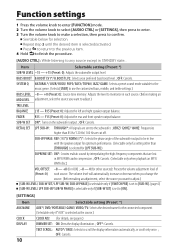
[SETTINGS]
Item
Selectable setting (Preset: *)
AUX NAME AUX*/ DVD/ PORTABLE/ GAME/ VIDEO/ TV: Selects the desired name for the connected component. (Selectable only if "AUX" is selected/... 0): Adjusts the left and right speaker output balance. Function settings
1 Press the volume knob to enter [FUNCTION] mode. 2 Turn the volume knob to select [AUDIO CTRL] or [SETTINGS], then press...
Instruction Manual - Page 12

....
2 Make proper input and output wire connections. \ "Wiring connection" (page 13)
3 Install the unit to the power source running through the fuse box. Always connect those wires to your...front output terminals or to professionals. If you may start a fire. When only two speakers are working properly. For safety's sake, leave this product requires skills and experience. To prevent a ...
Instruction Manual - Page 14

...into the slots on each side, then follow the arrows instructions as shown on the right.
14 Installing without using the mounting sleeve (Japanese car)
1 Remove the mounting sleeve and escutcheon from the unit....both sides) with the vehicle mounting bracket and secure
the unit with the supplied screws.
Installing the unit
1
Connect the wiring harness to hold the mounting sleeve firmly in the ...
Instruction Manual - Page 15
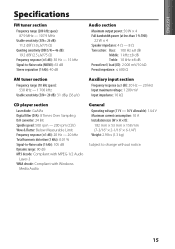
...(MONO): 63 dB Stereo separation (1 kHz): 40 dB
Audio section
Maximum output power: 50 W × 4 Full bandwidth power (at less than 1 % THD):
22 W × 4 Speaker impedance: 4 Ω... decode: Compliant with MPEG-1/2 Audio
Layer-3 WMA decode: Compliant with Windows
Media Audio
General Operating voltage (11 V - 16 V allowable): 14.4 V Maximum current consumption: 10 A Installation size (W × H...
Instruction Manual - Page 44
...on a circuit different from that interference will not occur in a residential installation. Changes or modifications to this equipment if an unauthorized change or modification is...the following are designed to provide reasonable protection against harmful interference in a particular installation. Kenwood Corporation 2967-3, ISHIKAWA-MACHI, HACHIOJI-SHI TOKYO, JAPAN
KENWOOD CORP. ...
Owners Manual - Page 1

KDC-152
CD-RECEIVER
INSTRUCTION MANUAL
AMPLI-TUNER LECTEUR DE CD
MODE D'EMPLOI
REPRODUCTOR DE DISCOS COMPACTOS ... spaces designated on the product. Familiarity with installation and operation procedures will help you call upon your records
Record the serial number, found on the back of the unit, in the space provided below. Model KDC-152 Serial number Refer to read through this instruction...
Owners Manual - Page 2

...purchase external components, check with your Kenwood dealer. Detailed information and notes about the playable audio files are used.
Therefore, what appears on the illustrations may cause an accident. To ...Installing the unit
Specifications
15
WARNING Stop the car before operating the unit. This may collect on the actual equipment. Caution: Adjust the volume so that they work ...
Owners Manual - Page 4

... use any accessories for the disc. Clean from this precaution may not function properly if the connectors between the unit and faceplate are dirty. ST: A stereo broadcast is in damage to damage the connector. When removing discs from the center of the disc. Do not use a disc with a cotton swab gently...
Owners Manual - Page 7
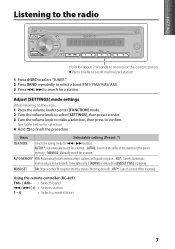
...162; to finish the procedure. MANUAL: Manually search for [PRESET TYPE].) (page 6)
MONO SET ON: Improves the FM reception (but the stereo effect may be lost). ; AUTO2: Search in the order of the stations in the preset memory. ;
Listening to the radio
ENGLISH
Hold...volume knob to make a selection, then press to memorize the current station. OFF*: Cancels (stereo effect resumes).
Owners Manual - Page 9

... number.
3 Press 4 / ¢ to search for [BUILTIN AUX]. (page 6) Auxiliary input jack
3.5 mm (3/16") stereo mini plug (optional accessory)
1 Press SRC to select "AUX." 2 Turn on the types or conditions of media or device.
About Audio file Playable Audio file: MP3 (.mp3), WMA (.wma) Playable disc media: CD-R/RW/ROM Playable disc file...
Owners Manual - Page 10
... R15 (Preset: 0): Adjusts the left and right speaker output balance. R15 -
Press to return to the previous item. 4 Hold to finish the procedure.
[AUDIO CTRL] : While listening to adjust.)
TRE LEVEL ...].
[SETTINGS]
Item
Selectable setting (Preset: *)
AUX NAME AUX*/ DVD/ PORTABLE/ GAME/ VIDEO/ TV: Selects the desired name for the connected component. (Selectable only if "AUX" is...
Owners Manual - Page 12
... heat sink and enclosure become hot. To prevent a short circuit, do not mix front and rear).
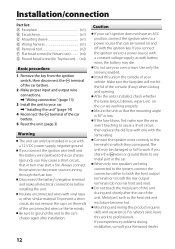
Use only the screws provided. When only two speakers are working properly. Installation/connection
Part list: A Faceplate 1) B Escutcheon 1) C Mounting sleeve 1) D Wiring harness 1) E Removal tool 2) F Flat head screw (for Nissan cars 4) G Round head screw (for Toyota cars).... (×...
Owners Manual - Page 14
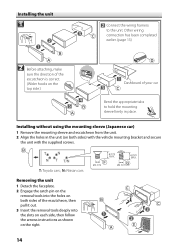
.... (page 13)
2 Before attaching, make
sure the direction of your car
Bend the appropriate tabs to the unit.
Installing the unit
1
Connect the wiring harness to hold the mounting sleeve firmly in place. Installing without using the mounting sleeve (Japanese car)
1 Remove the mounting sleeve and escutcheon from the unit. 2 Align the...
Owners Manual - Page 15
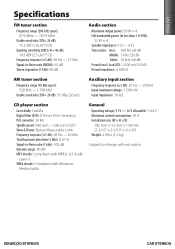
...(MONO): 63 dB Stereo separation (1 kHz): 40 dB
Audio section
Maximum output power: 50 W × 4 Full bandwidth power (at less than 1 % THD):
22 W × 4 Speaker impedance: 4 Ω... decode: Compliant with MPEG-1/2 Audio
Layer-3 WMA decode: Compliant with Windows
Media Audio
General Operating voltage (11 V - 16 V allowable): 14.4 V Maximum current consumption: 10 A Installation size (W × H...
Similar Questions

Installed Kenwood Kdc-mp238 In Car But Cannot Get Any Sound With Radio Or Cd Pla
installed Kenwood KDC-MP238 in car but cannot get any sound with radio or CD player? Check all four ...
installed Kenwood KDC-MP238 in car but cannot get any sound with radio or CD player? Check all four ...
(Posted by Graeme15 7 years ago)


How Do I Turn On Bass Boost On Kenwood Stereo Kdc-152
(Posted by roadbMITCH 9 years ago)
