Kenmore 7748 Support Question
Kenmore 7748 Support Question
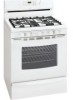
Find answers below for this question about Kenmore 7748 - 30 in. Gas Range.Need a Kenmore 7748 manual? We have 2 online manuals for this item!
Question posted by mmhuver on December 13th, 2011
Kenmore Gas Range. Top Left Burner Control Popped Out When Trying To Turn Off.
Model 790.7050*,7060 Very scary
Current Answers
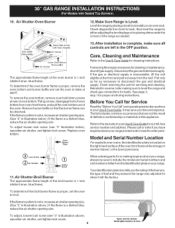
Related Kenmore 7748 Manual Pages
Use and Care Guide - Page 2
... 790. This warranty covers only defects in all instructions supplied with the product. 9.
Damage to or failure of this product if it properly according to all instructions supplied with the
product. 7. Table of Contents
Free-Standing Range Warranty 2
Product Record
2
iMPORTANT SAFETY iNSTRUCTiONS 3-5
ProtectionAgreements 6
Range Features
7
Before Setting Oven Controls...
Use and Care Guide - Page 3
...range. tip bracket installation.
)
• Remove all instructions before using this range.
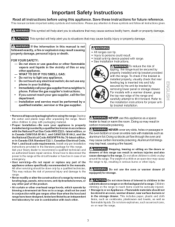
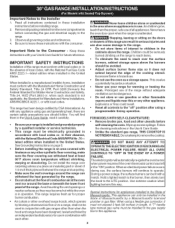
important Safety instructions
Read all tape and packaging before using the range.
Children climbing on or near surface burners...WHAT TO DO IF YOU SMELL GAS: • Do not try to tip, resulting in the manuals. Aluminum foil linings may cause the range to light any appliance. •...
Use and Care Guide - Page 4

...control. If the power fails,
always turn knob to the full LITE position when igniting top burners. If the oven is not turned off the oven. Let hot air or steam escape before turning...to accumulate.
Refer
to the range manufacturer's instructions for cleaning....Burners--To reduce the risk of burns, ignition of utensil to reposition. IMPORTANT--ELECTRIC
IGNITION MODELS...
Use and Care Guide - Page 5
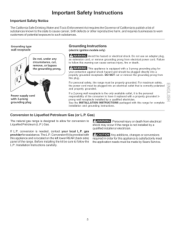
... installed by Sears Service. Conversion to Liquefied Petroleum Gas (or L.R Gas)
The natural gas range is located on the left lower REAR (back side) panel of potential exposure...range for your local L.P. Power supply cord with this warning can cause serious injury, fire or death. Conversion Kit is provided with 3=prong grounding plug
Grounding instructions
(electric ignition models...
Use and Care Guide - Page 7
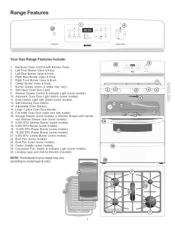
... with Shield (some models). 22. Center Griddle (some models). 26. NOTE: The features of your range may vary). 8. Self-Cleaning Oven interior. 13. Convection Fan, Switch & Indicator Light (some models). 25. Warmer Drawer Control & Indicator Light (some models). 24.
Range Features
© Y
@
o®
i
Your Gas Range Features include:
1. Left Front Burner Valve & Knob. 3. Right...
Use and Care Guide - Page 9
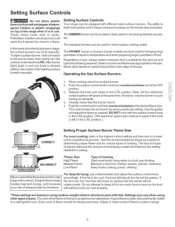
... undercooked. Use caution when lighting surface burners manually. Setting Surface Controls Your range may vary when using medium-weight metal or aluminum pans with the surface control knob
in and turn to a lower one to the pan. The SIMMER burner (some models) are based on surface burner. 2. Operating the Gas Surface Burners:
1. The control knobs do not have to spark if...
Use and Care Guide - Page 14
... Controls (conrd)
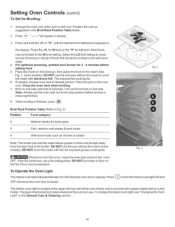
To Set for LO broil. Place the pan on 2nd side. Turn and...the t%. For optimum browning, preheat broil burner for 3 - 4 minutes before turning or removing the food.
8. If needed...left rear wall of the oven interior and is browned. Note: Always pull the oven rack out to turn... NOT cover the insert with aluminum foil.
some models). to the stop position before adding food. 5....
Use and Care Guide - Page 17
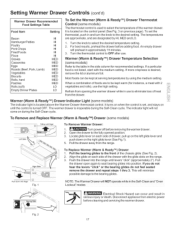
...Shock Hazard can be kept warm (for recommended settings. Disconnect appliance from the range. For best results, preheat the drawer before removing thewarmerdrawer.
2. When a ...control. Turn the thermostat control to OFF after use to be kept at serving temperatures by Hi, MED and LO.
1. Warmer (Warm & Ready TM) Drawer Temperature Selection (some models)
Left Glide
Pull up on the left...
Use and Care Guide - Page 20
... cause damage to the appliance.
Control Panels
Before cleaning the controlpanel, turn all cleaners orthe porcelain may occur... the burner cap so the electrode is essential for 30-40 minutes.
Squeeze excess water from igniting. Porcelain Enamel
Burner Grates...changes or conversions required in or around the controls. Leave on self cleaning models, which is not damaged. Rinse with a...
Use and Care Guide - Page 22
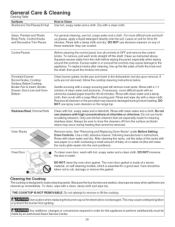
General Care & Cleaning (cont'd)
Cleaning the ContouredWell Areas, Burner Cap, Burner Head and Burner Drip Pans (some models) The contoured well areas, burner cap, burner head and burner drip pans (some models) should be routinely cleaned. If a spill occurs on or in the recessed or contoured areas, blot up spill with a clean, damp cloth and wipe dry.
...
Use and Care Guide - Page 23

... ports are clogged.
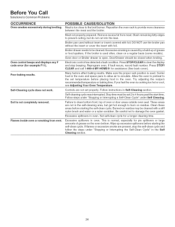
Electrical power outage (electric ignition models only). See Setting Surface Controls. Cannot move appliance easily. Surface burners do not light. Oven does not operate.
Cii:i
Burner ports are clogged. Range power cord is orange. See Setting Surface Controls. Be sure the oven controls are square and have sufficient room for service, review this...
Use and Care Guide - Page 24
...Many factors affect baking results. Try adjusting the recipe's recommended ...seal.
Remove excess fat from vent. Broiler drawer needs to the broil burner. Failure to clear the display and stop the self-clean cycle and...-Clean Cycle" in the Self Cleaning section.
24 Burned-on residue. Oven control beeps and displays any F code error (for pie spillovers or large amounts of...models).
Installation Instructions - Page 1

...try to operate on Either Side oMf inRimanugme. Installation and service must be performed by a qualified
installer, service agency or the gas supplier.
Provide Proper Fuel Type Before Proceeding: Your range...WHAT TO DO IF YOU SMELL GAS:
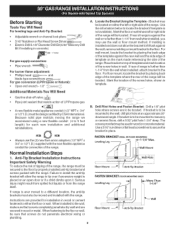
- Immediately call your serial plate for Cabinets AMbaoxvime uRmanDgeptThop. !_
Jl_r JL_l,L Jl_PJL_l,L
_,----25"
30" _l
0" Clearance Below Cooking Top...
Installation Instructions - Page 2
...control was left in the Use & Care Guide.
• Unlike the standard gas range, THIS COOKTOP IS NOT REMOVABLE. During a power outage, the surface burners can only be avoided.
• Adjust surface burner...
or drawers of the range without shrinking, warping or discoloring. FOR MODELS WITH SELF-CLEAN FEATURE:
• Remove broiler pan, food and other overhead range hoods, which operate by...
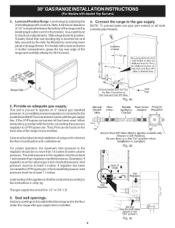
Installation Instructions - Page 3
...If bracket is not available). When installed to either the left or right side of the range will allow the range to tip over if excessive weight is installed and does ...Drill
Bit if installing in concrete)
For gas supply connection:
• Pipe wrench
For burner flame adjustment:
• Phillips head _
and
blade-type screwdrivers
For gas conversion (LP/Propane or Natural):
•...
Installation Instructions - Page 4
... threads.
_Recommended Area for 120V Outlet on Rear of Wall and Area for natural gas 4 inch manifold pressure, inlet pressure must be taken during installation of range not to obstruct the flow of the range (some models). For models with the gas supply line. NOTE: To prevent leaks use .
if regulator has been converted for LP...
Installation Instructions - Page 5

... to range. Turn burnervalveon. Be sure the gas supply (inlet) pressure is at all joints and conduits to check for Natural Gas the manifold pressure is 4." (For LP/Propane Gas the manifold pressure is in the system.
of torque NOTE: Be sure to stabilize the left side of torque.Be sure to external manual shut-off...
Installation Instructions - Page 6
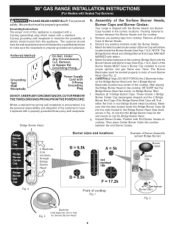
... and gas flame size. c. NOTE: The Bridge Burner Head and 3 Bridge Burner End Caps ARE NOT MARKED with a properly grounded three-prong wall receptacle. Burner Heads MUST...Burner Head
g. PLEASE READ CAREFULLY! Burner Caps and Burner Grates:
Grounding instructions The power cord of Burner Cap with the Burner Heads and Burner Caps (See Figs. 1 & 2).
Preferred
Not, Under
Your range...
Installation Instructions - Page 7
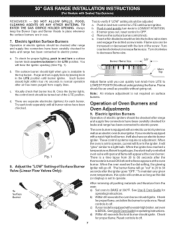
... instructions. Check for leaks and range has been connected to 30 seconds after the igniter goes "OFF." d) Within 60 seconds the broil burner should ignite.
You
will also have been checked.
8. Push in 20 to electric power. b. Remove the surface burner control knob.
If your model is equipped with an electric control system as well asan electric...
Installation Instructions - Page 8
... flame is 1 inch (distinct inner, blue flame).
Remove burner baffle so that are left the factory. To adjust loosen lock screw (see "3" in illustration above .) if the flame is complete, make sure all controls are not the result of fuel and the pressure the range was adjusted for our toll-free service number and...
Similar Questions

Error Code Eo 31 On Burner Controls. F 11 Code When Stop Is Held Down.
(Posted by momenk81 9 years ago)

Right Front Burner Is Out Model# 790.46713605
(Posted by qrsref 11 years ago)

Knob Assembly On 790 7748 Gas Range
Igniter will not spark with one control knob. Igniter sparks when other control knobs are turned the...
Igniter will not spark with one control knob. Igniter sparks when other control knobs are turned the...
(Posted by greglovick 12 years ago)

Can I Convert A Kenmore Gas Range Model #970-560292 From Natural Gas To Propane
(Posted by mjunick 12 years ago)

Gasoline Pipe Size From House To Stove.
What size of gasoline pipe is needed to support the BTU output of the Kenmore gas Range modle 7748. ...
What size of gasoline pipe is needed to support the BTU output of the Kenmore gas Range modle 7748. ...
(Posted by HapRutherford 13 years ago)