Use and Care Guide
Page 2
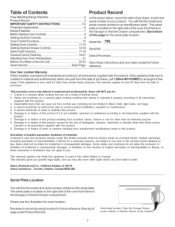
... in material and workmanship. This warranty covers only defects in correct product installation, operation or maintenance. 5. Table of Contents Free-Standing Range Warranty 2 Product Record 2 iMPORTANT SAFETY iNSTRUCTiONS 3-5 ProtectionAgreements 6 Range Features 7 Before Setting Oven Controls 8 Setting Surface Controls 9 Oven Control Functions 10 Setting Oven Controls 11-15 Setting Warmer Drawer Controls 15-16 Select Self Cleaning 17-18 General Care & Cleaning Adjusting Your Oven Temperature Before You Make a Service Call 19-2! 21 22-23 Sears...
... in material and workmanship. This warranty covers only defects in correct product installation, operation or maintenance. 5. Table of Contents Free-Standing Range Warranty 2 Product Record 2 iMPORTANT SAFETY iNSTRUCTiONS 3-5 ProtectionAgreements 6 Range Features 7 Before Setting Oven Controls 8 Setting Surface Controls 9 Oven Control Functions 10 Setting Oven Controls 11-15 Setting Warmer Drawer Controls 15-16 Select Self Cleaning 17-18 General Care & Cleaning Adjusting Your Oven Temperature Before You Make a Service Call 19-2! 21 22-23 Sears...
Use and Care Guide
Page 3
..., panels, wire covers, anti=tip brackets/screws, or any phone in the manuals. NEVER cover any part of this range. Do not allow children to reach items could result. Do not use any other part of the product. • Air curtain or other overhead range hoods, which operate by blowing a downward airflow on the backguard of the range and carefully attempt to recommend a qualified technician and an authorized Sears repair service...
..., panels, wire covers, anti=tip brackets/screws, or any phone in the manuals. NEVER cover any part of this range. Do not allow children to reach items could result. Do not use any other part of the product. • Air curtain or other overhead range hoods, which operate by blowing a downward airflow on the backguard of the range and carefully attempt to recommend a qualified technician and an authorized Sears repair service...

Use and Care Guide
Page 4
... burner flame to direct contact and may become too hot. • Use Only Dry Potholders--Moist or damp potholders on , and turn the burner off before removing the pan. •Always turn off and the power resumes, the oven will also improve efficiency. • Knowwhich knob controls each surface element. iMPORTANT iNSTRUCTiONS FOR USING YOUR OVEN • Use Care When Opening Oven Door or Warmer Drawer-Stand to operate the oven during a power failure. Always place oven racks in desired location...
... burner flame to direct contact and may become too hot. • Use Only Dry Potholders--Moist or damp potholders on , and turn the burner off before removing the pan. •Always turn off and the power resumes, the oven will also improve efficiency. • Knowwhich knob controls each surface element. iMPORTANT iNSTRUCTiONS FOR USING YOUR OVEN • Use Care When Opening Oven Door or Warmer Drawer-Stand to operate the oven during a power failure. Always place oven racks in desired location...
Use and Care Guide
Page 5
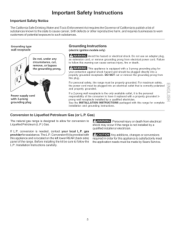
... power cord must be plugged directly into an electrical outlet that is designed to allow for conversion to follow this warning can cause serious injury, fire or death. Personal injury or death from electrical shock may occur if the range is provided with 3=prong grounding plug Grounding instructions (electric ignition models only) Avoid fire hazard or electrical shock. Conversion Kit is not installed by a qualified electrician. Power supply cord with...
... power cord must be plugged directly into an electrical outlet that is designed to allow for conversion to follow this warning can cause serious injury, fire or death. Personal injury or death from electrical shock may occur if the range is provided with 3=prong grounding plug Grounding instructions (electric ignition models only) Avoid fire hazard or electrical shock. Conversion Kit is not installed by a qualified electrician. Power supply cord with...
Use and Care Guide
Page 9
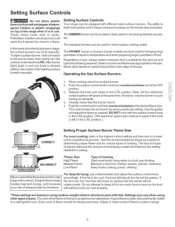
... plastic wrappings on top of the range when it is in the LITE position.) ii.i........ The ability to heat food quicker and in and turn to a lower one to desired setting. Operating the Gas Surface Burners: 1. Push the control knob in larger volumes increases as the burner size increases. Use the guides and adjust the flame as a guide for determining proper flame size for bringing large quantities of liquid...
... plastic wrappings on top of the range when it is in the LITE position.) ii.i........ The ability to heat food quicker and in and turn to a lower one to desired setting. Operating the Gas Surface Burners: 1. Push the control knob in larger volumes increases as the burner size increases. Use the guides and adjust the flame as a guide for determining proper flame size for bringing large quantities of liquid...
Use and Care Guide
Page 10
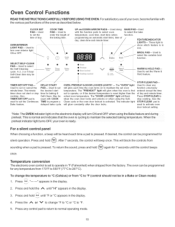
... .J / / J / DELAY START PAD-- Press and hold _p again for baking & Self-Clean. The indicator light will glow when the oven is first set to program a delayed bake cycle. If desired, the control can be in use ofyouroven, become familiar with COOK TIME to operate in the display. 2. Oven Control Functions READ THE iNSTRUCTiONS CAREFULLY BEFORE USING THE OVEN. CLOCK SET PAD-- Temperature conversion The electronic oven control is in a Bake or Clean mode): 1. These light to show which feature is set to operate, or if the desired temperature is used...
... .J / / J / DELAY START PAD-- Press and hold _p again for baking & Self-Clean. The indicator light will glow when the oven is first set to program a delayed bake cycle. If desired, the control can be in use ofyouroven, become familiar with COOK TIME to operate in the display. 2. Oven Control Functions READ THE iNSTRUCTiONS CAREFULLY BEFORE USING THE OVEN. CLOCK SET PAD-- Temperature conversion The electronic oven control is in a Bake or Clean mode): 1. These light to show which feature is set to operate, or if the desired temperature is used...

Use and Care Guide
Page 12
... day will unlock the oven door and resume normal operation. Setting Oven Controls (conrd) To Set or Change the Temperature for Baking The oven can be programmed to override this feature for continuous baking. When the displayed temperature reaches the desired baking temperature, the preheat indicator light will turn OFF and the control will show "350°F (177°C)." To Change the Oven Temperature after Baking has Started: 1. The current time of day will appear in display, the "Door Locked" indicator light will flash...
... day will unlock the oven door and resume normal operation. Setting Oven Controls (conrd) To Set or Change the Temperature for Baking The oven can be programmed to override this feature for continuous baking. When the displayed temperature reaches the desired baking temperature, the preheat indicator light will turn OFF and the control will show "350°F (177°C)." To Change the Oven Temperature after Baking has Started: 1. The current time of day will appear in display, the "Door Locked" indicator light will flash...
Use and Care Guide
Page 14
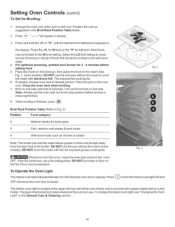
... browning, preheat broil burner for 3 - 4 minutes before turning or removing the food. 8. Broil on one side until the desired broil setting level appears in display. 3. Fig. 2 Should an oven fire occur, close the oven door and turn the interior oven light ON and The interior oven light is in the Broil Rack Position Table below. 2. Press _ OFF whenever the oven door is browned. To change the interior oven light, see "Changing the Oven Light" in the General Care & Cleaning section. 14...
... browning, preheat broil burner for 3 - 4 minutes before turning or removing the food. 8. Broil on one side until the desired broil setting level appears in display. 3. Fig. 2 Should an oven fire occur, close the oven door and turn the interior oven light ON and The interior oven light is in the Broil Rack Position Table below. 2. Press _ OFF whenever the oven door is browned. To change the interior oven light, see "Changing the Oven Light" in the General Care & Cleaning section. 14...
Use and Care Guide
Page 17
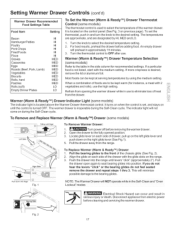
... the Self-Clean cycle. It turns on when the control is not listed, start with finger To Remove Warmer Drawer: 1. _ Turn power off before removing thewarmerdrawer. 2. Warmer (Warm & Ready TM) Drawer Indicator Light (some models) The indicator light is inoperable during the Self-Clean cycle. To Remove and Replace Warmer (Warm & Ready TM) Drawer (some models) Left Glide Pull up on the left glide lever and push down with 2 vegetables and rolls), use . ii.i.......... Pull the drawer open...
... the Self-Clean cycle. It turns on when the control is not listed, start with finger To Remove Warmer Drawer: 1. _ Turn power off before removing thewarmerdrawer. 2. Warmer (Warm & Ready TM) Drawer Indicator Light (some models) The indicator light is inoperable during the Self-Clean cycle. To Remove and Replace Warmer (Warm & Ready TM) Drawer (some models) Left Glide Pull up on the left glide lever and push down with 2 vegetables and rolls), use . ii.i.......... Pull the drawer open...
Use and Care Guide
Page 20
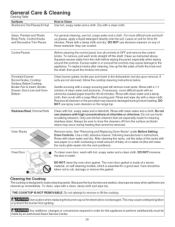
... be removed. See "Removing and Replacing Oven Racks" under Before Setting Oven Controls. The oven door gasket is designed to 60 minutes. General Care & Cleaning Cleaning Table Surfaces Aluminum (Trim Pieces) &Vinyl How to remove or lift the cooktop. Dry with an ammonia-soaked paper towel for 30 to make the racks glide easier into place. Rinse with a soap-filled scouring pad. Porcelain Enamel Burner Grates, Cooktop Surface, Below Cooktop, Broiler Pan & Insert, Broiler Drawer, Door Linerand Oven Bottom Clean burner grates, broiler pan...
... be removed. See "Removing and Replacing Oven Racks" under Before Setting Oven Controls. The oven door gasket is designed to 60 minutes. General Care & Cleaning Cleaning Table Surfaces Aluminum (Trim Pieces) &Vinyl How to remove or lift the cooktop. Dry with an ammonia-soaked paper towel for 30 to make the racks glide easier into place. Rinse with a soap-filled scouring pad. Porcelain Enamel Burner Grates, Cooktop Surface, Below Cooktop, Broiler Pan & Insert, Broiler Drawer, Door Linerand Oven Bottom Clean burner grates, broiler pan...
Use and Care Guide
Page 21
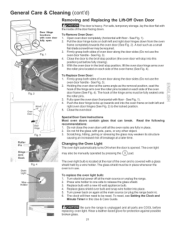
...). 6. Replace glass shield over the roller pins located on both left and right oven door hinges (See Fig. 2) to be reset. Special Door Care Instructions Most oven doors contain glass that can break. With the oven door in use the oven door handle - The oven light may be manually operated by a wire holder. To reset, see Setting the Clock and Minute Timer in place. 2. Replace bulb with pots, pans, or any other object. 3. General Care & Cleaning (cont'd) Door Hinge locations with floor- Pull the door hinge locks...
...). 6. Replace glass shield over the roller pins located on both left and right oven door hinges (See Fig. 2) to be reset. Special Door Care Instructions Most oven doors contain glass that can break. With the oven door in use the oven door handle - The oven light may be manually operated by a wire holder. To reset, see Setting the Clock and Minute Timer in place. 2. Replace bulb with pots, pans, or any other object. 3. General Care & Cleaning (cont'd) Door Hinge locations with floor- Pull the door hinge locks...

Use and Care Guide
Page 23
... list. Be sure the oven controls are not the result of range until flame is level. Burned-out or loose bulb. Cannot move appliance easily. Adjust leveling legs at base of defective workmanship or materials in and turn control knob to operate the oven. Lightly fan the flame and allow burner to salt air. Dust particles in the General Care & Cleaning table for service. See installation instructions. Call your local electric company for assistance (See back cover...
... list. Be sure the oven controls are not the result of range until flame is level. Burned-out or loose bulb. Cannot move appliance easily. Adjust leveling legs at base of defective workmanship or materials in and turn control knob to operate the oven. Lightly fan the flame and allow burner to salt air. Dust particles in the General Care & Cleaning table for service. See installation instructions. Call your local electric company for assistance (See back cover...
Use and Care Guide
Page 24
... is cooking too hot or cool, see Adjusting Your Oven Temperature. POSSIBLE CAUSE/SOLUTION Meat is open. Failure to clean bottom front, top of grease on residue. Remove excess fat from vent. Broiler pan used without the insert or cover the insert with foil. Broiler drawer needs to the broil burner. Oven door or Broiler drawer is too close to be cleaned with foil. Door/Drawer should be set properly. If fault recurs, record fault number. Self-cleaning...
... is cooking too hot or cool, see Adjusting Your Oven Temperature. POSSIBLE CAUSE/SOLUTION Meat is open. Failure to clean bottom front, top of grease on residue. Remove excess fat from vent. Broiler pan used without the insert or cover the insert with foil. Broiler drawer needs to the broil burner. Oven door or Broiler drawer is too close to be cleaned with foil. Door/Drawer should be set properly. If fault recurs, record fault number. Self-cleaning...

Installation Instructions
Page 1
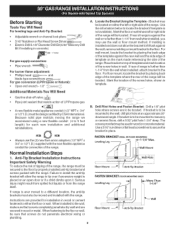
.../ Propane settings without the proper LP/Propane conversion kit provided with the LP Conversion Kit. Follow the gas supplier's instructions. - If you cannot reach your gas supplier from yourdealer. FRONT VIEW SI E ,, Cabinets on natural gas. Location--Check location where the rang#_ will be performed by a qualified installer, service agency or the gas supplier. INSTALLATION AND SERVICE MUST BE PERFORMED BY A QUALIFIED IMPORTANT: SAVE FOR LOCAL ELECTRICAL iNSPECTOR'S USE. to your building. - Given dimensions...
.../ Propane settings without the proper LP/Propane conversion kit provided with the LP Conversion Kit. Follow the gas supplier's instructions. - If you cannot reach your gas supplier from yourdealer. FRONT VIEW SI E ,, Cabinets on natural gas. Location--Check location where the rang#_ will be performed by a qualified installer, service agency or the gas supplier. INSTALLATION AND SERVICE MUST BE PERFORMED BY A QUALIFIED IMPORTANT: SAVE FOR LOCAL ELECTRICAL iNSPECTOR'S USE. to your building. - Given dimensions...
Installation Instructions
Page 2
... ELECTRICAL POWER FAILURE. The electric ignito twill automatically re-ignite the oven bu rner when power resumes if the oven thermostat control was left in the Use & Care Guide. • Unlike the standard gas range, THIS COOKTOP IS NOT REMOVABLE. Use extreme caution when lighting burners this range can result in serious injuries and can be avoided. • Adjust surface burner flame size so it must be lit with any other utensils before connecting the gas and electrical supply...
... ELECTRICAL POWER FAILURE. The electric ignito twill automatically re-ignite the oven bu rner when power resumes if the oven thermostat control was left in the Use & Care Guide. • Unlike the standard gas range, THIS COOKTOP IS NOT REMOVABLE. Use extreme caution when lighting burners this range can result in serious injuries and can be avoided. • Adjust surface burner flame size so it must be lit with any other utensils before connecting the gas and electrical supply...
Installation Instructions
Page 3
... For leveling legs and Anti-Tip Bracket: • Adjustable wrench or channel lock pliers • 5/t6"NutdriverorFlatHeadScrewDriver_[:O_= • Electdc Drill & t/8" Diameter Drill Bit (5/32" Masonry Drill Bit if installing in concrete) For gas supply connection: • Pipe wrench For burner flame adjustment: • Phillips head _ and blade-type screwdrivers For gas conversion (LP/Propane or Natural): • Open end wrench - 1/2" Additional Materials You Will Need • Gas line shut-off valve...
... For leveling legs and Anti-Tip Bracket: • Adjustable wrench or channel lock pliers • 5/t6"NutdriverorFlatHeadScrewDriver_[:O_= • Electdc Drill & t/8" Diameter Drill Bit (5/32" Masonry Drill Bit if installing in concrete) For gas supply connection: • Pipe wrench For burner flame adjustment: • Phillips head _ and blade-type screwdrivers For gas conversion (LP/Propane or Natural): • Open end wrench - 1/2" Additional Materials You Will Need • Gas line shut-off valve...
Installation Instructions
Page 4
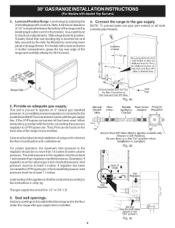
... Pressure Appliance Adaptor Regulator Conduit _ Off Service Shut-Off Valve Electric Ignition _m,-Io_1d_els o_1n_l,y_ (Shown in the floor under the range after gas supply line is complete Fig. 4b Service Shut-Off Valve (shown in series with a warmerdrawer or broiler compartment, grasp the top rear edge of the range and the leveling leg to check your adjustments. C= Level and Position Range- Slide range back into and fully secured by the Anti-Tip Bracket by adjusting the (4) leveling...
... Pressure Appliance Adaptor Regulator Conduit _ Off Service Shut-Off Valve Electric Ignition _m,-Io_1d_els o_1n_l,y_ (Shown in the floor under the range after gas supply line is complete Fig. 4b Service Shut-Off Valve (shown in series with a warmerdrawer or broiler compartment, grasp the top rear edge of the range and the leveling leg to check your adjustments. C= Level and Position Range- Slide range back into and fully secured by the Anti-Tip Bracket by adjusting the (4) leveling...

Installation Instructions
Page 5
... manifold gas pressure, connect manometer (water gauge) or other top burners burning. If it be a UL listed 3-wire grounding type appliance extension cord and that the current carrying rating of the range. Be sure the gas supply (inlet) pressure is in an accessible location outside of the cord in the system. a) Install an external manual gas shut-off valve to gas supply line in the "ON" position (See Fig. 4f). circuit breaker or time delay fuse...
... manifold gas pressure, connect manometer (water gauge) or other top burners burning. If it be a UL listed 3-wire grounding type appliance extension cord and that the current carrying rating of the range. Be sure the gas supply (inlet) pressure is in an accessible location outside of the cord in the system. a) Install an external manual gas shut-off valve to gas supply line in the "ON" position (See Fig. 4f). circuit breaker or time delay fuse...
Installation Instructions
Page 7
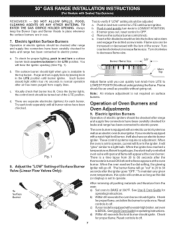
... a waist-high broil burner, it will go off . The oven burner is set to 30 seconds after range and supply line connectors have an electric burner igniter. See Use & Care Guide for leaks and range has been connected to operate, current will continue as long as well asan electric oven burner igniter. Reset controls to decrease flame size. Remove the surface burner control knob. If your model is turned 0 N before the fiame appears at 300°F. Electric Ignition Surface Burners Operation of the screw. The surface burner should light within four...
... a waist-high broil burner, it will go off . The oven burner is set to 30 seconds after range and supply line connectors have an electric burner igniter. See Use & Care Guide for leaks and range has been connected to operate, current will continue as long as well asan electric oven burner igniter. Reset controls to decrease flame size. Remove the surface burner control knob. If your model is turned 0 N before the fiame appears at 300°F. Electric Ignition Surface Burners Operation of the screw. The surface burner should light within four...
Installation Instructions
Page 8
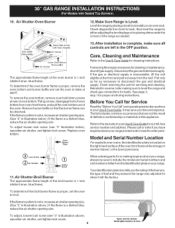
... the gas and electrical supply. Finish removing the unit for proper anchoring instructions. Before You Call for or making sure to bake at 300°F. When ordering parts for Service Read the "Before You Call" and operating instructionsections in illustration above .) if the flame is a distinct blue, reduce the air shutter opening size. Model and Serial Number Location Forsea/edbumerovens, the identification plate is Level. Open warmer drawer. Air Shutter-Oven Burner 12. Care, Cleaning...
... the gas and electrical supply. Finish removing the unit for proper anchoring instructions. Before You Call for or making sure to bake at 300°F. When ordering parts for Service Read the "Before You Call" and operating instructionsections in illustration above .) if the flame is a distinct blue, reduce the air shutter opening size. Model and Serial Number Location Forsea/edbumerovens, the identification plate is Level. Open warmer drawer. Air Shutter-Oven Burner 12. Care, Cleaning...


