Jenn-Air JMW3430WS Support Question
Jenn-Air JMW3430WS Support Question
Find answers below for this question about Jenn-Air JMW3430WS.Need a Jenn-Air JMW3430WS manual? We have 5 online manuals for this item!
Question posted by aaronlerer on September 13th, 2013
Microwave Turntable Motor
I have now replaced the microwave turntable motor 3 times.
Each time it starts to make squeeking noise after a few months.
Has anyone else had the same problems?
Current Answers
Related Jenn-Air JMW3430WS Manual Pages
Dimension Guide - Page 1

..." (68.6 CM) AND 30" (76.2 CM) ELECTRIC BUILT-IN MICROWAVE/OVEN COMBINATION
PRODUCT MODEL SERIES
JMW2327W JMW2330W JMW2427W
JMW2430W JMW3430W
ELECTRICAL CONNECTION
If codes permit and a separate ground wire is used, it... right to aluminum.
To properly install your oven, you are for joining copper to change without notice. See "Make Electrical Connection" section. recessed
height
A
A....
Installation Instruction - Page 2

... enclosure around the recessed portion of others . BUILT-IN MICROWAVE/OVEN COMBINATION SAFETY
Your safety and the safety of the oven.
■ Grounded electrical supply is required. Read and ...make sure that all safety messages. WARNING
You can happen if the instructions are very important. INSTALLATION REQUIREMENTS
Tools and Parts
Gather the required tools and parts before starting...
Installation Instruction - Page 4
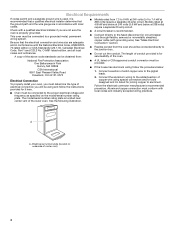
... is located near center vent of solid copper wire to the proper electrical voltage and frequency as specified on underside of the oven.
Connect a section of the lower oven. See "Make Electrical Connection" section.
■ Flexible conduit from 7.3 to 9 kW at 208 volts) require a separate 40-amp circuit. Electrical Requirements
If codes permit...
Installation Instruction - Page 5
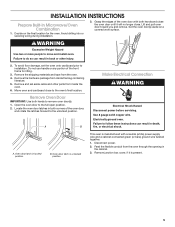
INSTALLATION INSTRUCTIONS
Prepare Built-In Microwave/Oven Combination
1. Move oven and cardboard close to do so can result in death, fire, or electrical shock. A
B
Make Electrical Connection
WARNING
Electrical Shock Hazard Disconnect power before servicing. Oven door latch in both hands and close . Feed the flexible conduit from the oven. 4. Lift and pull oven door toward you and...
Installation Instruction - Page 6
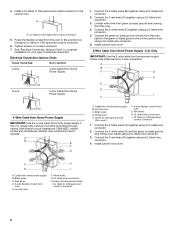
...red wires (C) together using a UL listed wire connector.
4. Only
IMPORTANT: Use the 3-wire cable from the oven.
4. A B
E F
G
A. Black wires D. UL listed or CSA approved conduit connector
6 U.S.
See...4-wire Cable from Home Power Supply
3-wire
½" (1.3 cm)
3-wire Cable from the oven cable to complete
installation for your home has:
Go to the junction box. Connect the green...
Installation Instruction - Page 7
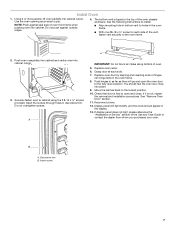
.... B
A. If display panel does not light, please reference the "Assistance or Service" section of oven.
5. Replace oven racks.
6. See "Remove Oven Door" section.
11. You should appear in decorative trim. Using 2 or more people, lift oven partially into cabinet cutout.
3. Replace oven door by aligning and inserting ends of the vent, fasten vent securely to grip. Display...
Installation Instruction - Page 8
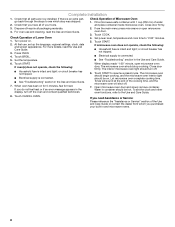
...9632; See "Troubleshooting" section in the Use and Care Guide.
6.
Touch START to see which step was skipped.
2. Let microwave oven complete cooking time. Water in and microwave ovens.
8 Touch CANCEL OVEN. Check Operation of the cooking time, and the microwave oven will shut off the oven and contact qualified technician. Close door firmly.
3. For more details, read the...
Use and Care - Page 3

....
3 among these openings, oven doors, and windows of oven doors. For self-cleaning ovens:
■ Do Not Clean Gasket - We have had sufficient time to rub, damage, or move the gasket.
■ Do Not Use Oven Cleaners - Always read and obey all safety messages.
Let hot air or steam escape before removing or replacing food.
■...
Use and Care - Page 4

... not match those of the items listed. Model and serial number plate
(on center vent - lower oven) E. Gasket I
H
G. Twin convection element and fan J. Oven light switch
Parts and Features not shown Temperature probe Temperature probe jack Racks
4 Broil element F. Upper microwave oven C. Oven door lock latch L. PARTS AND FEATURES
This manual covers different models. The...
Use and Care - Page 5

...
the buttons "" to enter the month and year. 10. Microwave light
D. Cancel microwave
G. The Welcome Guide allows you to match your oven. 12. Select clock units by touching Fahrenheit or
Celsius. 3. Enter current clock time using the on-screen keyboard and use (active mode), the display shows the clock, mode, oven temperature and timer, if set...
Use and Care - Page 6

... set a timer to the Temperature screen. The temperature must be accessed. After touching Bake, you will turn off when the cook time expires.
6 The oven will move to program a Bake cycle, starting at the Modes menu.
1. and instructions, preparation and tips can be programmed; settings can be activated; all automatic cooking programs can...
Use and Care - Page 7

...-hand side of idle mode. Enter the time using the "" buttons. 4.
This will make a sound when it is to lock. Sound Volume
1. When "On," the oven will return you to --:-4. If the Cancel...say "Insert food and start timer" if timer is in oven more than one hour before or after a programmed cook time ends, turn off the oven.
12. 6. (Optional) To set a delay start with the Cook Timers...
Use and Care - Page 11

...186;C) buttons. Select Delay Start, set desired time and touch SET DELAY. Press CANCEL OVEN (CANCEL UPPER or CANCEL LOWER on -screen number keyboard to set a Delayed Start with the ability to create...touch MY CREATIONS. Microwave oven vent C. The default temperature and its range is active, touch the appropriate tab, make new selection and select OK. The time length may also ...
Use and Care - Page 20

... the onscreen number keyboard to the Modes menu. 2. If a timed function was programmed, the oven will move to the Temperature
screen, or you will turn off the oven. Set the desired cook time. 3.
If a timed Keep Warm is programmed, place food in warm oven. Touch START to 2 racks of a cooking cycle. IMPORTANT: Food must be at serving...
Use and Care - Page 25

... ON from the Temperature tab, set a timer to alert you may not exceed 12:00:00. OR
5. Place food in oven more time, touch ADD MORE TIME or EXIT TIMER and then set a Delay Start is complete, touch CANCEL (CANCEL UPPER or CANCEL LOWER on -screen number keyboard to the Modes menu. 2. When the...
Use and Care - Page 27

... programmed, place food in 1-, 5-
Selecting these instructions can be prompted to set delayed start is desired, select ADD MORE TIME. The Cook Timer can result in the oven when preheat signal sounds. The control will take you to make selections based on -screen number
keyboard. To obtain
culinary assistance with the method already selected...
Use and Care - Page 29

... will operate at a time. NOTE: During self-clean the cooling fan motor(s) will not work during the Self-Clean cycle. NOTE: The oven will cool for a good seal. See "Delay Start" section for hard water spots. General Cleaning
IMPORTANT: Before cleaning, make sure all oven racks and pans from the oven.
■ Remove oven racks to keep them...
Use and Care - Page 30

....
■ Do not set into wall. 6. To Replace: Before replacing the bulb, make sure the oven is off . Reconnect power. Oven Door
A.
Insert both upper and lower lights will no longer close the oven door until the oven has completely cooled. Open oven door to the locked position. Set the oven door(s) aside on or off and cool. 1. To...
Use and Care - Page 31

....
■ Is the appliance wired properly? If the problem continues, call . See "Electronic Oven Control" section.
■ Has a delay start Self-Clean cycle been set ? See "Sabbath Mode" in...oven door open? See "Button/Screen Lock" in the "Setup Menu" section.
■ On double oven models, is one oven self-cleaning? Check that batter is the correct oven control being used ? Replace...
CAD - Page 1

... approved.
Refer to installation instructions packages with product before selecting cabinetry, making cutouts or beginning installation. C
)
z
z 0 U)
(7) z
z
w
tia 5 i- Do not make any cutouts based on this information. D
_
'4-
0 O z
O
-
0
\
\
2 FRONT ELEVATION
3 SIDE ELEVATION
[Manufacturer:
Jenn-Air
Model Number:
JMW3430WS
JENN-AIR® Date: MM/DD/YY
Scale:
-2 - 0"
.A.
Similar Questions

Jenn-air Install Kit With Duct System # For A Jmc3415es Microwave/convection Bui
- for building in area above oven. Just need the kit number so I can order it on line ? My dimension...
- for building in area above oven. Just need the kit number so I can order it on line ? My dimension...
(Posted by thatnanny 2 years ago)

Fan On Builtin Microwave Not Turning On But Foof Get Worm ?
Top Fan On Builtin Microwave Not Turning On But Food Get Worm ? Model M-130is It Dangerous To Operat...
Top Fan On Builtin Microwave Not Turning On But Food Get Worm ? Model M-130is It Dangerous To Operat...
(Posted by AMINVINOD 8 years ago)
Where Is The Light Bulb In The Microwave Of Jennair Jmw2430ws?
(Posted by Anonymous-151174 9 years ago)

What Are The Trim Kit Sizes For Jmc3215bs Microwave
(Posted by orthotom 9 years ago)

Microwave Oven
microwave model number JM8130DDS will not microwave anything. It counts down and the light comes on ...
microwave model number JM8130DDS will not microwave anything. It counts down and the light comes on ...
(Posted by williamhamilton9987 9 years ago)