Jenn-Air JMW2430WS Support Question
Jenn-Air JMW2430WS Support Question
Find answers below for this question about Jenn-Air JMW2430WS.Need a Jenn-Air JMW2430WS manual? We have 5 online manuals for this item!
Question posted by Anonymous-151174 on May 7th, 2015
Where Is The Light Bulb In The Microwave Of Jennair Jmw2430ws?
The person who posted this question about this Jenn-Air product did not include a detailed explanation. Please use the "Request More Information" button to the right if more details would help you to answer this question.
Current Answers
Related Jenn-Air JMW2430WS Manual Pages
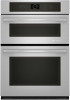
Dimension Guide - Page 1

....6 CM) AND 30" (76.2 CM) ELECTRIC BUILT-IN MICROWAVE/OVEN COMBINATION
PRODUCT MODEL SERIES
JMW2327W JMW2330W JMW2427W
JMW2430W JMW3430W
ELECTRICAL CONNECTION
If codes permit and a separate ground wire is... right to floor is acceptable. cabinet width
B. 43 110.0 cm) from the oven should be connected to change materials and specifications without notice. Specifications subject to a ...
Installation Instruction - Page 2

... "Electrical Requirements." A 1¹⁄₄" (3.4 cm) minimum diameter hole should be killed or seriously injured if you how to support a total weight of (microwave and built-in oven) of cabinet cutout. All safety messages will follow the instructions provided with the maximum allowable wood cabinet temperatures of injury, and tell you to...
Installation Instruction - Page 4
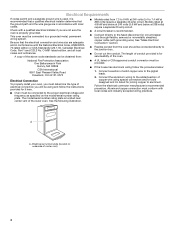
... Models rated at 4.8 kW and below at 240 volts (3.6 kW and below :
1. This oven must be provided.
■ If the house has aluminum wiring follow the instructions provided for it...is recommended.
■ Connect directly to a grounded metal, permanent wiring system. A copy of the lower oven. See "Make Electrical Connection" section.
■ Flexible conduit from 7.3 to 9 kW at 240 volts ...
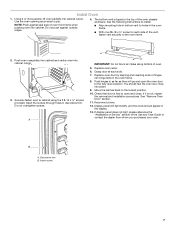
Installation Instruction - Page 5
... parts from inside the
oven. 6. Lift and pull oven door toward you and remove. Move oven and cardboard close .
... the oven. Remove the hardware package from inside the bag containing
literature. 5. Remove and set the oven onto...shipping materials and tape from the oven through the opening in locked position
B. Failure to remove oven door(s). 1. A.
WARNING
Excessive ...
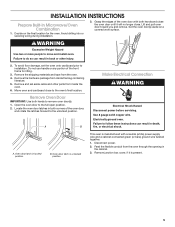
Installation Instruction - Page 6
...
5. Connect the 2 red wires (C) together using a UL listed wire connector.
2. Cable from the oven.
4. Black wires D. Black wires C.
Route the flexible conduit from Home Power Supply
1.
UL listed ...or bare) ground wire (of electrical connection. Red wires D. 4-wire flexible conduit from the oven cable to the green (or bare) ground wire (in the U.S. UL listed or CSA ...
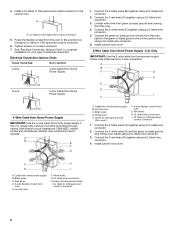
Installation Instruction - Page 7
... to the fully open and close. Grasp door at each side of oven front frame when pushing oven into hinge slots in the oven frame.
8. Reconnect power.
12. If display panel does not light, please reference the "Assistance or Service" section of oven.
5. Install Oven
1. A
IMPORTANT: Do not block air intake along bottom of the Use...
Installation Instruction - Page 8
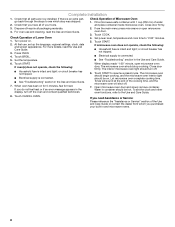
... circuit breaker has not tripped.
■ Electrical supply is an extra part, go back through the steps to the Use and Care Guide.
8.
The interior microwave oven light should stop cooking. Touch START to "2:00" minutes. 5. The microwave oven should begin cooking, and the microwave oven interior light should be on. Let microwave oven complete cooking time.
Use and Care - Page 4
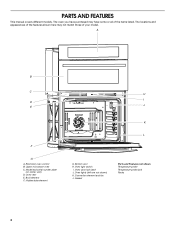
... match those of the items listed. Bottom vent H. A
B
C D E
F
G
A. The oven you have some or all of your model. Convection element and fan L. Upper microwave oven C. Electronic oven control B. Oven vent E.
Gasket
Parts and Features not shown Temperature probe Temperature probe jack Racks
4 Oven light switch I J
K
L
G. Model and serial number plate
(on center vent) D.
Use and Care - Page 5
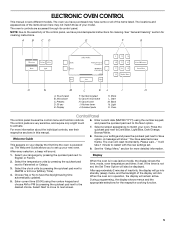
...Light/Blue, Dark/Orange, Bronze/White. Display
When the oven is powered up your new oven. The oven you to Save option. Back N. Please wait...." Select the clock units by pressing the quickset pad next to Fahrenheit or Celsius.
3.
Microwave C. Presets D. 30 sec E. Cancel microwave... set up . When the oven is not set . Light O. The Welcome Guide allows you...
Use and Care - Page 6
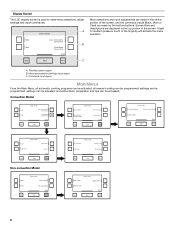
...
More
6 A. Menu and selection/settings input region C. Command input region
Main Menus
From the Main Menu, all manual cooking can be programmed;
Title/description region B. A light to make menu selections, adjust settings and input commands. all automatic cooking programs can be activated;
settings can be adjusted; A
Select mode:
Bake Broil
Auto...
Use and Care - Page 7
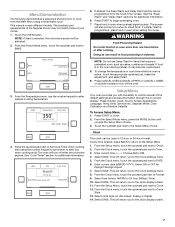
... preheat signal sounds. NOTE: Do not use the number keypad to control several of your model.
1. To change the temperature or cook time while the oven is selected, the microwave screen will return you with the ability to enter desired cooking temperature.
Select SAVE. This will be activated.
2. Select SAVE. Touch the...
Use and Care - Page 8
...Adjust the screen brightness by touching the left quickset pad until Off is opened or closed, the oven light will return you to increase the volume. This will not turn on , the animation (gradient ... Menu, touch the quickset pad next to Timer
Volume. 3.
The JennAir service phone number and website are shown while the oven is set , only the number and Start keys will be actively ...
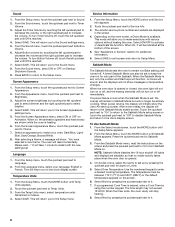
Use and Care - Page 11
... rack assembly out. Meat Thermometer
On models without a temperature probe, use a meat thermometer to determine whether meat, poultry and fish are level on the rack.
Microwave oven
D. Oven vent E. Blocking or covering vents will be blocked or covered since it is not supplied with the slide rails. The MultiMode® Convection allows you...
Use and Care - Page 20
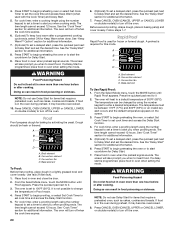
... rack 2f (flat rack). 1. Before second proofing, shape dough, place in a lightly greased bowl and cover loosely.
WARNING
Food Poisoning Hazard
Do not let food sit in Proof mode. 4. NOTE: Do not use Delay Start for additional information. Press CANCEL OVEN (CANCEL UPPER or CANCEL LOWER, on double models) to
set the...
Use and Care - Page 23
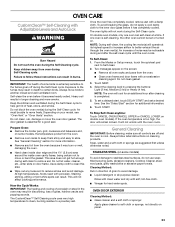
... extremely sensitive to another closed and well-ventilated room. The door gasket is self-cleaning, the other oven cannot be noticeable during the Self-Clean cycle. Select the cleaning level by pressing the buttons:
Light (2 hrs), Medium (3 hrs) or Heavy (4 hrs). See the "Delay Start" section for an additional hour after the...
Use and Care - Page 24
... Levels and Auto Lock" first.
Food spills should be cleaned when oven cools. When the oven door is closed, touch LIGHT to handle
bulb. Remove glass light cover by snapping back into the oven cavity or when bakeware extends past the front edge of an oven rack. ■ Do not set objects on the glass surface of...
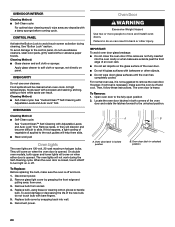
Use and Care - Page 26
... every new JENN-AIR® appliance. Call the Jenn-Air Customer eXperience Center toll free: 1-800-JENNAIR (1-800-536-6247)
Our consultants provide assistance with : ■ Use and maintenance procedures.
■... parts in your telephone directory Yellow Pages. Mississauga, Ontario L5N 0B7
Web address: www.jennair.ca Please include a daytime phone number in your area, you the cost of your...
Use and Care - Page 27

... or installation date for future reference. You will pay for repairs. Costs associated with the removal from unauthorized modifications made to repair or replace appliance light bulbs, air filters or water filters.
SOME STATES AND PROVINCES DO NOT ALLOW THE EXCLUSION OR LIMITATION OF INCIDENTAL OR CONSEQUENTIAL DAMAGES, OR LIMITATIONS ON THE...
Warranty - Page 1
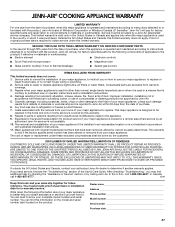
... for the following information about your major appliance to know your major appliance, to replace or
repair house fuses, or to repair or replace appliance light bulbs, air filters or water filters. You can find additional help you obtain assistance or service if you may find this information on the model and...
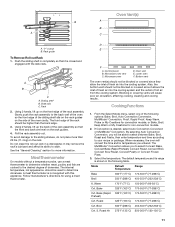
CAD - Page 1
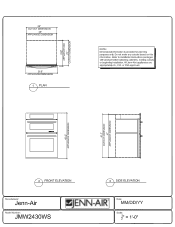
All Jenn-Air® appliances are appropriately UL, CUL or CSA approved. D
_
'4-
0 O z
O
-
0
\
\
2 FRONT ELEVATION
3 SIDE ELEVATION
[Manufacturer:
Jenn-Air
Model Number:
JMW2430WS
JENN-AIR® Date: MM/DD/YY
Scale:
-2 - 0"
.A. Do not make any cutouts based on this information. C
)
Mika
U.
29" CUTOUT DIMENSION
28" 'APPLIANCE DIMENSION
0 'cm z
(.]
a
...
Similar Questions

Jenn-air Install Kit With Duct System # For A Jmc3415es Microwave/convection Bui
- for building in area above oven. Just need the kit number so I can order it on line ? My dimension...
- for building in area above oven. Just need the kit number so I can order it on line ? My dimension...
(Posted by thatnanny 2 years ago)

Fan On Builtin Microwave Not Turning On But Foof Get Worm ?
Top Fan On Builtin Microwave Not Turning On But Food Get Worm ? Model M-130is It Dangerous To Operat...
Top Fan On Builtin Microwave Not Turning On But Food Get Worm ? Model M-130is It Dangerous To Operat...
(Posted by AMINVINOD 8 years ago)

My 2130 Will Not Shut Off After Cooking.
Jenn Air JMC2130 does not shut off after the set cook time is up. It seems to be defaulting to "keep...
Jenn Air JMC2130 does not shut off after the set cook time is up. It seems to be defaulting to "keep...
(Posted by Anonymous-150805 9 years ago)

Microwave Oven
microwave model number JM8130DDS will not microwave anything. It counts down and the light comes on ...
microwave model number JM8130DDS will not microwave anything. It counts down and the light comes on ...
(Posted by williamhamilton9987 9 years ago)
